RC Car using L298N, HC-06, and Arduino Uno
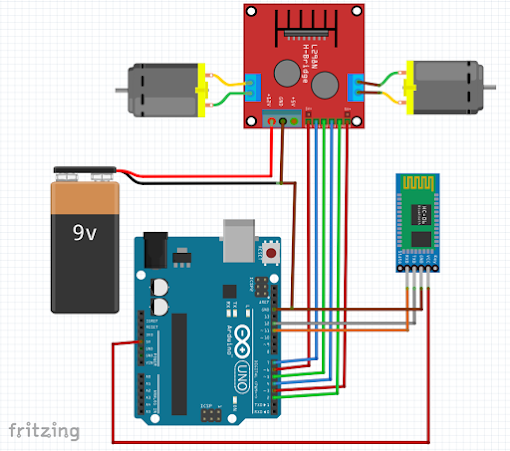
With this article, we will create a remote control (RC) car with the use of HC-06 bluetooth module to make it wireless and L298N motor driver to control speed and direction of rotations of the motors.
Materials:
1. Arduino Uno as the main board
2. HC-06 bluetooth module to receive commands via bluetooth communication protocol.
3. L298N motor driver module
4. DC motors to move the RC car.
Video Demonstration:
Source Code:
#include "SoftwareSerial.h"

#define IN3Br 2
#define IN4Br 4
#define PWMBr 3

#define IN1Al 7
#define IN2Al 5
#define PWMAl 6

#define HC_06_Rx 12
#define HC_06_Tx 11

#define NORMAL_SPEED 60
#define TURNS_SPEED 10

SoftwareSerial swSerial(HC_06_Rx,HC_06_Tx);
String cmd="";
bool isAlEnabled = false;
bool isBrEnabled = false;
byte PWMAl_val = 100;
byte PWMBr_val = 100;

void setup() {
  // put your setup code here, to run once:
  Serial.begin(9600);

  swSerial.begin(9600);


  pinMode(IN3Br, OUTPUT);
  pinMode(IN4Br, OUTPUT);
  pinMode(PWMBr, OUTPUT);

  pinMode(IN1Al, OUTPUT);
  pinMode(IN2Al, OUTPUT);
  pinMode(PWMAl, OUTPUT);

  digitalWrite(IN3Br, LOW);
  digitalWrite(IN4Br, LOW);
  digitalWrite(PWMBr, LOW);

  digitalWrite(IN1Al, LOW);
  digitalWrite(IN2Al, LOW);
  digitalWrite(PWMAl, LOW);

  swSerial.println("Setup Complete");
}

void loop() {
  // put your main code here, to run repeatedly:
  checkSerial();
}


void checkSerial() {
 //Read data from Serial
 while(Serial.available()>0){
   cmd+=(char)Serial.read();
 }

 while(swSerial.available()>0){
   cmd+=(char)swSerial.read();
 }

 //Select function with cmd
 if(cmd!=""){
    cmd.trim();  // Remove added LF in transmit
    // We expect Command from bluetooth
    if (cmd.equals("S")) {
      swSerial.println("Braking");
      brakeVehicle();
    } else if(cmd.equals("R")) {
       swSerial.println("Right turn");
       turnVehicleRght();
    }else if (cmd.equals("L")){
       swSerial.println("Left turn");
       turnVehicleLeft();
    }else if(cmd.equals("F")){
       swSerial.println("Moving forward");
       moveVehicleForward();
    }else if(cmd.equals("B")){
       swSerial.println("Moving backward");
       moveVehicleBackward();
    }
    cmd=""; //reset cmd
 }


}

void brakeVehicle () {
  digitalWrite(PWMBr, LOW);
  digitalWrite(PWMAl, LOW);
}

void turnVehicleRght() {
  analogWrite(PWMBr, TURNS_SPEED);
  analogWrite(PWMAl, NORMAL_SPEED);
}

void turnVehicleLeft() {
  analogWrite(PWMAl, TURNS_SPEED);
  analogWrite(PWMBr, NORMAL_SPEED);
}

void moveVehicleForward() {
  digitalWrite(IN3Br, HIGH);
  digitalWrite(IN4Br, LOW);
  analogWrite(PWMBr, NORMAL_SPEED);

  digitalWrite(IN1Al, HIGH);
  digitalWrite(IN2Al, LOW);
  analogWrite(PWMAl, NORMAL_SPEED);
}

void moveVehicleBackward() {
  digitalWrite(IN3Br, LOW);
  digitalWrite(IN4Br, HIGH);
  analogWrite(PWMBr, NORMAL_SPEED);

  digitalWrite(IN1Al, LOW);
  digitalWrite(IN2Al, HIGH);
  analogWrite(PWMAl, NORMAL_SPEED);
}
If you found this tutorial helpful, please consider supporting me by sharing this to your friends. You may leave your comments and suggestions in the comment box.
Thank you and have a good day.


