Project Idea: Door Lock Security | Arduino
In this project, we will create a door lock security system using an Arduino.
The idea is as follows:
1. The door lock is controlled by entering the correct password.
2. If user password entered is correct, open the door lock
3. If user password entered is wrong, an alarm will be triggered (alarm sound and flashing of LED). It can be turned only by entering the admin password.
The materials needed are:
1. An Arduino Uno board or any other compatible Arduino board.
2. A 16×2 LCD for the display
3. A 3×4 or 4×4 membrane keypad for inputting the password.
4. A servo motor that will serve as a door lock
5. A buzzer or a speaker for the audible alarm.
6. Some LED for the visual indicator, this is optional
7. Some resistor for limiting the current to the LED
8. A breadboard and wires for connecting the circuit.
9. A potentiometer for the LCD contrast, this is optional
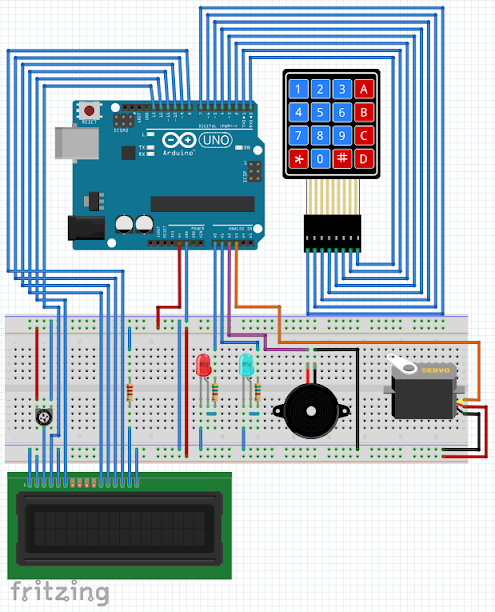
Circuit Diagram:
Instruction:
If you have some confusion regarding the connection, please refer to the circuit diagram.
1. Connect the LCD pin 1 VSS to the Arduino GND.
2. Connect the LCD pin 2 VDD to the Arduino 5V.
3. Connect the potentiometer pin 1 and pin 3 to Arduino 5V and GND respectively, and the potentiometer center pin 2 to LCD pin 3 VEE/Vo.
4. Connect the LCD pin 4 RS to the Arduino digital pin 13.
5. Connect the LCD pin 5 RW to the Arduino GND because we only need to write to the LCD (no reading required).
6. Connect the LCD pin 6 En to the Arduino digital pin 12.
7. Leave the LCD pin 7 D0 to pin 10 D3 not connected because we will use 4-bit mode of the LCD.
8. Connect the LCD pin 11 D4 to the Arduino digital pin 11.
9. Connect the LCD pin 12 D5 to the Arduino digital pin 10.
10. Connect the LCD pin 13 D6 to the Arduino digital pin 9.
11. Connect the LCD pin 14 D7 to the Arduino digital pin 8.
12. Connect the LCD pin 15 Anode to the Arduino 5V via current limiting resistor.
13. Connect the LCD pin 16 Cathode to the Arduino GND.
14. Connect the 4×4 membrane keypad to Arduino digital pin 7 to digital pin 0.
15. Connect the red LED to Arduino analog pin A0 via current limiting resistor.
16. Connect the blue LED to the Arduino analog pin A1 via current limiting resistor.
17. Connect buzzer to Arduino analog pin A2 and GND respectively.
18. Connect the servo motor signal pin to Arduino analog pin A3, and its power to external power supply.
19. I already Uploaded the source code in the Arduino Uno, so lets power it.
Video Demonstration:
If you like this video, please give me thumbs up and share this to your friends.
Leave your comments and suggestions in the comment box.
Please do not forget to Subscribe to TechToTinker Youtube channel:
Please click this to SUBSCRIBE
Thank you and have a good day.
Source Code:
/*
 * Project Idea: Door Lock Security System
 *    - the idea here is to create a door lock security system with
 *      keypad entry for the password. If the password entered is
 *      wrong, the alarm will be triggered. The alarm could be
 *      disabled by entering the admin password.
 *
 *      If the password is correct, it will open the door lock then
 *      after sometime, will automatically close the door lock.
 *
 *      Please feel free to modify this source code to adapt
 *      to your specific application. Please do not forget to SUBSCRIBE.
 *
 * Author: George Bantique (TechToTinker) @ July 23, 2020
 */

// Place include libraries here:
#include "LiquidCrystal.h"
#include "Keypad.h"
#include "Servo.h"

// Pin definitions here:
#define RED_LED A0
#define BLU_LED A1
#define BUZ_PIN A2
#define SRV_PIN A3

// Global variables here:
char* password = "1234";  // User password
char* admnpass = "9876";  // Admin password
uint8_t keyPos = 0;       // Key position for password entry
uint8_t invalid_cnt = 0;  // Invalid entry counter
bool isAlarmed = false;   // Alarmed flag, use for alarming sound and flashing light
uint8_t currStatus = 0;   // This is for the current requested state
uint8_t prevStatus = 0;   // This holds the previous state, #### INITIALIZED THIS TO VALUE 1 #####
const byte ROWS = 4;      // 4 keypad rows
const byte COLS = 4;      // 4 keypad columns
char keys[ROWS][COLS] = { // keypad key array
  {'1', '2', '3', 'A'},
  {'4', '5', '6', 'B'},
  {'7', '8', '9', 'C'},
  {'*', '0', '#', 'D'}
};
byte rowPins[ROWS] = {7, 6, 5, 4}; // pin assignments for the keypad
byte colPins[COLS] = {3, 2, 1, 0};

// Create the objects here:
Keypad keypad = Keypad( makeKeymap(keys), rowPins, colPins, ROWS, COLS );
LiquidCrystal lcd (13, 12, 11, 10, 9, 8); // pins of the LCD. (RS, E, D4, D5, D6, D7)
Servo myservo;

// Function prototypes here:
void doAlarm();
void manageKeypad();
void manageStatus();

void setup(){
  lcd.begin(16, 2);         // Initialized the lcd as 16 characters by 2 lines
  pinMode(RED_LED, OUTPUT); // Set the pin directions
  pinMode(BLU_LED, OUTPUT);
  pinMode(BUZ_PIN, OUTPUT);
  myservo.attach(SRV_PIN);  // attaches the servo on pin to the servo object
  myservo.write(90);        // set initial angle
  manageStatus();           // Set initial lcd display
} // end of void setup()

void loop() {
  manageKeypad();           // Manage keypad inputs
  manageStatus();           // Respond according to keypad key presses
  if (isAlarmed) {          // If alarm is triggered
    doAlarm();              // Make an alarm notification
  }
} // end of void loop()

void doAlarm() {
  tone(BUZ_PIN, 1000);        // Send 1KHz sound signal...
  digitalWrite(RED_LED, HIGH);
  digitalWrite(BLU_LED, LOW);
  delay(150);
  digitalWrite(RED_LED, LOW);
  digitalWrite(BLU_LED, HIGH);
  noTone(BUZ_PIN);
  delay(50);
} // end of void doAlarm()

void manageStatus() {
  if ( currStatus != prevStatus ) {   // check if the status is different from previous
                                      // this is to avoid unnecessary lcd updating same display
    switch(currStatus) {
      case 0:                         // default screen
        lcd.clear();
        lcd.setCursor(0,0);
        lcd.print("    Welcome     ");
        lcd.setCursor(0,1);
        lcd.print(" Enter password ");
        digitalWrite(RED_LED, HIGH);
        digitalWrite(BLU_LED, LOW);
        prevStatus = currStatus;
        currStatus = 0;
        break;
      case 1:                         // invalid entry
        lcd.clear();
        lcd.print(" Invalid entry  ");
        delay(1000);
        prevStatus = currStatus;
        currStatus = 0;
        break;
      case 2:                         // valid entry
        digitalWrite(BLU_LED, HIGH);
        delay(100);
        digitalWrite(BLU_LED, LOW);
        prevStatus = currStatus;
        currStatus = 0;
        break;
      case 3:                         // entry verified
        lcd.clear();
        lcd.print(" Entry verified ");
        digitalWrite(BLU_LED, HIGH);
        delay(1000);
        prevStatus = currStatus;
        currStatus = 4;
        break;
      case 4:                         // notification for opening door
        lcd.clear();
        lcd.print(" Opening lock ");
        isAlarmed = false;
        tone(BUZ_PIN, 1000); // Send 1KHz sound signal...
        delay(2000);
        noTone(BUZ_PIN);
        for (int pos = 90; pos >= 0; pos--) {
          myservo.write(pos);
          delay(10);
        }
        prevStatus = currStatus;
        currStatus = 5;
        break;
      case 5:                         // unlocking the door lock
        lcd.clear();
        lcd.print(" Door open ");
        digitalWrite(RED_LED, LOW);
        delay(5000);
        prevStatus = currStatus;
        currStatus = 6;
        break;
      case 6:                         // warning, door will close
        lcd.clear();
        lcd.print(" Door closing ");
        for (int i=0; i < 20; i++) {
          tone(BUZ_PIN, 1000);
          delay(150);
          noTone(BUZ_PIN);
          delay(50);
        }
        prevStatus = currStatus;
        currStatus = 7;
        break;
      case 7:                         // locking the door lock
        digitalWrite(RED_LED, HIGH);
        digitalWrite(BLU_LED, LOW);
        for (int pos = 0; pos <= 90; pos++) {
          myservo.write(pos);
          delay(10);
        }
        lcd.clear();
        lcd.print(" Door Close ");
        delay(2000);
        prevStatus = currStatus;
        currStatus = 9;
        break;
      case 8:                         // Continues alarm
        lcd.clear();
        lcd.setCursor(0,0);
        lcd.print("    Alarmed     ");
        lcd.setCursor(0,1);
        lcd.print("Enter admin pass");
        prevStatus = currStatus;
        break;
      case 9:                         // Promotional message :)
        lcd.clear();
        lcd.print("  TechToTinker  ");
        lcd.setCursor(0,1);
        lcd.print(" - Project Ideas");
        delay(3000);
        currStatus = 0;
      default:
        break;
    }
  }
} // end of void manageStatus

void manageKeypad() {
  char key = keypad.getKey();         // Get the key press

  if (key){
    if (!isAlarmed) {                 // Currently in no alarm status
      if (key == password[keyPos]) {  // user password entered is still correct
        currStatus = 2;               // valid entry
        keyPos = keyPos + 1;          // increment the password key position
      } else {                        // user password entered is incorrect
        keyPos = 0;                   // reset key position, [possibility to change this to increase security
                                      // like press something (i.e * or #) to reset counter
        currStatus = 1;               // invalid entry
        invalid_cnt = invalid_cnt + 1;// increment invalid counter
        if (invalid_cnt == 3) {       // if 3 times invalid entry, set an alarm
          currStatus = 8;             // alarmed
          isAlarmed = true;
        }
      }
      if (keyPos == 4) {              // user password entered is correct
        keyPos = 0;                   // reset password key position
        currStatus = 3;               // entry verified
      }
    } else {                          // Currently in alarmed status
      // currently alarming, enter admin password to disable alarm
      if (key == admnpass[keyPos]) {  // admin password entry is still correct
        invalid_cnt = 0;              // reset invalid counter
        keyPos = keyPos + 1;          // increment the password key position
      } else {                        // admin password entered is incorrect
        keyPos = 0;                   // reset key position, [possibility to change this to increase security
                                      // like press something (i.e * or #) to reset counter
        invalid_cnt = invalid_cnt + 1;// increment invalid counter
      }
      if (keyPos == 4) {              // admin password entered is correct
        keyPos = 0;                   // reset password key position
        currStatus = 0;               // reset the current status
        isAlarmed = false;            // disabled current alarm
      }
    }
  }
} // end of void manageKeypad

Key Lock Insert
hi i want to know where to set for the time to close the door, because the time closing for the door is to long
Thanks for sharing such informative Blog. Composite doors are increasingly popular and provide an attractive alternative to front doors for houses and flats. Composite doors are made up of PVC, glass-reinforced plastic, wood and insulating foam that provides good weather resistance. Of course a high quality and reliable door lock must be used on your composite door to ensure your safety and security. “Locksmith York” is here to provide a range of locks. Visit our Site. composite door locks