Tutorial: How to Use Arduino Uno as HID | Part 1: Arduino Keyboard Emulation
Arduino boards are pre-configured to function as serial device so to emulate keyboard, we will reconfigure it as Human Interface Device (HID) so our computer will see it as keyboard.
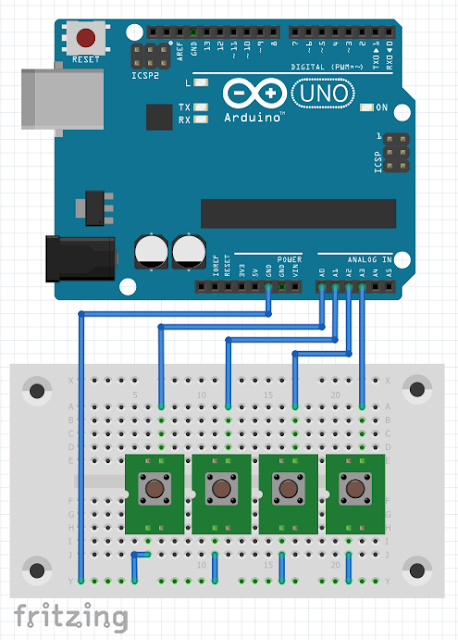
Circuit Diagram:
Video Demonstration:
If you find this tutorial as helpful, please consider supporting my Youtube channel, it’s TechToTinker. Please click this link to Subscribe.
For more H.I.D. key values, please refer to:
https://www.freebsddiary.org/APC/usb_hid_usages
https://www.freebsddiary.org/APC/usb_hid_usages
Source Code:
uint8_t buf[8] = {
  0
};  // Keyboard Report Buffer: 8 bytes

#define PIN_W A0
#define PIN_A A1
#define PIN_S A2
#define PIN_D A3

//#define SERIAL_DEBUG  // for serial debug: remove //
                        // for actual HID: put //

bool currState_W = HIGH;
bool currState_A = HIGH;
bool currState_S = HIGH;
bool currState_D = HIGH;

bool prevState_W = HIGH;
bool prevState_A = HIGH;
bool prevState_S = HIGH;
bool prevState_D = HIGH;

unsigned long prevTime_W = 0;
unsigned long prevTime_A = 0;
unsigned long prevTime_S = 0;
unsigned long prevTime_D = 0;

unsigned long waitTime_W = 50;
unsigned long waitTime_A = 50;
unsigned long waitTime_S = 50;
unsigned long waitTime_D = 50;

void setup()
{
  Serial.begin(9600);

  pinMode(PIN_W, INPUT_PULLUP);
  pinMode(PIN_A, INPUT_PULLUP);
  pinMode(PIN_S, INPUT_PULLUP);
  pinMode(PIN_D, INPUT_PULLUP);

  delay(200);
}

void loop()
{
  checkButton();
}


void checkButton() {

  bool currRead_W = digitalRead(PIN_W);
  bool currRead_A = digitalRead(PIN_A);
  bool currRead_S = digitalRead(PIN_S);
  bool currRead_D = digitalRead(PIN_D);

  if (currRead_W != prevState_W) {
    prevTime_W = millis();
  }
  if (currRead_A != prevState_A) {
    prevTime_A = millis();
  }
  if (currRead_S != prevState_S) {
    prevTime_S = millis();
  }
  if (currRead_D != prevState_D) {
    prevTime_D = millis();
  }

  if ((millis() - prevTime_W) > waitTime_W) {
    if (currRead_W != currState_W) {
      currState_W = currRead_W;
      if (currState_W == LOW) {
        // Send the code
        buf[2] = 26;    // HID: W key
#ifdef SERIAL_DEBUG
        buf[2] = 'W';     // Serial: W key
#endif
        Serial.write(buf, 8); // Send keypress
      } else {
        // Release the keyboard
        releaseKey();
      }
    }
  }
  if ((millis() - prevTime_A) > waitTime_A) {
    if (currRead_A != currState_A) {
      currState_A = currRead_A;
      if (currState_A == LOW) {
        // Send the code
        buf[2] = 4;   // HID: A key
#ifdef SERIAL_DEBUG
        buf[2] = 'A';   // Serial: A key
#endif
        Serial.write(buf, 8); // Send keypress
      } else {
        // Release the keyboard
        releaseKey();
      }
    }
  }
  if ((millis() - prevTime_S) > waitTime_S) {
    if (currRead_S != currState_S) {
      currState_S = currRead_S;
      if (currState_S == LOW) {
        // Send the code
        buf[2] = 22;    // HID: S key
#ifdef SERIAL_DEBUG
        buf[2] = 'S';     // Serial: S key
#endif
        Serial.write(buf, 8); // Send keypress
      } else {
        // Release the keyboard
        releaseKey();
      }
    }
  }
  if ((millis() - prevTime_D) > waitTime_D) {
    if (currRead_D != currState_D) {
      currState_D = currRead_D;
      if (currState_D == LOW) {
        // Send the code
        buf[2] = 7;   // HID: D key
#ifdef SERIAL_DEBUG
        buf[2] = 'D';   // Serial: D key
#endif
        Serial.write(buf, 8); // Send keypress
      } else {
        // Release the keyboard
        releaseKey();
      }
    }
  }

  prevState_W = currRead_W;
  prevState_A = currRead_A;
  prevState_S = currRead_S;
  prevState_D = currRead_D;

}

void releaseKey()
{
  buf[0] = 0;
  buf[2] = 0;
  Serial.write(buf, 8); // Release key
}
Download Links:
If you found this tutorial as helpful, please share this to your friends so that many could benefit from it.
Don’t forget to Subscribe to TechToTinker Youtube channel:
Thank you and have a good day.


gawin ko to paps
Where's the driver ?
https://www.microchip.com/en-us/development-tool/flip
Hi Tom, thank you for sharing. Appreciated. Cheers.
This comment has been removed by a blog administrator.
This comment has been removed by the author.
Is we want to downlord some arduino library fileS for this
Arduino library? No, there is no library needed to make it work. If you look at the source code, there is no line which says #include.
Will it work on a Arduino Nano ??
No, it will not work with Arduino Nano.
Can u create a coding with Arduino neno for as a keyboard
I do not see the Adruino HID, HID-KeyCode, and Keyboard Modifiers Reference files. Wherre can I find them. Thank you
https://drive.google.com/file/d/1jfOJmFf9C6QCb8I_kZypch4hHIXBshGo/view
how to add more key
ex: function or alt, ctrl
Hello Sir! i would like to use piezo as button, and add a cd4051 multiplexer. how can i code this? A tutorial would be a great help. Thank you.