


Tutorial: How to use Keypad | Text Entry Mode | Arduino
In this article, I will discuss how we can use a matrix keypad for text entry purposes which is similar to T9 keypad used by Nokia and other bar phones.
The circuit is the same as the previous tutorial. Be sure to check it out here: 4×4 Keypad Introduction
Circuit Diagram:
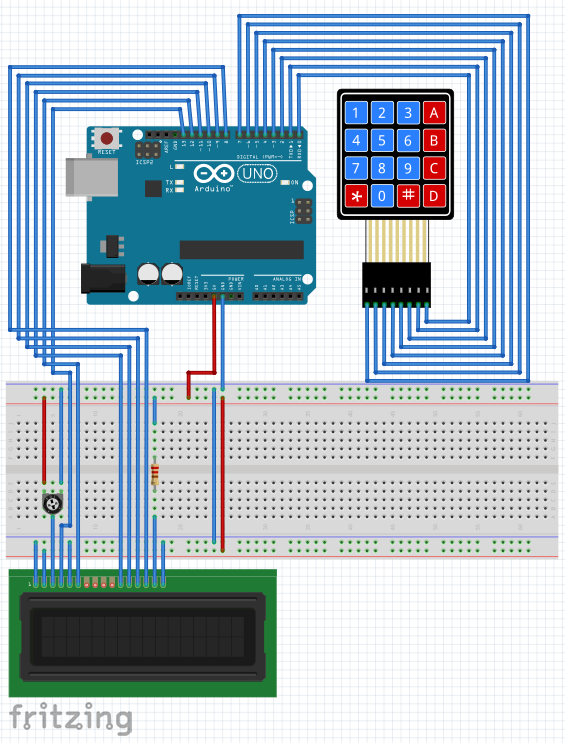
1. Connect the LCD pin 1 VSS to the Arduino GND
2. Connect the LCD pin 2 VDD to the Arduino 5V
3. Connect the potentiometer pin 1 and pin 3 to Arduino 5V and GND respectively, and the potentiometer center pin 2 to LCD pin 3 VEE/Vo
4. Connect the LCD pin 4 RS to the Arduino digital pin 13
5. Connect the LCD pin 5 RW to the Arduino GND because we only need to write to the LCD (no reading required)
6. Connect the LCD pin 6 En to the Arduino digital pin 12
7. Leave the LCD pin 7 D0 to pin 10 D3 not connected because we will use 4-bit mode of the LCD.
8. Connect the LCD pin 11 D4 to the Arduino digital pin 11
9. Connect the LCD pin 12 D5 to the Arduino digital pin 10
10. Connect the LCD pin 13 D6 to the Arduino digital pin 9
11. Connect the LCD pin 14 D7 to the Arduino digital pin 8
12. Connect the LCD pin 15 Anode to the Arduino 5V via current limiting resistor (220 ohms).
13. Connect the LCD pin 16 Cathode to the Arduino GND
14. Connect the keypad Row1 (left-most) to the Arduino Uno digital pin D7.
15. Connect the keypad Row2 to the Arduino Uno digital pin D6.
16. Connect the keypad Row3 to the Arduino Uno digital pin D5.
17. Connect the keypad Row4 to the Arduino Uno digital pin D4.
18. Connect the keypad Column1 to the Arduino Uno digital pin D3.
19. Connect the keypad Column2 to the Arduino Uno digital pin D2.
20. Connect the keypad Column3 to the Arduino Uno digital pin D1.
21. Connect the keypad Column4 (right-most) to the Arduino Uno digital pin D0.
22. Upload the provided sketch making sure that the correct board and serial comm port is selected under the Tools menu of Arduino IDE.
23. If it works, modify and experiment with it, and enjoy learning.
Video demonstration:
If you find this article as helpful, please consider supporting my Youtube Channel TechToTinker by SUBSCRIBING. Click THIS for TechToTinker Subscribe
Thank you and have a good day.
Source Code:
/*
    July 16, 2020
    This will be use to explore the use of 4x4 keypad for
      1. T9 text entry
      2. A, B, C, and D will be use for the menu operations

    Author: George Bantique ( TechToTinker )
*/

#include "LiquidCrystal.h"
#include "Keypad.h"


#define DEFAULT_DELAY 300

const byte ROWS = 4; //four rows
const byte COLS = 4; //four columns

int x = 0;                // Holds the LCD x position
int y = 0;                // Holds the LCD y position
int minValue = 0;         // Lower character location for T9 text entry
int maxValue = 0;         // Max character location for T9 text entry
int keyPressTime = 100;   // Number of loops check of the key
String msg = "";          // Holds the created message
String num = "";          // Holds the mobile number
String alpha = "!@_$%?1 ABC2 DEF3 GHI4 JKL5 MNO6 PQRS7 TUV8 WXYZ9 * 0# "; // Characters for T9 text entry

char hexaKeys[ROWS][COLS] = { // Character matrix for the keypad
  {'1', '2', '3', 'A'},
  {'4', '5', '6', 'B'},
  {'7', '8', '9', 'C'},
  {'*', '0', '#', 'D'}
};

byte rowPins[ROWS] = {7, 6, 5, 4};        // pin assignments for keypad rows
byte colPins[COLS] = {3, 2, 1, 0};        // pin assignments for keypad columns

Keypad customKeypad = Keypad( makeKeymap(hexaKeys), rowPins, colPins, ROWS, COLS);
LiquidCrystal lcd(13, 12, 11, 10, 9, 8);  // pin assignments for LCD

byte charUp[8] = {  // arrow up character for LCD
  B00100,
  B01110,
  B11111,
  B00000,
  B00000,
  B00000,
  B00000,
  B00000
};
byte charDown[8] = {  // arrow down character for LCD
  B00000,
  B00000,
  B00000,
  B00000,
  B00000,
  B11111,
  B01110,
  B00100
};
byte charUpDown[8] = {  // arrow up and down character for LCD
  B00100,
  B01110,
  B11111,
  B00000,
  B00000,
  B11111,
  B01110,
  B00100
};

byte menuLevel = 0;     // Level 0: no menu display, display anything you like
                        // Level 1: display main menu
                        // Level 2: display sub menu
                        // Level 3: display sub menu of sub menu
byte menu = 1;          // holds the menu level
byte sub = 1;           // holds the sub menu level


void setup()
{
  lcd.begin(16, 2);               // initialized the LCD as 16 characters with 2 lines
  lcd.createChar(0, charUp);      // arrow up character
  lcd.createChar(1, charDown);    // arrow down character
  lcd.createChar(2, charUpDown);  // arrow up and down character
  updateLevel_0();                // display the HOME screen
}

void loop() {
  // Process the keys
  processkey();

  // Do other stuffs here

}

void processkey() {
  char key = customKeypad.getKey();
  if (isAlpha(key)) {   // check if key press is a letter
    processKeys(key);   // process it according to keys
  }
}

void parseKey(int minValue, int maxValue, char keyPress) {
  int ch = minValue;
  char key = keyPress;
  if (keyPress == '*') {              // if *, means backspace
    if ( (x > 0) || (y > 0) ) {       // prevent backspace when no character yet
      x = x - 1;                      // go back to previous character position
      lcd.setCursor(x,y);             // set the new lcd position
      lcd.print("*");                 // write *, which means for editing
      msg.remove(msg.length() - 1);   // remove the last character from the string
    }
  } else {
    for (int i = 0; i < keyPressTime; i++) {
      if (key == keyPress) {          // make sure that same key is press
        lcd.setCursor(x, y);          // set the lcd position
        lcd.print(alpha[ch]);         // print the character according to the character position
        ch++;                         // increment character position
        if (ch > maxValue) {          // if the character counter reached the max value
          ch = minValue;              // reset to min value
          i = 0;                      // reset the loop counter
        }
      }
      key = customKeypad.getKey();  // get the keypress
      delay(10);                    // delay for some time
    }
    x++;                    // increment the x position
    msg += alpha[ch - 1];   // add the character to the variable msg
    if (x > 15) {           // if the lcd reached the rightmost position
      y = 1;                // then wrap to the next line
      x = 0;                // in first character in the left
    }
  }
}

void enterMSG() {
  char key;
  lcd.clear();  // clear the LCD display
  x = 0;        // init the x position to zero
  y = 0;        // init the y position to zero
  msg = "";     // clear the msg variable

  do {
    key = customKeypad.getKey();
    if        (key == '1') {    // if a key is pressed,
      parseKey(0, 7, key);        // compare it to the alpha string array
    } else if (key == '2') {
      parseKey(8, 12, key);
    } else if (key == '3') {
      parseKey(13, 17, key);
    } else if (key == '4') {
      parseKey(18, 22, key);
    } else if (key == '5') {
      parseKey(23, 27, key);
    } else if (key == '6') {
      parseKey(28, 32, key);
    } else if (key == '7') {
      parseKey(33, 38, key);
    } else if (key == '8') {
      parseKey(39, 43, key);
    } else if (key == '9') {
      parseKey(44, 49, key);
    } else if (key == '0') {
      parseKey(52, 54, key);
    } else if (key == '*') {
      parseKey(50, 51, key);
    } else if (key == '#') {
      // do nothing
    }
  } while (key != '#');       // exit the loop when # is pressed

  lcd.setCursor(0, 0);        // these are for verification only
  lcd.print("created msg");   // feel free to modify it and
  lcd.setCursor(0, 1);        // adapt to your specific requirements
  lcd.print(msg);
  delay(2000);
}

void enterNUM() {
  char key;
  lcd.clear();
  x = 0;
  y = 0;
  num = "";
  do {
    key = customKeypad.getKey();
    if (isDigit(key)) {                 // verify if the key press is a number
      num = num + key;
      lcd.setCursor(x,y);
      lcd.print(key);                   // print it to the lcd
      x++;                              // increment the x position
      if (x > 15)                       // if the lcd reached the rightmost position
      {                                 // then wrap to the next line
        x = 0;
        y = 1;
      }
    } else {                              // key press is not a number
      if (key == '*') {                   // if *, means backspace
        if ( (x > 0) || (y > 0) ) {       // prevent backspace when no character yet
          x = x - 1;                      // go back to previous character position
          lcd.setCursor(x,y);             // set the new lcd position
          lcd.print("*");                 // write *, which means for editing
          num.remove(num.length() - 1);   // remove the last character from the string
        }
      }
    }
  } while (key != '#');                   // exit the loop when # is pressed
                                          // means entering number is complete
  lcd.setCursor(0, 0);
  lcd.print("created num");
  lcd.setCursor(0, 1);
  lcd.print(num);
  delay(2000);
}

void sendSMS() {            // this is for demonstration only
                            // you need to modify this and adapt
                            // to your specific application
  lcd.clear();
  lcd.print("Sending SMS");
  delay(500);
  lcd.clear();
  lcd.print("Done Sending");
  delay(500);
}

void processKeys(char keyPressed) {
  switch (menuLevel) {
    case 0:                     // Level 0, home screen
      switch ( keyPressed ) {
        case 'D':               // Enter
          menu = 1;
          menuLevel = 1;        // go to main menu
          updateLevel_1();      // show main menu
          delay(DEFAULT_DELAY);
          break;
        case 'A': // Up
          break;
        case 'B': // Down
          break;
        case 'C': // Back
          menuLevel = 0;        // go to home screen
          updateLevel_0();      // show home screen
          delay(DEFAULT_DELAY);
          break;
        default:
          break;
      }
      break;
    case 1:                     // Level 1, main menu
      switch ( keyPressed ) {
        case 'D':               // Enter
          sub = 1;
          menuLevel = 2;        // go to sub menu
          updateLevel_2();      // show sub menu
          delay(DEFAULT_DELAY);
          break;
        case 'A':               // Up
          menu--;
          updateLevel_1();      // show main menu
          delay(DEFAULT_DELAY);
          break;
        case 'B':               // Down
          menu++;
          updateLevel_1();      // show main menu
          delay(DEFAULT_DELAY);
          break;
        case 'C': // Back
          menuLevel = 0;        // hide menu, go back to level 0
          updateLevel_0();      // show home screen
          delay(DEFAULT_DELAY);
          break;
        default:
          break;
      }
      break;
    case 2:                     // Level 2, sub menu
      switch ( keyPressed ) {
        case 'D':               // Enter
          if        (sub == 1) {  // Create SMS
            lcd.clear();
            lcd.print("Enter message");
            delay(1000);
            enterMSG();
            delay(500);
            lcd.clear();
            lcd.print("Enter number");
            delay(500);
            enterNUM();
            menuLevel = 2;        // go to sub menu
            updateLevel_2();      // show sub menu
          } else if (sub == 2) {  // Send SMS
            sendSMS();
            menuLevel = 2;        // go to sub menu
            updateLevel_2();      // show sub menu
          } else if (sub == 3) {  // Read SMS
            menuLevel = 3;        // go to sub menu of sub menu
            updateLevel_3();      // show sub menu of sub menu
          } else if (sub == 4) {  // Delete SMS
            executeAction();
            delay(1000);
            menuLevel = 2;        // go to sub menu
            updateLevel_2();      // show sub menu
          }
          delay(DEFAULT_DELAY);
          break;
        case 'A':               // Up
          sub--;
          updateLevel_2();
          delay(DEFAULT_DELAY);
          break;
        case 'B':               // Down
          sub++;
          updateLevel_2();      // show main menu
          delay(DEFAULT_DELAY);
          break;
        case 'C':               // Back
          menuLevel = 1;        // go back to level 1
          updateLevel_1();      // show main menu
          delay(DEFAULT_DELAY);
          break;
        default:
          break;
      }
      break;
    case 3:                     // Level 3, sub menu of sub menu
      switch ( keyPressed ) {
        case 'D':               // Enter
          //menuLevel = 2;        // go back to level 2
          //updateLevel_2();      // show sub menu
          delay(DEFAULT_DELAY);
          break;
        case 'A':               // Up
          updateLevel_3();      // show sub menu
          delay(DEFAULT_DELAY);
          break;
        case 'B':               // Down
          updateLevel_3();      // show sub menu
          delay(DEFAULT_DELAY);
          break;
        case 'C':               // Back
          menuLevel = 2;        // go back to main menu
          updateLevel_2();      // show main menu
          delay(DEFAULT_DELAY);
          break;
        default:
          break;
      }
      break;
    default:
      break;
  }
}

void updateLevel_0() {
  lcd.clear();
  lcd.println("Keypad TextEntry");
  lcd.setCursor(0, 1);
  lcd.println("  - D for menu  ");
}

void updateLevel_1 () {
  switch (menu) {
    case 0:
      menu = 1;
      break;
    case 1:
      lcd.clear();
      lcd.print(">Messages       ");
      lcd.setCursor(0, 1);
      lcd.print(" Contacts       ");
      lcd.setCursor(15, 1);
      lcd.write((byte)1);     // down arrow
      break;
    case 2:
      lcd.clear();
      lcd.print(" Messages       ");
      lcd.setCursor(0, 1);
      lcd.print(">Contacts       ");
      lcd.setCursor(15, 1);
      lcd.write((byte)2);     // up and down arrow
      break;
    case 3:
      lcd.clear();
      lcd.print(" Contacts       ");
      lcd.setCursor(0, 1);
      lcd.print(">Others         ");
      lcd.setCursor(15, 1);
      lcd.write((byte)0);     // up arrow
      break;
    case 4:
      menu = 3;
      break;
  }
}

void updateLevel_2 () {
  switch (menu) {
    case 0:
      break;
    case 1:                                 // Messages
      switch (sub) {
        case 0:
          break;
        case 1:
          lcd.clear();
          lcd.print(" Messages:      ");
          lcd.setCursor(0, 1);
          lcd.print("  Create SMS    ");
          lcd.setCursor(15, 1);
          lcd.write((byte)1);     // down arrow
          break;
        case 2:
          lcd.clear();
          lcd.print(" Messages:      ");
          lcd.setCursor(0, 1);
          lcd.print("  Send SMS      ");
          lcd.setCursor(15, 1);
          lcd.write((byte)2);     // up and down arrow
          break;
        case 3:
          lcd.clear();
          lcd.print(" Messages:      ");
          lcd.setCursor(0, 1);
          lcd.print("  Read SMS      ");
          lcd.setCursor(15, 1);
          lcd.write((byte)2);     // up and down arrow
          break;
        case 4:
          lcd.clear();
          lcd.print(" Messages:      ");
          lcd.setCursor(0, 1);
          lcd.print("  Delete SMS    ");
          lcd.setCursor(15, 1);
          lcd.write((byte)0);     // up arrow
          break;
        default:
          break;
      }
      break;
    case 2:                                 // Relay 2
      switch (sub) {
        case 0:
          break;
        case 1:
          lcd.clear();
          lcd.print(" Contacts:      ");
          lcd.setCursor(0, 1);
          lcd.print("  Save Contacts ");
          lcd.setCursor(15, 1);
          lcd.write((byte)1);     // down arrow
          break;
        case 2:
          lcd.clear();
          lcd.print(" Contacts:      ");
          lcd.setCursor(0, 1);
          lcd.print("  Edit Contacts ");
          lcd.setCursor(15, 1);
          lcd.write((byte)2);     // up and down arrow
          break;
        case 3:
          lcd.clear();
          lcd.print(" Contacts:      ");
          lcd.setCursor(0, 1);
          lcd.print("  Del Contacts");
          lcd.setCursor(15, 1);
          lcd.write((byte)0);     // up arrow
          break;
        default:
          break;
      }
      break;
    case 3:                               // Relay 3
      switch (sub) {
        case 0:
          break;
        case 1:
          lcd.clear();
          lcd.print(" Others:        ");
          lcd.setCursor(0, 1);
          lcd.print("  Send AT       ");
          lcd.setCursor(15, 1);
          lcd.write((byte)1);     // down arrow
          break;
        case 2:
          lcd.clear();
          lcd.print(" Others:        ");
          lcd.setCursor(0, 1);
          lcd.print("  Send ATA      ");
          lcd.setCursor(15, 1);
          lcd.write((byte)2);     // up and down arrow
          break;
        case 3:
          lcd.clear();
          lcd.print(" Others:        ");
          lcd.setCursor(0, 1);
          lcd.print("  Send ATH      ");
          lcd.setCursor(15, 1);
          lcd.write((byte)0);     // up arrow
          break;
        default:
          break;
      }
      break;
    case 4:
      sub = 3;
      break;
  }
}

void updateLevel_3 () {
  switch (menu) {
    case 0:
      break;
    case 1:
      lcd.clear();
      lcd.print(" Relay 1:");
      lcd.setCursor(0, 1);
      lcd.print("  Val 1 = ");
      break;
    case 2:
      lcd.clear();
      lcd.print(" Relay 2:");
      lcd.setCursor(0, 1);
      lcd.print("  Val 2 = ");
      break;
    case 3:
      lcd.clear();
      lcd.print(" Relay 3:");
      lcd.setCursor(0, 1);
      lcd.print("  Val 3 = ");
      break;
    case 4:
      sub = 3;
      break;
  }
}

void executeAction () {
  switch (menu) {
    case 0:
      break;
    case 1:
      lcd.clear();
      lcd.print(" Executing # 1");
      break;
    case 2:
      lcd.clear();
      lcd.print(" Executing # 2");
      break;
    case 3:
      lcd.clear();
      lcd.print(" Executing # 3");
      break;
    case 4:
      sub = 3;
      break;
  }
}
nice Project
Hi Rauf, glad you like it.
Hi George,
Thank you for sharing your various tinkering.
I truly enjoy your tutorials, and learning thru the process (being a Noob).
I am wondering whether you have similar text entry tutorial but using the KY-040 Rotary Encoder (instead of the Keypad)?
Been searching in YouTube for a good, clear examples, but sadly none.
Hope you can make this tutorial on the sideline soon. Thank You.
Hi,
The recent "Unknown" poster was from me (Dermawan – mohamad.dermawan@gmail.com).
There was a server error during posting. Thanks.
Hmm, that's a good suggestion. Noted with your suggestion. Thank you for the kind words.
Hello Dermawan, no worries bro. Thanks and nice to know you. Cheers.
Hi George,
Dermawan here again. Nice to know you as well. Which part of the Philippines are you from? I'm in Singapore.
By the way, I need a text entry with lower case. Is there a way to add them?
Example, while holding down button "A" and at the same time pressing button "2" will toggle abc2.
Or a neater trick is having a "shift" key to toggle upper case and lower case character. Hope you can shed some light here.
TIA. Best Regards.
Hi George,
Forgot to ask you …. there is occasional keypad bouncing issue.
is there a workaround to debounce the keypad.
I've seen for buttons and rotary encoder application, but have not seen one for membrane keypad.
Thanks.
Dermawan, you might like to create another variable to hold the String alpha lets say String beta for the lowercase letters..
You might like to refer to this for debouncing: https://www.arduino.cc/en/Tutorial/BuiltInExamples/Debounce