


Tutorial Understanding Blink Without Delay | How to millis
In this tutorial, we will learn how BlinkWithoutDelay example can be use to do multiple task at the same time.
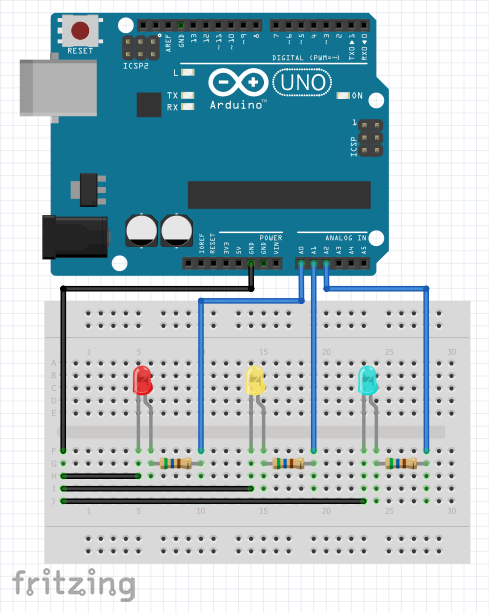
Circuit Diagram:
Video Demonstration:
Source Code:
1. Blinking 3 LED in Different Intervals:
// LED definitions for easy reference
#define RED_LED   A0
#define YEL_LED   A1
#define BLU_LED   A2

// variables for the red LED
bool ledState_RED = LOW;            // this holds the current state of the red LED
unsigned long prevMillis_RED = 0;   // this holds the start time of millis for computing the elapse time
unsigned long interval_RED = 3000;  // this holds the interval of each toggle of LED

// variables for the yellow LED
bool ledState_YEL = LOW;            // this holds the current state of the LED
unsigned long prevMillis_YEL = 0;   // this holds the start time of millis for computing the elapse time
unsigned long interval_YEL = 5000;  // this holds the interval of each toggle of LED

// variables for the blue led
bool ledState_BLU = LOW;            // this holds the current state of the LED
unsigned long prevMillis_BLU = 0;   // this holds the start time of millis for computing the elapse time
unsigned long interval_BLU = 7000;  // this holds the interval of each toggle of LED

unsigned long currMillis_ALL = 0;   // this holds the current time captured by the millis() function
                                    // it is use in general for synchronization purpose

void setup() {
  // Set the pin directions for LEDs
  pinMode(RED_LED, OUTPUT);
  pinMode(YEL_LED, OUTPUT);
  pinMode(BLU_LED, OUTPUT);
}

void loop() {

  // Store the currently time
  // Notice: it use a single current time for synchonization with other function
  currMillis_ALL = millis();

  // Virtually process all the task
  process_RED();
  process_YEL();
  process_BLU();

}

void process_RED() {
  if (currMillis_ALL - prevMillis_RED >= interval_RED) {
    // Elapse time has reached the interval
    // Save the current time as previous time
    prevMillis_RED = currMillis_ALL;

    // toggle LED state
    ledState_RED = !ledState_RED;

    digitalWrite(RED_LED, ledState_RED);
  }
}

void process_YEL() {
  if (currMillis_ALL - prevMillis_YEL >= interval_YEL) {
    // Elapse time has reached the interval
    // Save the current time as previous time
    prevMillis_YEL = currMillis_ALL;

    // toggle LED state
    ledState_YEL = !ledState_YEL;

    digitalWrite(YEL_LED, ledState_YEL);
  }
}

void process_BLU() {
  if (currMillis_ALL - prevMillis_BLU >= interval_BLU) {
    // Elapse time has reached the interval
    // Save the current time as previous time
    prevMillis_BLU = currMillis_ALL;

    // toggle LED state
    ledState_BLU = !ledState_BLU;

    digitalWrite(BLU_LED, ledState_BLU);
  }
}
2. Demonstration for delay blocking code:
#include "LiquidCrystal.h"

#define SW1 7
#define SW2 6

LiquidCrystal lcd(A0, A1, A2, A3, A4, A5);

void setup() {
  // put your setup code here, to run once:
  lcd.begin(16,2);

  pinMode(SW1, INPUT_PULLUP);
  pinMode(SW2, INPUT_PULLUP);

  lcd.setCursor(0,0);
  lcd.print("SW1 to delay    ");
  lcd.setCursor(0,1);
  lcd.print("You can press S2");

}

void loop() {

  if (digitalRead(SW1) == LOW) {
    lcd.setCursor(0,0);
    lcd.println("SW1 is pressed  ");
    lcd.setCursor(0,1);
    lcd.println("Uno delay: 5 sec");

    delay(5000);

  }

  if (digitalRead(SW2) == LOW) {
    lcd.setCursor(0,1);
    lcd.print("S2 is press     ");
  } else {
    lcd.setCursor(0,0);
    lcd.print("SW1 to delay    ");
    lcd.setCursor(0,1);
    lcd.print("You can press S2");
  }

}
3. Or you might want to blink the 3 LEDs in different intervals and also controls the duration of ON and OFF
// LED definitions for easy reference
#define RED_LED   A0
#define YEL_LED   A1
#define BLU_LED   A2

bool ledState_RED = LOW;
unsigned long prevMillis_RED = 0;
unsigned long interval_RED_H = 800;
unsigned long interval_RED_L = 200;
unsigned long interval_RED = interval_RED_L;

bool ledState_YEL = LOW;
unsigned long prevMillis_YEL = 0;
unsigned long interval_YEL_H = 2800;
unsigned long interval_YEL_L = 200;
unsigned long interval_YEL = interval_YEL_L;

bool ledState_BLU = LOW;
unsigned long prevMillis_BLU = 0;
unsigned long interval_BLU_H = 8800;
unsigned long interval_BLU_L = 200;
unsigned long interval_BLU = interval_BLU_L;

unsigned long currMillis_ALL = 0;


void setup() {
  // Set the pin directions for LEDs
  pinMode(RED_LED, OUTPUT);
  pinMode(YEL_LED, OUTPUT);
  pinMode(BLU_LED, OUTPUT);
}

void loop() {

  // Store the currently time
  // Notice: it use a single current time for synchonization with other function
  currMillis_ALL = millis();

  process_RED();
  process_YEL();
  process_BLU();

}

void process_RED() {
  if (currMillis_ALL - prevMillis_RED >= interval_RED) {
    // Elapse time has reached the interval
    // Save the current time as previous time
    prevMillis_RED = currMillis_ALL;

    // toggle LED state
    if (ledState_RED == HIGH) {
      ledState_RED = LOW;
      interval_RED = interval_RED_L;
    } else {
      ledState_RED = HIGH;
      interval_RED = interval_RED_H;
    }

    digitalWrite(RED_LED, ledState_RED);
  }
}

void process_YEL() {
  if (currMillis_ALL - prevMillis_YEL >= interval_YEL) {
    // Elapse time has reached the interval
    // Save the current time as previous time
    prevMillis_YEL = currMillis_ALL;

    // toggle LED state
    if (ledState_YEL == HIGH) {
      ledState_YEL = LOW;
      interval_YEL = interval_YEL_L;
    } else {
      ledState_YEL = HIGH;
      interval_YEL = interval_YEL_H;
    }

    digitalWrite(YEL_LED, ledState_YEL);
  }
}

void process_BLU() {
  if (currMillis_ALL - prevMillis_BLU >= interval_BLU) {
    // Elapse time has reached the interval
    // Save the current time as previous time
    prevMillis_BLU = currMillis_ALL;

    // toggle LED state
    if (ledState_BLU == HIGH) {
      ledState_BLU = LOW;
      interval_BLU = interval_BLU_L;
    } else {
      ledState_BLU = HIGH;
      interval_BLU = interval_BLU_H;
    }

    digitalWrite(BLU_LED, ledState_BLU);
  }
}
I hope you find it useful and helpful. If you have any question, please do not hesitate to write it in the comment box.
Please Subscribe to TechToTinker Youtube channel:
Click me to Subscribe
Thank you.
Sir npalaking bagay ito pra s amin n gsto matoto at s akin trabho medyo hnd ko maintndhan kaunti lng my project sana ako gawin kaso hnd ko mkuha pa help nman sir pag my time ka sir gawa sana ako n kasikgnawa ko sir pro delay function lng gawa sana ako prog. Purifier system na meron relay 4pcs meron sila time to activate each relay
Hi, most probably the example number 3 in this blog post is what you need. Use relay instead of LED and also modify the code a little bit to have 4 relays.
Good luck.
P.S. message me on my messenger account if you need further help.
Hi dr George! I need your help
how to make 3 leds blinking for each defferent intervals 3-4 time?
I want this below intervals.
1st led (350ms HIGH) – (120ms LOW) – (220ms HIGH) – (120ms LOW) – (220ms HIGH)- (570ms LOW)
2nd led (380ms HIGH) – (120ms LOW) – (380ms HIGH) – (720ms LOW)
3rd led (230ms HIGH) – (570ms LOW) (230ms HIGH) – (570ms LOW)
I tries to edit your sketch but no sucsess
Thanks
You may achieve that using state machines or something similar to what I did in this blog: https://techtotinker.blogspot.com/2020/08/sos-flasher-using-millis-function-with.html
Sir pwede ko po ba to include sa program ng RTC? need ko po sana kasi iset yung time ng on and off ng relay then need po sana ng repetition every 5 mins kaya magagamit ko sana yung number 3 example
If you already have an RTC module, better to use it than use millis(). RTC module is more efficient to use than millis.
Or if accuracy is not so important, you may just use millis.
If you need help, send me email to tech.to.tinker@gmail.com
Cheers.