


SOS Flasher Using Millis Function with Enable Switch
In this tutorial, you will learn to use the millis() function in creating an S.O.S Morse Code flasher. The advantage in using millis() function over the delay() function is the non-blocking code which means you can manage other inputs and outputs at the same time.
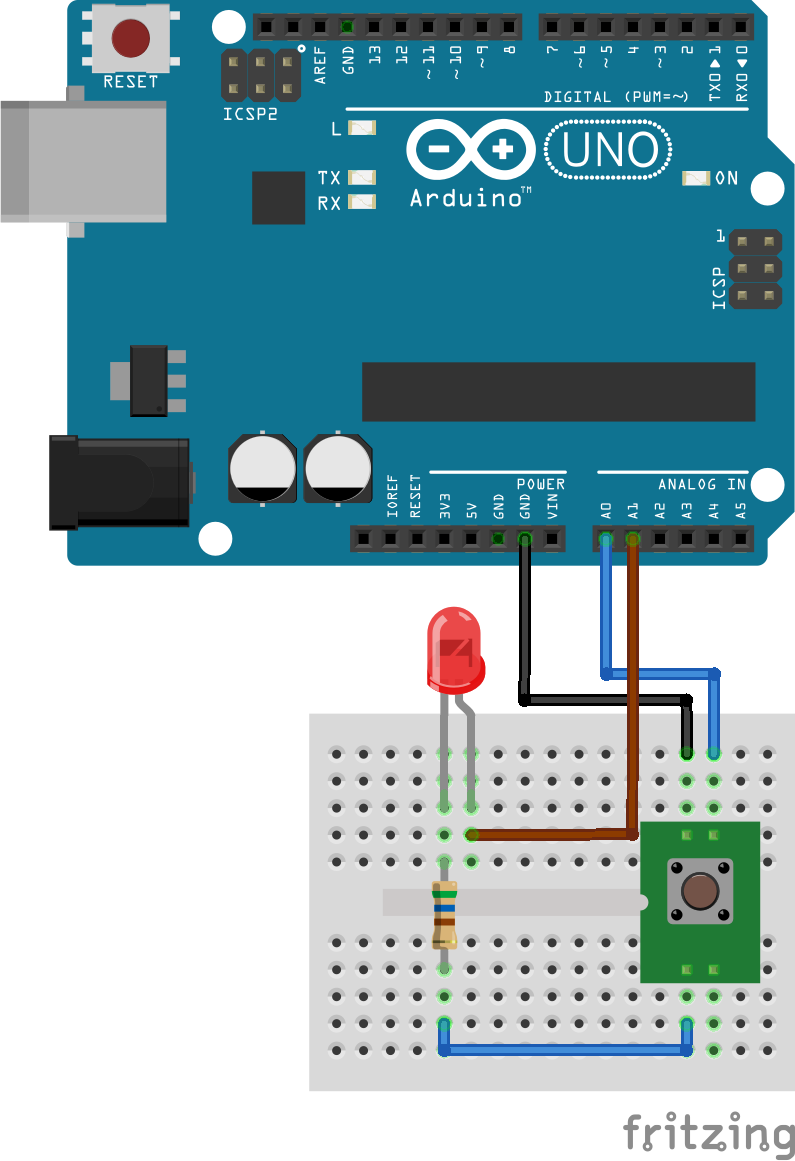
Circuit Diagram:
Instruction:
1. Connect the LED to Arduino Uno A1 with a limiting resistor of about 560 Ohms.
2. Connect the tactile switch to Arduino Uno A0. The other pin of the switch to the ground. The switch is configured as active LOW and internal pull-up resistor is use.
3. Copy and paste the provided source code. Please feel free to modify it according to your liking. Enjoy.
Video Demonstration:
If you have any question regarding this tutorial, please drop me a message in the comment box.
Please do LIKE and SHARE this to your friends and please do SUBSCRIBE. Click this to Subscribe.
Source Code:
/*
 *  S.O.S. signal implementation using
 *  millis() function
 *
 *  Author: George Bantique, TechToTinker
 *  Date: August 23, 2020
 *
 *  Please feel free to modify it and
 *  adapt it according to your application.
 *
 */
#define LED_PIN A1
#define SW1_PIN A0

const unsigned long DOTS_INTERVAL = 250;
const unsigned long DASH_INTERVAL = 750;
const unsigned long LOWS_INTERVAL = 500;
const unsigned long BETW_INTERVAL = 700;
unsigned long startMillis;

// true: sos signal is ON
// false: sos signal is OFF
bool isSOS = false;

// Tracks the current steps
uint8_t steps = 0;

// Holds the current state of the LED
bool ledState = false;

// This is for button debouncing
bool currState = HIGH;
bool prevState = HIGH;
bool buttonState = HIGH;
unsigned long debounceStart = 0;
unsigned long debounceDuration = 50;


void setup() {
  pinMode(LED_PIN, OUTPUT);
  pinMode(SW1_PIN, INPUT_PULLUP);
  Serial.begin(9600);
}

void loop() {
  /*
   *  dots signals:
   *    is the short duration lights ON
   *  dash signals:
   *    is the longer duration lights ON
   *    compared to dots
   *  lows signals:
   *    is the duration of lights OFF
   *  betw signals:
   *    is essentially a low signals but
   *    with different duration
   *
   *  Here is the breakdown of the steps:
   *  0:  in-between signals
   *  1:  dot signal
   *  2:  low signal
   *  3:  dot signal
   *  4:  low signal
   *  5:  dot signal
   *  6:  in-between signals
   *  7:  dash signal
   *  8:  low signal
   *  9:  dash signal
   *  10: low signal
   *  11: dash signal
   *  12: in-between signals
   */

  // Logic for the SOS
  //  Pseudo code:
  //    if SOS is ON, check the current steps
  //      if steps is 1, 3, and 5
  //        send a dots signals
  //      if steps is 7, 9, and 11
  //        send a dash signals
  //      if steps is 0, 6, and 12
  //        send a between signals
  //      else, it means 2, 4, 8, 10
  //        send a low signals
  //  The duration of each signal is achieve using
  //    the millis() function
  //    For example:
  //      if ( ( millis() - startMillis ) >= DOTS_INTERVAL ) {
  //        steps++;
  //        startMillis = millis(); // save the start time
  //      }
  //    The ( millis() - startMillis ) is basically the elapse time
  //      since the startMillis is recorded
  //      so that ( ( millis() - startMillis ) >= DOTS_INTERVAL ) is
  //      basically for checking if the required interval is achieve.
  //      If it becomes true, increment the counter and record the time
  //      and so on
  if (isSOS) {
    if        ( ( steps == 1  ) ||
                ( steps == 3  ) ||
                ( steps == 5 ) ) {
      ledState = true;
      if ( ( millis() - startMillis ) >= DOTS_INTERVAL ) {
        steps++;
        startMillis = millis(); // save the start time
      }
    } else if ( ( steps == 7 ) ||
                ( steps == 9 ) ||
                ( steps == 11 ) ) {
      ledState = true;
      if ( ( millis() - startMillis ) >= DASH_INTERVAL ) {
        // signal interval is complete
        // move to the next step
        steps++;
        startMillis = millis(); // save the start time
      }
    } else if ( ( steps == 0  ) ||
                ( steps == 6 ) ||
                ( steps == 12 ) ) {
      ledState = false;
      if ( ( millis() - startMillis ) >= BETW_INTERVAL ) {
        steps++;
        startMillis = millis(); // save the start time
      }
    } else {
      ledState = false;

      if ( ( millis() - startMillis ) >= LOWS_INTERVAL ) {
        steps++;
        startMillis = millis(); // save the start time
      }
    }
    // if the steps reach steps 13, go back to steps 0
    if (steps > 12) steps = 0;
  }

  // Update the output signal
  digitalWrite(LED_PIN, ledState);


  /*
   *  This is for debouncing the tactile switch
   */
  currState = digitalRead(SW1_PIN);
  if (currState != prevState) {
    debounceStart = millis();
  }

  if ((millis() - debounceStart) > debounceDuration) {
    if (currState != buttonState) {
      buttonState = currState;
      if (currState == LOW) {
        if ( isSOS ) {
          // currently sending SOS, now turn it off
          isSOS = false;
          Serial.println("off");
          ledState = false;
        } else {
          // currently SOS is off, now turn it on
          isSOS = true;
          startMillis = millis();
          Serial.println("on");
          steps = 0;
        }
      }
    }
  }
  prevState = currState;


  // Do other stuffs here, without blocking


}