003 - Raspberry Pi Pico: Charlieplexing
Introduction
Have you ever wonder how to control a number of LEDs with less GPIO pins? I actually don’t have idea about Charlieplexing until recently that one of the viewer in my Youtube videos requested about it.
So after a couple of searching the internet, I build the test circuit, coded the bare program that I could come up and I feel the necessity to share it also. So, here it is and I hope you like it.
Bill Of Materials
- Raspberry Pi Pico development board which will serve as the brain for the demo circuit.
- 6 pieces of LEDs preferably with different colors but any will do.
- A breadboard to hold the circuit in place.
- Some dupont jumper wires to interconnect the circuit.
Schematic Diagram
Hardware Instruction
- First, prepare the needed materials stated above.
- Next, attach the Raspberry Pi Pico on the breadboard and make sure that the pins are properly aligned.
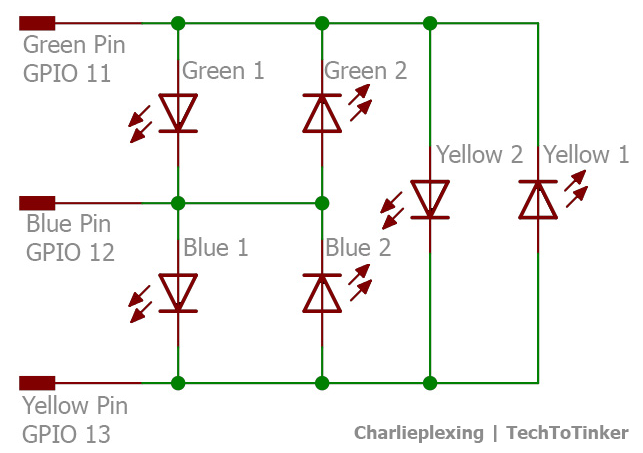
- Next, arrange each pair of LEDs with opposite direction (please refer to the circuit diagram).
- Next, attach GPIO 11 with green dupont wire to one side of the the green LED pairs.
- Next, attach GPIO 12 with blue dupont wire to one side of the blue LED pairs.
- Next, attach GPIO 13 with yellow dupont wire to one side of the yellow LED pairs.
- Next, attach GPIO 11 with green dupont wire to the other side of the yellow LED pairs.
- Next, attach GPIO 12 with blue dupont wire to the other side of the green LED pairs.
- Next, attach GPIO 13 with yellow dupont wire to the other side of the blue LED pairs.
- Please carefully refer to the schematic diagram.
- Note: I do not use any current limiting resistor for simplicity purposes BUT it is highly advisable to use around 330 Ohms resistor along the Green pin, Blue pin, and Yellow pin.
Schematic Diagram
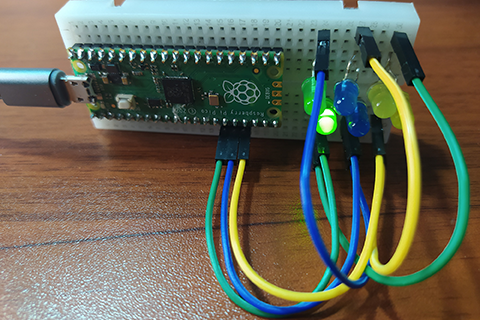
If all goes well, your circuit should look like this.

Video Demonstration
Call To Action
For any concern, write your message in the comment section.
You might also like to support my journey on Youtube by Subscribing. Click this to Subscribe to TechToTinker.
Thank you and have a good days ahead.
See you,
– George Bantique | tech.to.tinker@gmail.com
Source Code
 1 # More details can be found in TechToTinker.blogspot.com
 2 # George Bantique | tech.to.tinker@gmail.com
 3 from machine import Pin
 4 from time import sleep_ms
 5 def charlie(g_val, b_val, y_val):
 6   if g_val < 0:
 7     g = Pin(11, Pin.IN)
 8   else:
 9     g = Pin(11, Pin.OUT)
10     g.value(g_val)
11   if b_val < 0:
12     b = Pin(12, Pin.IN)
13   else:
14     b = Pin(12, Pin.OUT)
15     b.value(b_val)
16   if y_val < 0:
17     y = Pin(13, Pin.IN)
18   else:
19     y = Pin(13, Pin.OUT)
20     y.value(y_val)
21 def main():
22   while True:
23     """
24     TRUTH TABLE:
25     |-------------------------------------|
26     | g_val | b_val | y_val | Description |
27     |-------------------------------------|
28     |   1   |  0    | -1    | Green 1     |
29     |   0   |  1    | -1    | Green 2     |
30     |  -1   |  1    |  0    | Blue 1      |
31     |  -1   |  0    |  1    | Blue 2      |
32     |   1   | -1    |  0    | Yellow 1    |
33     |   0   | -1    |  1    | Yellow 2    |
34     |-------------------------------------|
35     """
36     charlie(1,0,-1) # green 1
37     sleep_ms(100)
38     charlie(0,1,-1) # green 2
39     sleep_ms(100)
40     charlie(-1,1,0) # blue 1
41     sleep_ms(100)
42     charlie(-1,0,1) # blue 2
43     sleep_ms(100)
44     charlie(1,-1,0) # yellow 1
45     sleep_ms(100)
46     charlie(0,-1,1) # yellow 2
47     sleep_ms(100)
Posts in this series
- 002 - Raspberry Pi Pico: LCD 4-bit Mode
- 001 - Raspberry Pi Pico: GPIO | MicroPython
- 000 - Raspberry Pi Pico: How to get started | MicroPython
No comments yet!