


MIT App Inventor for Arduino
Building an Android application is one option to control your robot project or anything that comes to your mind. And with the use of the MIT App Inventor 2, you can easily create an Android application.
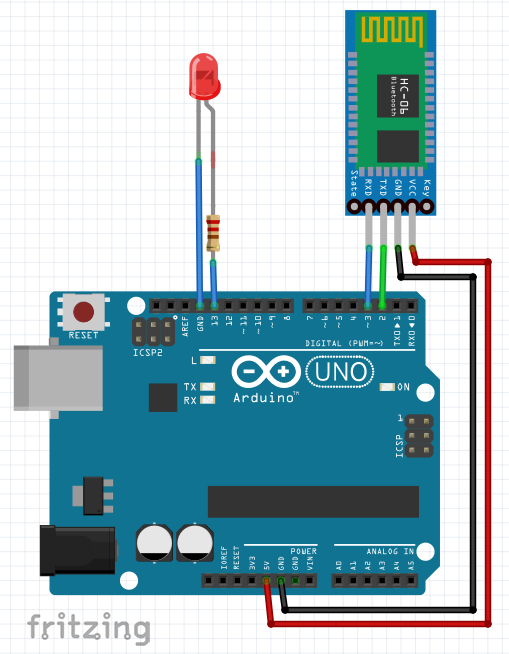
In this tutorial, we will learn to create a simple Android application which can control the state of the LED connected to Arduino Uno board. Bluetooth communication protocol will be use via HC-06 bluetooth module.
In the Arduino Uno, we will create a circuit according to the following diagram:
Source Code:
#include "SoftwareSerial.h"

#define LED_PIN 13
#define HC06_RX 2
#define HC06_TX 3

SoftwareSerial HC06(HC06_RX,HC06_TX);

bool LED_STATE = false;
String cmd = "";

void setup() {
  // put your setup code here, to run once:
  HC06.begin(9600);

  pinMode(LED_PIN, OUTPUT);
  digitalWrite(LED_PIN, LED_STATE);
}

void loop() {
  // put your main code here, to run repeatedly:

  while(HC06.available()>0){
   cmd+=(char)HC06.read();
  }

  if(cmd!=""){
    cmd.trim();  // Remove added LF in transmit
    // We expect Command from bluetooth
    if (cmd.equals("1")) {
      LED_STATE = true;
    } else if (cmd.equals("0")) {
      LED_STATE = false;
    }

    cmd=""; //reset cmd
  }

  digitalWrite(LED_PIN, LED_STATE);
}
MIT App Inventor:
Follow the following sketch for the MIT App Inventor.


You may download the Android application here:
Video Demonstration:
Part 1:
Part 2:
I hope I am able to impart a little information to you, but if you have any question, please do not hesitate to leave your question in the comment box.
Thank you and have a good day.
Happy tinkering.
Hi,
Very interesting post. Really helpful.
Where to download the offline MIT AI2 setup?
Hi @DIYer, thank you for visiting. Here is the link to the offline MIT AI2: https://sourceforge.net/projects/ai2u/