Tutorial: ESP32 Web Server | ESP32 WiFi in Access Point Mode
Introduction
Last time, I posted tutorial on how to use the ESP32 configured as WiFi Station. In order for us to control something in our web server, we need to connect to ESP32 and our device in the same Access Point or router. Now we will directly connect to our ESP32 Web Server by configuring it as WiFi Access Point.
You might interested to view the previous tutorial: https://techtotinker.com/2020/08/10/tutorial-esp32-web-server-control-something-through-esp32-wifi-in-station-mode/
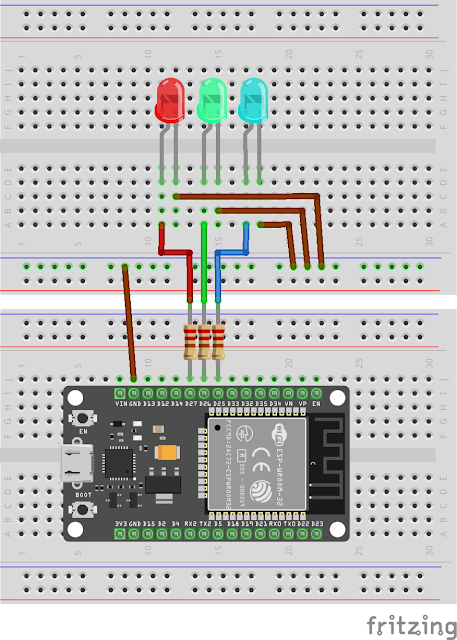
Circuit Diagram
Video Demonstration
Call To Action
If you find this tutorial as helpful, please give me THUMBS UP and SHARE this to your friends.
Please do not forget to SUBSCRIBE.
Thank you.
Source Code
  1  /*
  2  * Simple ESP32 Web Server
  3  *  The ESP32 Wifi is configured as Access Point.
  4  *
  5  */
  6 #include <WiFi.h>
  7
  8 #define BLUE_LED  25
  9 #define GREEN_LED  26
 10 #define RED_LED   27
 11
 12 // Create the objects for server and client
 13 WiFiServer server(80);
 14 WiFiClient client;
 15
 16 const char* ssid   = "ESP32-AP-WebServer";// This is the SSID that ESP32 will broadcast
 17 const char* password = "12345678";     // password should be atleast 8 characters to make it work
 18
 19 // Create the global variable
 20 String http;
 21 String bluLedState = "off";
 22 String grnLedState = "off";
 23 String redLedState = "off";
 24
 25 void setup() {
 26  Serial.begin(115200);
 27  pinMode(BLUE_LED, OUTPUT);
 28  pinMode(GREEN_LED, OUTPUT);
 29  pinMode(RED_LED, OUTPUT);
 30  digitalWrite(BLUE_LED, LOW);
 31  digitalWrite(GREEN_LED, LOW);
 32  digitalWrite(RED_LED, LOW);
 33  Serial.print("Connecting to ");
 34  Serial.println(ssid);
 35
 36  // Create the ESP32 access point
 37  /*
 38   * Alternative:
 39   * softAP(const char* ssid,
 40   *     const char* password,
 41   *     int channel,
 42   *     int ssid_hidden,
 43   *     int max_connection
 44   *
 45   *     where:
 46   *      ssid - this is the SSID that will be broadcast by ESP32
 47   *          maximum of 63 characters
 48   *      password - this is the password to connect to ESP32
 49   *          minimum of 8 characters to function
 50   *          Put NULL to make it open to public
 51   *      channel - wifi channels (ranging from 1 to 13)
 52   *      ssid_hidden - sets the SSID as broadcast or hidden
 53   *          0: broadcast SSID
 54   *          1: hidden SSID,
 55   *           you need to type the exact SSID name in order to connect
 56   *      max_connection - maximum number of connected clients
 57   *          accepts 1 to 4 only
 58   *
 59   */
 60  WiFi.softAP(ssid, password);
 61
 62  Serial.println( "" );
 63  Serial.println( "WiFi AP is now running" );
 64  Serial.println( "IP address: " );
 65  Serial.println( WiFi.softAPIP() );
 66
 67  // Start our ESP32 server
 68  server.begin();
 69 }
 70
 71 void loop(){
 72
 73  if ( client = server.available() ) {  // Checks if a new client tries to connect to our server
 74   Serial.println("New Client.");
 75   String clientData = "";
 76   while ( client.connected() ) {    // Wait until the client finish sending HTTP request
 77    if ( client.available() ) {     // If there is a data,
 78     char c = client.read();      //  read one character
 79     http += c;            //  then parse it
 80     Serial.write(c);
 81     if (c == 'n') {         // If the character is carriage return,
 82                      //  it means end of http request from client
 83      if (clientData.length() == 0) { //  Now that the clientData is cleared,
 84       sendResponse();        //    perform the necessary action
 85       updateLED();
 86       updateWebpage();
 87       break;
 88      } else {
 89       clientData = "";       //  First, clear the clientData
 90      }
 91     } else if (c != 'r') {      // Or if the character is NOT new line
 92      clientData += c;        //  store the character to the clientData variable
 93     }
 94    }
 95   }
 96   http = "";
 97   client.stop();            // Disconnect the client.
 98   Serial.println("Client disconnected.");
 99   Serial.println("");
100  }
101 }
102
103 void sendResponse() {
104  // Send the HTTP response headers
105  client.println("HTTP/1.1 200 OK");
106  client.println("Content-type:text/html");
107  client.println("Connection: close");
108  client.println();
109 }
110
111 void updateWebpage() {
112  // In here we will display / update the webpage by sending the HTML
113  //  to the connected client
114  // In order for us to use the HTTP GET functionality,
115  //  the HTML hyperlinks or href is use in the buttons.
116  //  So that, when you press the buttons, it will send a request to the
117  //  web server with the href links by which our ESP32 web server will
118  //  be check using HTTP GET and execute the equivalent action
119
120  // Send the whole HTML
121  client.println("<html>");
122  client.println("<head>");
123  client.println("<title>ESP32 WiFi Station</title>");
124  client.println("</head>");
125
126  // Web Page Heading
127  client.println("<body><h1>Simple ESP32 Web Server</h1>");
128
129  // Display buttons for Blue LED
130  client.println("<p>1. Blue LED is " + bluLedState + "</p>");
131  if (bluLedState == "off") {
132   client.println("<p><a href="/BLUE_LED/on"><button>Turn ON</button></a></p>");
133  } else {
134   client.println("<p><a href="/BLUE_LED/off"><button>Turn OFF</button></a></p>");
135  }
136
137  client.print("<hr>");
138
139  // Display buttons for Green LED
140  client.println("<p>2. Green LED is " + grnLedState + "</p>");
141  if (grnLedState == "off") {
142   client.println("<p><a href="/GREEN_LED/on"><button>Turn ON</button></a></p>");
143  } else {
144   client.println("<p><a href="/GREEN_LED/off"><button>Turn OFF</button></a></p>");
145  }
146
147  client.print("<hr>");
148
149  // Display buttons for Red LED
150  client.println("<p>3. Red LED is " + redLedState + "</p>");
151  if (redLedState == "off") {
152   client.println("<p><a href="/RED_LED/on"><button>Turn ON</button></a></p>");
153  } else {
154   client.println("<p><a href="/RED_LED/off"><button>Turn OFF</button></a></p>");
155  }
156
157  client.println("</body></html>");
158  client.println();
159 }
160
161 void updateLED() {
162  // In here we will check the HTTP request of the connected client
163  //  using the HTTP GET function,
164  //  Then turns the LED on / off according to the HTTP request
165  if    (http.indexOf("GET /BLUE_LED/on") >= 0) {
166   Serial.println("Blue LED on");
167   bluLedState = "on";
168   digitalWrite(BLUE_LED, HIGH);
169  } else if (http.indexOf("GET /BLUE_LED/off") >= 0) {
170   Serial.println("Blue LED off");
171   bluLedState = "off";
172   digitalWrite(BLUE_LED, LOW);
173  } else if (http.indexOf("GET /GREEN_LED/on") >= 0) {
174   Serial.println("Green LED on");
175   grnLedState = "on";
176   digitalWrite(GREEN_LED, HIGH);
177  } else if (http.indexOf("GET /GREEN_LED/off") >= 0) {
178   Serial.println("Green LED off");
179   grnLedState = "off";
180   digitalWrite(GREEN_LED, LOW);
181  } else if (http.indexOf("GET /RED_LED/on") >= 0) {
182   Serial.println("Red LED on");
183   redLedState = "on";
184   digitalWrite(RED_LED, HIGH);
185  } else if (http.indexOf("GET /RED_LED/off") >= 0) {
186   Serial.println("Red LED off");
187   redLedState = "off";
188   digitalWrite(RED_LED, LOW);
189  }
190 }
Posts in this series
- Tutorial: ESP32 Bluetooth Classic | How to get started with ESP32 | Arduino IDE
- Tutorial: ESP32 Web Server | Control something through ESP32 WiFi in Station Mode
No comments yet!