Tutorial: How to use MFRC522 RFID module using Arduino
I am sharing this tutorial so someone might benefited from it somehow.
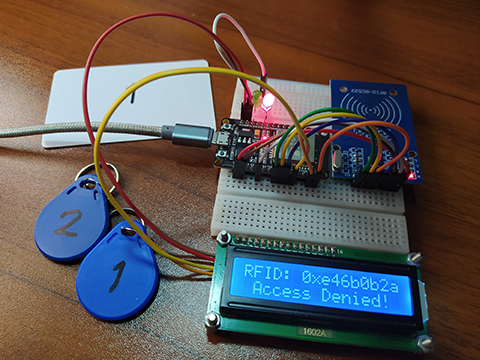
I am fascinated with RFIDs capability, though this technology has been around many years before me. Now that I have this module, I tried to play with it.
The RFID tags can contain 1 kilo bytes of data, amazing right?
Circuit Diagram:
Video Demonstration:
If you have any question or suggestion, please write it in the comment box provided below.
If you find this article as helpful, please kindly consider supporting my journey in tinkering Electronics by Subscribing CLICK THIS LINK TO SUBSCRIBE.
Thank you and have a good days ahead.
Source Code:
1. Read and Write to RFID tags:
 #include <SPI.h>
 #include <MFRC522.h>
 #define RST_PIN     9      // Configurable, see typical pin layout above
 #define SS_PIN     10     // Configurable, see typical pin layout above
 MFRC522 mfrc522(SS_PIN, RST_PIN);  // Create MFRC522 instance.
 MFRC522::MIFARE_Key key;
   // In this sample we use the second sector,
   // that is: sector #1, covering block #4 up to and including block #7
   byte sector     = 1;
   byte blockAddr   = 4;
   byte dataBlock[]  = {
     0x01, 0x02, 0x03, 0x04,
     0x05, 0x06, 0x07, 0x08,
     0x09, 0x0a, 0xff, 0x0b,
     0x0c, 0x0d, 0x0e, 0x0f
   };
 //  byte dataBlock[]  = {
 //    0x00, 0x00, 0x00, 0x00,
 //    0x00, 0x00, 0x00, 0x00,
 //    0x00, 0x00, 0x00, 0x00,
 //    0x00, 0x00, 0x00, 0x00
 //  };
   byte trailerBlock  = 7;
   MFRC522::StatusCode status;
   byte buffer[18];
   byte size = sizeof(buffer);
 /**
  * Initialize.
  */
 void setup() {
   Serial.begin(9600); // Initialize serial communications with the PC
   while (!Serial);  // Do nothing if no serial port is opened (added for Arduinos based on ATMEGA32U4)
   SPI.begin();    // Init SPI bus
   mfrc522.PCD_Init(); // Init MFRC522 card
   // Prepare the key (used both as key A and as key B)
   // using FFFFFFFFFFFFh which is the default at chip delivery from the factory
   for (byte i = 0; i < 6; i++) {
     key.keyByte[i] = 0xFF;
   }
 //  Serial.println(F("Scan a MIFARE Classic PICC to demonstrate read and write."));
 //  Serial.print(F("Using key (for A and B):"));
 //  dump_byte_array(key.keyByte, MFRC522::MF_KEY_SIZE);
 //  Serial.println();
 //
 //  Serial.println(F("BEWARE: Data will be written to the PICC, in sector #1"));
   Serial.println("Setup Done");
 }
 /**
  * Main loop.
  */
 void loop() {
   // Reset the loop if no new card present on the sensor/reader. This saves the entire process when idle.
   if ( ! mfrc522.PICC_IsNewCardPresent())
     return;
   // Select one of the cards
   if ( ! mfrc522.PICC_ReadCardSerial())
     return;
   // Show some details of the PICC (that is: the tag/card)
   Serial.print(F("Card UID:"));
   dump_byte_array(mfrc522.uid.uidByte, mfrc522.uid.size);
   Serial.println();
   Serial.print(F("PICC type: "));
   MFRC522::PICC_Type piccType = mfrc522.PICC_GetType(mfrc522.uid.sak);
   Serial.println(mfrc522.PICC_GetTypeName(piccType));
   // Check for compatibility
   if (  piccType != MFRC522::PICC_TYPE_MIFARE_MINI
     && piccType != MFRC522::PICC_TYPE_MIFARE_1K
     && piccType != MFRC522::PICC_TYPE_MIFARE_4K) {
     Serial.println(F("This sample only works with MIFARE Classic cards."));
     return;
   }
   Serial.println("");
   // Authenticate using key A
   //Serial.println(F("Authenticating using key A..."));
   status = (MFRC522::StatusCode) mfrc522.PCD_Authenticate(MFRC522::PICC_CMD_MF_AUTH_KEY_A, trailerBlock, &key, &(mfrc522.uid));
   if (status != MFRC522::STATUS_OK) {
     Serial.print(F("PCD_Authenticate() failed: "));
     Serial.println(mfrc522.GetStatusCodeName(status));
     return;
   }
   // Read data from the block
   Serial.print(F("Reading data from block ")); Serial.print(blockAddr);
   Serial.println(F(" ..."));
   status = (MFRC522::StatusCode) mfrc522.MIFARE_Read(blockAddr, buffer, &size);
   if (status != MFRC522::STATUS_OK) {
     Serial.print(F("MIFARE_Read() failed: "));
     Serial.println(mfrc522.GetStatusCodeName(status));
   }
   Serial.print(F("Data in block ")); Serial.print(blockAddr); Serial.println(F(":"));
   dump_byte_array(buffer, 16); Serial.println();
   Serial.println();
   // Write data to the block
   Serial.print(F("Writing data into block ")); Serial.print(blockAddr);
   Serial.println(F(" ..."));
   dump_byte_array(dataBlock, 16); Serial.println();
   status = (MFRC522::StatusCode) mfrc522.MIFARE_Write(blockAddr, dataBlock, 16);
   if (status != MFRC522::STATUS_OK) {
     Serial.print(F("MIFARE_Write() failed: "));
     Serial.println(mfrc522.GetStatusCodeName(status));
   }
   Serial.println();
   // Read data from the block (again, should now be what we have written)
   Serial.print(F("Reading data from block ")); Serial.print(blockAddr);
   Serial.println(F(" ..."));
   status = (MFRC522::StatusCode) mfrc522.MIFARE_Read(blockAddr, buffer, &size);
   if (status != MFRC522::STATUS_OK) {
     Serial.print(F("MIFARE_Read() failed: "));
     Serial.println(mfrc522.GetStatusCodeName(status));
   }
   Serial.print(F("Data in block ")); Serial.print(blockAddr); Serial.println(F(":"));
   dump_byte_array(buffer, 16);
   Serial.println();
   // Halt PICC
   mfrc522.PICC_HaltA();
   // Stop encryption on PCD
   mfrc522.PCD_StopCrypto1();
 }
 /**
  * Helper routine to dump a byte array as hex values to Serial.
  */
 void dump_byte_array(byte *buffer, byte bufferSize) {
   for (byte i = 0; i < bufferSize; i++) {
     Serial.print(buffer[i] < 0x10 ? " 0" : " ");
     Serial.print(buffer[i], HEX);
   }
 }
2. Sample Application: RFID Security Key
 #include <SPI.h>
 #include <MFRC522.h>
 #define SS_PIN 10
 #define RST_PIN 9
 MFRC522 mfrc522(SS_PIN, RST_PIN);
 void setup()
 {
  Serial.begin(9600);
  SPI.begin();
  mfrc522.PCD_Init();
  Serial.println("Welcome, scan your card to enter");
  Serial.println();
 }
 void loop()
 {
  // Check for new RFID
  if ( ! mfrc522.PICC_IsNewCardPresent())
  {
   return;
  }
  // If the card use is not compatible,
  // do not continue
  if ( ! mfrc522.PICC_ReadCardSerial())
  {
   Serial.println("Access Denied");
   return;
  }
  // Process the RFID
  Serial.print("UID tag :");
  String content= "";
  byte letter;
  for (byte i = 0; i < mfrc522.uid.size; i++)
  {
    Serial.print(mfrc522.uid.uidByte[i] < 0x10 ? " 0" : " ");
    Serial.print(mfrc522.uid.uidByte[i], HEX);
    content.concat(String(mfrc522.uid.uidByte[i] < 0x10 ? " 0" : " "));
    content.concat(String(mfrc522.uid.uidByte[i], HEX));
  }
  Serial.println();
  Serial.print("Message : ");
  content.toUpperCase();
  // Verify if the card is in the record
  if ( (content.substring(1) == "E4 6B 0B 2A") ||
     (content.substring(1) == "E7 45 8E 7A"))  {
   Serial.println(" Access granted.");
   Serial.println();
   delay(3000);
  } else {
   Serial.println(" Access denied");
   delay(3000);
  }
 }



thanks…how to micropython code for esp32