


Part 2: DF Player Mini Tinkering with Arduino Nano
This will serve as a part 2 in tinkering of the DF Player Mini (you may also visit the Part 1: Getting Started with DF Player Mini – a small mp3 player), so let’s get started.
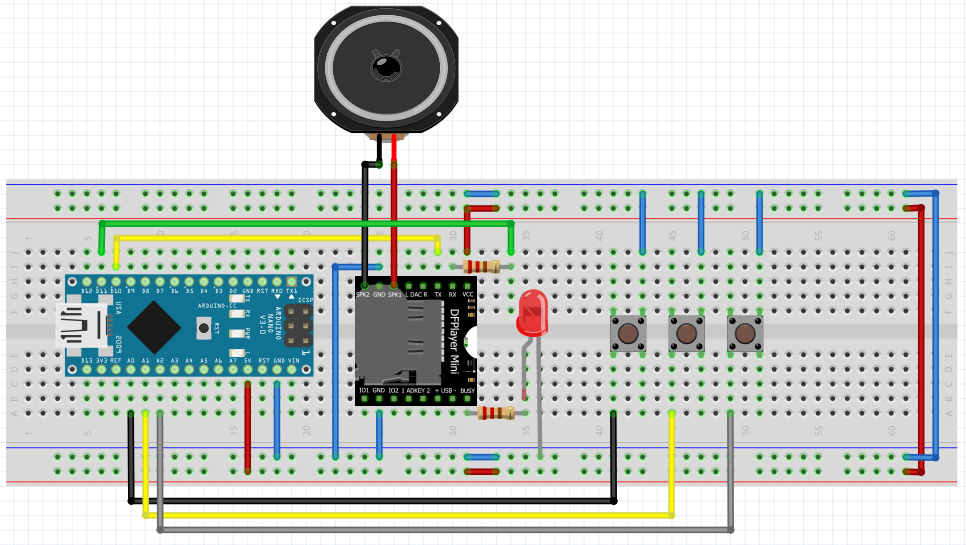
Materials:1. DF Player mini board 2. Arduino Nano 3. Micro SD card with mp3 files inside 4. Some tactile switch 5. LED 6. Resistor 7. Power supply of 3.3V to 5.0V 8. A speaker 9. Breadboard (or a perfboard) 10. Some jumper wires

Instruction:
1. Insert the micro SD card to the DF player mini.
2. Place the DF player mini to the breadboard.
3. Connect power supply +5V to VCC pin (pin 1, please refer to below picture)
4. Connect power supply ground to GND pin (pin 7 and pin 10).
5. Connect the speaker – pin to SPK_1 (pin 6) and speaker + pin to SPK_2 pins (pin 8).
6. Connect 1K Ohm resistor in between Arduino Nano Tx pin (pin 11) and DFP Rx pin (pin 2). This is very important since DF Player Mini is 3.3V compliant while our Arduino Nano is 5.0V compliant.
7. Connect the Arduino Nano Rx pin (pin 10) to DF Player Mini Tx pin (pin 3).
8. Connect 1K Ohm resistor and an LED in busy pin (pin 16). BUSY pin works as follows:
Logic HIGH: not busy
Logic LOW : busy, something is playing
9. All other pins of DF Player is not used (pin 4, 5, 9, 11, 12, 13, 14, and 15).
10. Connect the Arduino Nano to the computer.
11. Make sure the correct serial port is selected under Tools > Port.
12. Select “Arduino Nano” under Tools > Board.
13. Select “ATmega328P (Old Bootloader)” under Tools > Processor.
14. Upload the sketch using the source code provided below.
15. Test the circuit as follows:
a. Short press Button 1 to play previous song.
b. Short press Button 2 to play / pause song.
c. Short press Button 3 to play next song.
d. Long press Button 1 to decrease song volume.
e. Long press Button 3 to increase song volume.
Schematic Diagram:
Video demonstration:
Part 2: DF Player Mini Tinkering with Arduino Nano
You may also like to watch the part 1:
Part 1: Getting Started with DF Player Mini – a small mp3 player
Source Code:
///              MP3 PLAYER PROJECT
/// https://educ8s.tv/arduino-mp3-player/
//////////////////////////////////////////


#include "SoftwareSerial.h"

SoftwareSerial dfpSerial(10, 11);

/*************************
DF Player Serial Format:
  1. START_BYTE     0x7E
  2. VERSION        0xFF
  3. LENGTH         0x06
  4. COMMAND        CMD / operation
  5. FEEDBACK       1: with Feedback, 0: no feedback
  6. PARAMETER_1    Parameter of Command (High data byte)
  7. PARAMETER_2    Parameter of Command (Low data byte)
  8. CHECKSUM
  9. CHECKSUM
  10. END_BYTE      0xEF

*/
# define START_BYTE 0x7E
# define VERSION    0xFF
# define LENGTH     0x06
# define FEEDBACK   0x00
# define END_BYTE   0xEF


# define ACTIVATED LOW

const byte buttonPin = A3;

int buttonNext = A2;
int buttonPause = A1;
int buttonPrevious = A0;
boolean isPlaying = false;


unsigned long buttonTimerL = 0;
unsigned long longPressTimeL = 250;
boolean buttonActiveL = false;
boolean longPressActiveL = false;

unsigned long buttonTimerR = 0;
unsigned long longPressTimeR = 250;
boolean buttonActiveR = false;
boolean longPressActiveR = false;

byte currVolume = 25;


void setup () {
  pinMode(buttonPause, INPUT_PULLUP);
  pinMode(buttonNext, INPUT_PULLUP);
  pinMode(buttonPrevious, INPUT_PULLUP);
  pinMode(buttonPin, INPUT_PULLUP);

  Serial.begin(9600);

  dfpSerial.begin (9600);
  delay(1000);
  //playFirst();
  isPlaying = false;

  setVolume(currVolume);
  delay(500);


  Serial.println("Setup Completed.");
}

void loop () {
  // Button PREVIOUS / Volume DOWN
  if (digitalRead(buttonPrevious) == LOW) {
    if (buttonActiveL == false) {
      buttonActiveL = true;
      buttonTimerL = millis();
    }
    //if ((millis() - buttonTimerL > longPressTimeL) && (longPressActiveL == false)) {
    if (millis() - buttonTimerL > longPressTimeL) { // multiple long press
      longPressActiveL = true;
      volumeDown();
      Serial.println("Volume DOWN: ");
      Serial.println(currVolume);
    }
  }
  else {
    if (buttonActiveL == true) {
      if (longPressActiveL == true) {
        longPressActiveL = false;
      } else {
        playPrevious();
        Serial.println("Playing PREVIOUS song");
      }
      buttonActiveL = false;
    }
  }

  // Button PLAY / PAUSE
  if (digitalRead(buttonPause) == ACTIVATED)
  {
    Serial.println("Button PLAY");
    if(isPlaying)
    {
      pause();
      isPlaying = false;
      Serial.println("Pause");
    }else
    {
      isPlaying = true;
      play();
      Serial.println("Play");
    }
  }

  // Button NEXT / Volume UP
  if (digitalRead(buttonNext) == LOW) {
    if (buttonActiveR == false) {
      buttonActiveR = true;
      buttonTimerR = millis();
    }

    //if ((millis() - buttonTimerR > longPressTimeR) && (longPressActiveR == false)) {
    if (millis() - buttonTimerR > longPressTimeR) { // Try multiple long press
      longPressActiveR = true;
      volumeUp();
      Serial.println("Volume UP: ");
      Serial.println(currVolume);
    }

  }
  else {
    if (buttonActiveR == true) {
      if (longPressActiveR == true) {
        longPressActiveR = false;
      } else {
        playNext();
        Serial.println("Playing NEXT song");
      }
      buttonActiveR = false;
    }
  }
}


void volumeUp() {
  if (currVolume < 30) {
    currVolume++;
    setVolume(currVolume);
    delay(500);
  }
}


void volumeDown() {
  if (currVolume > 0){
    currVolume--;
    setVolume(currVolume);
    delay(500);
  }
}


void playFirst() {
  // Send initialization parameters
  execute_CMD(0x3F, 0, 0);
  delay(500);

  // Set volume
  setVolume(30);
  delay(500);

  // Repeat play:
  // 1: start repeat play
  // 0: stop play
  execute_CMD(0x11,0,1);
  delay(500);
}

void pause() {
  execute_CMD(0x0E,0,0);
  delay(500);
}

void play() {
  // Playback
  execute_CMD(0x0D,0,1);
  delay(500);
}

void playNext() {
  // Next
  execute_CMD(0x01,0,1);
  delay(500);
}

void playPrevious() {
  // Previous
  execute_CMD(0x02,0,1);
  delay(500);
}

void setVolume(int volume) {
  execute_CMD(0x06, 0, volume); // Set the volume (0x00~0x30)
  delay(2000);
}

void execute_CMD(byte CMD, byte Par1, byte Par2) {
  // Excecute the command and parameters

  // Calculate the checksum (2 bytes)
  word checksum = -(VERSION + LENGTH + CMD + FEEDBACK + Par1 + Par2);

  // Build the command line
  byte Command_line[10] = { START_BYTE, VERSION, LENGTH, CMD, FEEDBACK,
                            Par1, Par2, highByte(checksum), lowByte(checksum), END_BYTE};

  //Send the command line to the module
  for (byte k = 0; k < 10; k++) {
    dfpSerial.write(Command_line[k]);
  }
}
If you find this lesson useful, please consider supporting my blog post:
1. Blogger: tech-to-tinker.blogspot.com
2. Youtube: tech-to-tinker Youtube Channel
Please leave your comments and suggestions in the comment box below.
Thank you. Happy tinkering!