


035 – MicroPython TechNotes: Dual Motor Driver
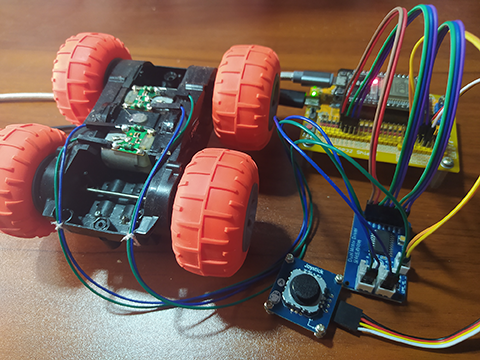
In this article, we will talk about the Dual Motor Driver with ESP32 using MicroPython. With Dual Motor Driver module, you can drive 2 or 4 pieces of DC motor with the ability to rotate the motor in clock-wise and counter-clockwise direction which is commonly found on remote control toy car and on robots.
PINOUT:
- GND – for the ground pins.
- VCC – for the supply voltage for the H-bridge dual motor driver chip.
- AIN1 – for motor A input pin 1.
- PWMA – for motor A input PWM pin.
- AIN2 – for motor A input pin 2.
- BIN1 – for motor B input pin 1.
- PWMB – for motor B input PWM pin.
- BIN2 – for motor B input pin 2.
BILL OF MATERIALS:
- ESP32 development board.
- ESP32 shield (Gorillacell).
- Joystick module (Gorillacell)
- Dual Motor Driver module (Gorillacell).
- Some DC motors.
VIDEO DEMONSTRATION:
For any concern, write your message in the comment section.
You might also like to support my journey on Youtube by Subscribing. Click this to Subscribe to TechToTinker.
Thank you and have a good days ahead.
See you,
– George Bantique | tech.to.tinker@gmail.com
SOURCE CODE:
1. Example # 1, explores the basics of controlling the DUAL MOTOR DRIVER module:
# More details can be found in TechToTinker.blogspot.com
# George Bantique | tech.to.tinker@gmail.com

from machine import Pin
from machine import PWM

# Create pin assignment instance
AIN1 = Pin(12, Pin.OUT)
PWMA = Pin(13, Pin.OUT)
AIN2 = Pin(14, Pin.OUT)
BIN1 = Pin(26, Pin.OUT)
PWMB = Pin(27, Pin.OUT)
BIN2 = Pin(32, Pin.OUT)
pwmA = PWM(PWMA) # attached PWM driver to GPIO pin
pwmB = PWM(PWMB)
pwmA.freq(500)   # sets default frequency
pwmB.freq(500)
pwmA.duty(0)     # initialized the PWM pulse to OFF
pwmB.duty(0)

# A function for stopping the motors using digital logic
# A logic 0 turns OFF the pin
# A logic 1 turns ON the pin
def dig_move_stop():
    PWMA.value(0)
    AIN1.value(0)
    AIN2.value(0)
    PWMB.value(0)
    BIN1.value(0)
    BIN2.value(0)
    print('[dig] Moving stopped.')

# A function for moving forward using digital logic
# PWMx pin:
#    logic 1 - will enable the motor
#    logic 0 - disable the motor
# AIN1 and AIN2 or (BIN1 and BIN2) pins:
#    * this pins should not be driven both logic 1
#    ** AIN1 = 0 and AIN2 = 1 will rotate the motor forward
#    ** BIN1 = 0 and BIN2 = 1 will rotate the motor forward
def dig_move_forward():
    pwmA.duty(1023)
    AIN1.value(0)
    AIN2.value(1)
    pwmB.duty(1023)
    BIN1.value(0)
    BIN2.value(1)
    print('[dig] Moving forward.')

# A function for moving backward using digital logic
# The logic here is just the opossite of dig_move_forward()
def dig_move_backward():
    pwmA.duty(1023)
    AIN1.value(1)
    AIN2.value(0)
    pwmB.duty(1023)
    BIN1.value(0)
    BIN2.value(1)
    print('[dig] Moving backward.')

# A function to demonstrate stopping the motor using pwm
# A PWM duty value of 0 will disable the motor driver
# A PWM duty value of 1 to 1023 will control the speed
#   of rotation of the motor
def pwm_move_stop():
    pwmA.duty(0)
    AIN1.value(0)
    AIN2.value(0)
    pwmB.duty(0)
    BIN1.value(0)
    BIN2.value(0)
    print('[pwm] Moving stopped.')

# A function to demonstrate moving forward with controlled speed
# A PWM duty value can be set both for motor A and B with value
#   from 0 to 1023.
# A PWM duty value for both motor A and B is default to 700 incase
#   you don't want to input in function parameters
def pwm_move_forward(pwm=700):
    pwmA.duty(pwm)
    AIN1.value(0)
    AIN2.value(1)
    pwmB.duty(pwm)
    BIN1.value(0)
    BIN2.value(1)
    print('[pwm] Moving forward.')

# A function to demonstrate moving backward with controlled speed
# The logic here works the same as pwm_move_forward()
def pwm_move_backward(pwm=700):
    pwmA.duty(pwm)
    AIN1.value(1)
    AIN2.value(0)
    pwmB.duty(pwm)
    BIN1.value(0)
    BIN2.value(1)
    print('[pwm] Moving backward.')


# The following can be tested using the REPL:
# 1. To move the toy car forward:
# dig_move_forward()
# 2. To move the toy car backward:
# dig_move_backward()
# 3. To stop the car:
# dig_move_stop()
# ***********************************************************
# Or you may also use the PWM in controlling the motor speed.
# -----------------------------------------------------------
# 4. To move the toy car foward with controlled speed:
# pwm_move_forward()
# 5. or you may set the speed of the motor:
# pwm_move_forward(400)
# 6. To move the toy car backward with controlled speed:
# pwm_move_backward()
# 7. or you may set the speed of the motor:
# pwm_move_backward(500)
# 8. And to pwm stop the toy car:
# pwm_move_stop()
2. Example # 2, demonstrates how you can use a joystick in controlling a toy car movement:
# More details can be found in TechToTinker.blogspot.com
# George Bantique | tech.to.tinker@gmail.com

from machine import Pin
from machine import PWM
from machine import ADC
from time import ticks_us
from time import sleep_ms

def map(x, in_min, in_max, out_min, out_max):
    return int((x - in_min) * (out_max - out_min) /
               (in_max - in_min) + out_min)

AIN1 = Pin(12, Pin.OUT, Pin.PULL_DOWN, value=0)
PWMA = PWM(Pin(13, Pin.OUT, Pin.PULL_DOWN, value=0))
AIN2 = Pin(14, Pin.OUT, Pin.PULL_DOWN, value=0)
BIN1 = Pin(26, Pin.OUT, Pin.PULL_DOWN, value=0)
PWMB = PWM(Pin(27, Pin.OUT, Pin.PULL_DOWN, value=0))
BIN2 = Pin(32, Pin.OUT, Pin.PULL_DOWN, value=0)

PWMA.freq(5000)
PWMA.duty(0)
PWMB.freq(5000)
PWMB.duty(0)

led = Pin(2, Pin.OUT)
joy_x = ADC(Pin(33, Pin.IN))
joy_y = ADC(Pin(34, Pin.IN))
joy_x.atten(ADC.ATTN_11DB)
joy_y.atten(ADC.ATTN_11DB)

def backward():
    AIN1.on()
    AIN2.off()
    BIN1.on()
    BIN2.off()

def forward():
    AIN1.off()
    AIN2.on()
    BIN1.off()
    BIN2.on()

def stop():
#     PWMA.off()
#     PWMB.off()
    PWMA.duty(0)
    PWMB.duty(0)


start_A = ticks_us()
start_B = ticks_us()
interval_A = 0
interval_B = 0
signal_A = 0
signal_B = 0

left_val = 0
right_val = 0
front_val = 0
back_val = 0
left_duty = 0
right_duty = 0

while True:
    sleep_ms(100)

    # ******************************************************
    # Process the Joystick:
    # 1. Read the x and y analog values
    # 2. Convert it to directional values: L, R, F, B
    # ------------------------------------------------------
    x_val = joy_x.read()
    if x_val < 1875:
        # move left
        left_val = map(x_val,1874,0,0,1000)
        right_val = 0
    elif x_val > 1902:
        # move right
        right_val = map(x_val,1903,4095,0,1000)
        left_val = 0
    else:
        # move center
        left_val = 0
        right_val = 0
    y_val = joy_y.read()
    if y_val < 1917:
        # move backward
        back_val = map(y_val, 1916, 0, 0, 1000)
        front_val = 0
    elif y_val > 1944:
        # move forward
        front_val = map(y_val, 1945, 4095, 0, 1000)
        back_val = 0
    else:
        # stop moving
        front_val = 0
        back_val = 0

    if front_val==0 and left_val==0 and right_val==0 and back_val==0: # A
        # stop moving
        left_duty = 0
        right_duty = 0
    elif front_val!=0 and left_val==0 and right_val==0 and back_val==0: # B
        forward()
        left_duty = front_val
        right_duty = front_val
    elif front_val!=0 and left_val==0 and right_val!=0 and back_val==0: # C
        forward()
        left_duty = right_val
        right_duty = right_val * 8 // 10
    elif front_val==0 and left_val==0 and right_val!=0 and back_val==0: # D
        left_duty = 800 #right_val // 3 # rotates the left wheel
        right_duty = 0
    elif front_val==0 and left_val==0 and right_val!=0 and back_val!=0: # E
        backward()
        left_duty = right_val * 8 // 10
        right_duty = right_val
    elif front_val==0 and left_val==0 and right_val==0 and back_val!=0: # F
        backward()
        left_duty = back_val
        right_duty = back_val
    elif front_val==0 and left_val!=0 and right_val==0 and back_val!=0: # G
        backward()
        right_duty = left_val
        left_duty = left_val * 8 // 10
    elif front_val==0 and left_val!=0 and right_val==0 and back_val==0: # H
        right_duty = 800 #left_val // 3 # rotates the right wheel
        left_duty = 0
    elif front_val!=0 and left_val!=0 and right_val==0 and back_val==0: # I
        forward()
        left_duty = left_val * 8 // 10
        right_duty = left_val
    else: # stop
        left_duty = 0
        right_duty = 0

    PWMA.duty(right_duty)
    PWMB.duty(left_duty)

    print(left_val, right_val, front_val, back_val, left_duty, right_duty)
REFERENCES AND CREDITS:
1. Purchase your Gorillacell ESP32 Development kit at:
https://gorillacell.kr
https://gorillacell.kr
Good morning,
This tutorial is very helpful. I have copied the code but am having some challenges. I am using a esp32, micropython, dc brushless motor, 10k duel pot joystick and a BTS7960 motor controller. I can only get the motor to spin one direction regardless of the joystick direction, also am not getting full speed out of the motor at full deflection.
What I want to do is hook up two motors. When the joystick forward both motors run forward, joystick back both motors run reverse, joystick right, left motor forward, right motor reverse and joystick left, right motor forward, left motor reverse. The deflection of the joystick also controls speed. Can you point me in the right direction or show a tutorial? Thank you so much for your tutorials and help. Ron