001 - MicroPython TechNotes: Get Started with MicroPython
Introduction
In this article, I will guide you on how to get started with MicroPython using an ESP32.
I divided the procedure in to 3 simple steps as follows:
- ESP32 USB driver installation.
- Thonny Python IDE installation.
- Flashing the ESP32 with MicroPython firmware.
So without further delays, lets dive in.
1. ESP32 USB Driver Installation:
Most of ESP32 development board comes with CP210x USB to Serial bridge chip.
a. Lets download it by going to https://www.silabs.com/developers/usb-to-uart-bridge-vcp-drivers.
b. Go to Downloads section.
c. and download the latest USB driver available according to your Operating System.
d. After the download completion, install it and just accept and follow through.
2. Thonny Python IDE installation:
I choose Thonny because of its user friend interface besides it looks beautiful.
a. Download Thonny by going to https://thonny.org/ and click your Operating System.
b. After the download completion, just install it and just accept whatever it have.
3. Flashing the ESP32 with MicroPython firmware:
ESP32 is not preconfigured with MicroPython, that’s why we need to install it.
a. Download the latest MicroPython firmware by going to http://micropython.org/download/
b. At the bottom part of the webpage, look for Generic ESP32 module and click it.
c. There are 2 supported MicroPython firmware for ESP32, one is ESP-IDF v3.x which supports all the ESP32 peripherals while ESP-IDF v4.x does not. I recommend to use v3.x and click the latest stable firmware to download it. In my case its,
- GENERIC : esp32-idf3-20200902-v1.13.bin
d. After the downloads, open the Thonny IDE.
e. Flash the ESP32 with new MicroPython firmware by clicking the Tools menu.
f. Select “Options”
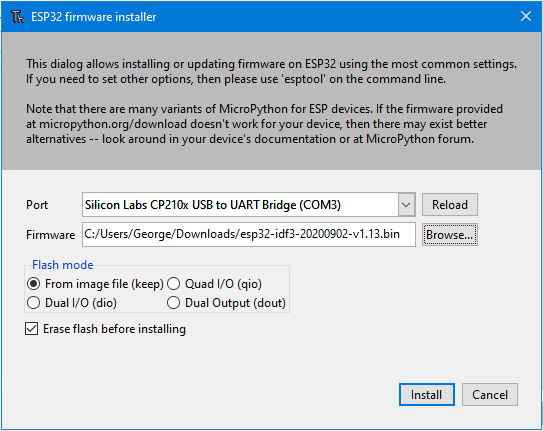
g. Under the “Interpreter” tab, click “Install or update firmware”.
h. Under the “Port”, look for “CP210x” and select it.
i. Under the “Firmware”, click “Browse” and select the download MicroPython firmware.
j. In the Flash mode, select “From image file(keep)”.
k. and make sure that “Erase flash before installing” is checked.
l. Click Install.
If everything goes accordingly, you should now be ready to start programming your ESP32 with MicroPython. Congratulations.

Video Demonstration
Call To Action
For any concern, write your message in the comment section.
You might also like to support my journey on Youtube by Subscribing. Click this to Subscribe to TechToTinker.
Thank you and have a good days ahead.
See you,
– George Bantique | tech.to.tinker@gmail.com
References And Credits
- Purchased your GorillaCell ESP32 Development kit at: gorillacell.kr/
Posts in this series
- 049 - MicroPython TechNotes: MP3 Player
- 048 - MicroPython TechNotes: Analog Touch Sensor
- 047 - MicroPython TechNotes: E108 GPS
- 046 - MicroPython TechNotes: RF433 Transceivers
- 045 - MicroPython TechNotes: Infrared Transmitter
- 044 - MicroPython TechNotes: Infrared Receiver
- 043 - MicroPython TechNotes: ESP12E WiFi | External WiFi module
- 042 - MicroPython TechNotes: JDY-32 | Bluetooth Low Energy BLE
- 041 - MicroPython TechNotes: Bluetooth HC-06
- 040 - MicroPython TechNotes: Relay
- 039 - MicroPython TechNotes: Electromagnet
- 038 - MicroPython TechNotes: Buzzer
- 037 - MicroPython TechNotes: Servo Motor
- 036 - MicroPython TechNotes: Stepper Motor
- 035 - MicroPython TechNotes: Dual Motor Driver
- 034 - MicroPython TechNotes: DC Motors | Gear Motor and Fan Motor
- 033 - MicroPython TechNotes: TCS34725 RGB Color Sensor
- 032 - MicroPython TechNotes: BMP280 Sensor
- 031 - MicroPython TechNotes: TOF Distance Sensor
- 030 - MicroPython TechNotes: DS3231 RTC
- 029 - MicroPython TechNotes: HC-SR04 Ultrasonic Sensor
- 028 - MicroPython TechNotes: DHT11 Temperature and Humidity Sensor
- 027 - MicroPython TechNotes: Rotary Encoder
- 026 - MicroPython TechNotes: Light Dependent Resistor (LDR)
- 025 - MicroPython TechNotes: Joystick
- 024 - MicroPython TechNotes: Slider Switch
- 023 - MicroPython TechNotes: Continuous Rotation Potentiometer
- 022 - MicroPython TechNotes: Potentiometer | Reading an Analog Input
- 021 - MicroPython TechNotes: Color Touch Sensor
- 020 - MicroPython TechNotes: Touch Sensor
- 019 - MicroPython TechNotes: Switch Module
- 018 - MicroPython TechNotes: Button | Reading an Input
- 017 - MicroPython TechNotes: LASER Module
- 016 - MicroPython TechNotes: RGB LED Matrix
- 015 - MicroPython TechNotes: Neopixel 16
- 014 - MicroPython TechNotes: 8x8 Dot Matrix Display (I2C)
- 013 - MicroPython TechNotes: 8x16 Dot Matrix Display (SPI)
- 012 - MicroPython TechNotes: 8x8 Dot Matrix Display (SPI)
- 011 - MicroPython TechNotes: 1.3 OLED Display
- 010 - MicroPython TechNotes: 0.96 OLED Display
- 009 - MicroPython TechNotes: 7 Segment Display
- 008 - MicroPython TechNotes: 16x2 LCD
- 007 - MicroPython TechNotes: RGB LED
- 006 - MicroPython TechNotes: Traffic Light LED Module
- 005 - MicroPython TechNotes: Gorilla Cell LED | MicroPython Hello World
- 004 - MicroPython TechNotes: Gorilla Cell I/O Devices
- 003 - MicroPython TechNotes: Gorillacell ESP32 Shield
- 002 - MicroPython TechNotes: Introduction for Gorillacell ESP32 Dev Kit
- 000 - MicroPython TechNotes: Unboxing Gorillacell ESP32 Development Kit
No comments yet!