021 - MicroPython TechNotes: Color Touch Sensor
Introduction
In this article, we will learn how to use a color touch sensor module with ESP32 using MicroPython programming language.
Pinout
- G – for the ground.
- V – for the supply voltage.
- S – for the signal pin.
Bill Of Materials
- An ESP32 development board that will serve as the brain for this experiment.
- An ESP32 shield from Gorillacell ESP32 development kit to extend the pins to pin headers for easy circuit connection.
- A 3-pin female-female dupont jumper wires to attach the color touch sensor module to the ESP32 shield pin headers.
- And of course the color touch sensor modules itself.
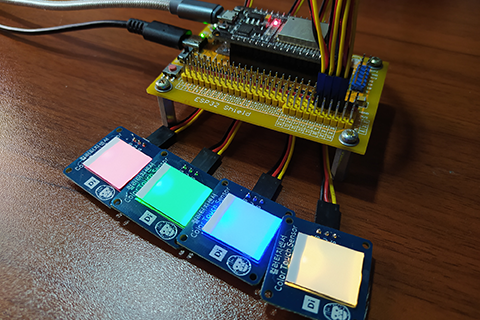
Hardware Instruction
- First, attach the ESP32 board on top of the ESP32 shield and make sure that both USB port are on the same side.
- Next, attach the dupont wires to the color touch sensor by following the color coding which is black for the ground, red for the VCC, and yellow for the signal pin.
- Next, attach the other end of the dupont wires to the ESP32 shield by matching the colors of the wires to the colors of the pin headers which is black to black, red to red, and yellow to yellow. For this experiment I choose GPIO 32, GPIO 33, GPIO 34, and GPIO 35 for the red, green, blue, and rainbow color touch sensor respectively.
- Next, power the ESP32 shield with an external power supply with a type-C USB connector and make sure that the power switch is set to ON state.
- Lastly, connect the ESP32 to the computer through the micro USB cable. Our demo circuit should now be ready.
Software Instruction
I prepared 5 examples below which you can copy and paste to your Thonny IDE.
Play with it and modify it to adapt according to your needs.
Hope you enjoy it by learning. Happy tinkering!
Video Demonstration
Call To Action
For any concern, write your message in the comment section.
You might also like to support my journey on Youtube by Subscribing. Click this to Subscribe to TechToTinker.
Thank you and have a good days ahead.
See you,
– George Bantique | tech.to.tinker@gmail.com
Source Code
1. Example # 1, exploring the basics:
 1# More details can be found in TechToTinker.blogspot.com
 2# George Bantique | tech.to.tinker@gmail.com
 3
 4from machine import Pin
 5
 6cts = Pin(32, Pin.IN)
 7
 8# # The following lines of code can be tested in the REPL:
 9# cts.value() # Reads the current value of the color touch sensor.
10# # Return value is 1 when color touch sensor is touch,
11# # the value is 0 when color touch sensor is not being touch.
py
2. Example # 2, multiple color touch sensor:
 1# More details can be found in TechToTinker.blogspot.com
 2# George Bantique | tech.to.tinker@gmail.com
 3
 4from machine import Pin
 5from time import sleep_ms
 6
 7red_cts = Pin(32, Pin.IN)
 8grn_cts = Pin(33, Pin.IN)
 9blu_cts = Pin(34, Pin.IN)
10rbw_cts = Pin(35, Pin.IN)
11isRed = red_cts.value()
12isGrn = grn_cts.value()
13isBlu = blu_cts.value()
14isRbw = rbw_cts.value()
15
16while True:
17    if red_cts.value()==1:
18        if isRed==False:
19            isRed = True
20            print('Red color touch sensor is activated.')
21    else:
22        isRed = False
23
24    if grn_cts.value()==1:
25        if isGrn==False:
26            isGrn = True
27            print('Green color touch sensor is activated.')
28    else:
29        isGrn = False
30
31    if blu_cts.value()==1:
32        if isBlu==False:
33            isBlu = True
34            print('Blue color touch sensor is activated.')
35    else:
36        isBlu = False
37
38    if rbw_cts.value()==1:
39        if isRbw==False:
40            isRbw = True
41            print('Rainbow color touch sensor is activated.')
42    else:
43        isRbw = False
44
45    sleep_ms(300)
py
3. Example # 3, introducing pin interrupt:
 1
 2# More details can be found in TechToTinker.blogspot.com
 3# George Bantique | tech.to.tinker@gmail.com
 4
 5from machine import Pin
 6
 7red_cts = Pin(32, Pin.IN)
 8led = Pin(2, Pin.OUT)
 9
10def handle_interrupt(pin):
11    led.value(not led.value())
12    print('LED is toggled.')
13
14# Use Pin.IRQ_RISING to set interrupt trigger to rising edge.
15# Use Pin.IRQ_FALLING to set interrupt trigger to falling edge.
16# Use Pin.IRQ_RISING | Pin.IRQ_FALLING to set interrupt trigger to both edge.
17# Interrupt with rising edge detects signal change from logic LOW to logic HIGH.
18# Interrupt with falling edge detects signal change from logic HIGH to logic LOW.
19red_cts.irq(trigger=Pin.IRQ_RISING, handler=handle_interrupt)
py
4. Example # 4, multiple pin interrupt:
 1# More details can be found in TechToTinker.blogspot.com
 2# George Bantique | tech.to.tinker@gmail.com
 3
 4from machine import Pin
 5
 6red_cts = Pin(32, Pin.IN)
 7grn_cts = Pin(33, Pin.IN)
 8blu_cts = Pin(34, Pin.IN)
 9rbw_cts = Pin(35, Pin.IN)
10
11def handle_interrupt(pin):
12    print(pin)
13
14# Use Pin.IRQ_RISING to set interrupt trigger to rising edge.
15# Use Pin.IRQ_FALLING to set interrupt trigger to falling edge.
16# Use Pin.IRQ_RISING | Pin.IRQ_FALLING to set interrupt trigger to both edge.
17# Interrupt with rising edge detects signal change from logic LOW to logic HIGH.
18# Interrupt with falling edge detects signal change from logic HIGH to logic LOW.
19red_cts.irq(trigger=Pin.IRQ_RISING | Pin.IRQ_FALLING, handler=handle_interrupt)
20grn_cts.irq(trigger=Pin.IRQ_RISING | Pin.IRQ_FALLING, handler=handle_interrupt)
21blu_cts.irq(trigger=Pin.IRQ_RISING | Pin.IRQ_FALLING, handler=handle_interrupt)
22rbw_cts.irq(trigger=Pin.IRQ_RISING | Pin.IRQ_FALLING, handler=handle_interrupt)
py
This just shows how to use multiple pin interrupts by expanding the Example # 3.
5. Example # 5, simple pin interrupt example:
 1# More details can be found in TechToTinker.blogspot.com
 2# George Bantique | tech.to.tinker@gmail.com
 3
 4from machine import Pin
 5from time import sleep_ms
 6
 7red_cts = Pin(32, Pin.IN)
 8grn_cts = Pin(33, Pin.IN)
 9blu_cts = Pin(34, Pin.IN)
10rbw_cts = Pin(35, Pin.IN)
11led = Pin(2, Pin.OUT)
12
13press = False
14irq_pin = 0
15
16def handle_interrupt(pin):
17    global press
18    press = True
19    global irq_pin
20    irq_pin = int(str(pin)[4:-1])
21"""
22   String slicing [<start position>,<end position>]
23   positive value - starts counting from left-hand side
24   negative value - starts counting from right-hand side
25   For example:
26     If you press red color touch sensor it will return:
27       Pin(32)
28     Now to get only the integer value, we can slice the string
29     by removing the "Pin(" and that is 4 position from left.
30     We also need to remove the ")" and that is 1 position from right
31     (use negative "-" to indicate slice from right).
32     Which leaves a string "32".
33     And to make it as an integer value, we can use an int() casting.
34   """
35red_cts.irq(trigger=Pin.IRQ_RISING, handler=handle_interrupt)
36grn_cts.irq(trigger=Pin.IRQ_RISING, handler=handle_interrupt)
37blu_cts.irq(trigger=Pin.IRQ_RISING, handler=handle_interrupt)
38rbw_cts.irq(trigger=Pin.IRQ_RISING, handler=handle_interrupt)
39
40while True:
41    if press:
42        press = False
43        if irq_pin == 32:
44            print('Red color touch sensor triggered.')
45        if irq_pin == 33:
46            print('Green color touch sensor triggered.')
47        if irq_pin == 34:
48            print('Blue color touch sensor triggered.')
49        if irq_pin == 35:
50            print('Rainbow color touch sensor triggered.')
py
This code works still the same as Example # 3 and Example # 4.
References And Credits
- Purchase your Gorillacell ESP32 development kit at: gorillacell.kr
Posts in this series
- 049 - MicroPython TechNotes: MP3 Player
- 048 - MicroPython TechNotes: Analog Touch Sensor
- 047 - MicroPython TechNotes: E108 GPS
- 046 - MicroPython TechNotes: RF433 Transceivers
- 045 - MicroPython TechNotes: Infrared Transmitter
- 044 - MicroPython TechNotes: Infrared Receiver
- 043 - MicroPython TechNotes: ESP12E WiFi | External WiFi module
- 042 - MicroPython TechNotes: JDY-32 | Bluetooth Low Energy BLE
- 041 - MicroPython TechNotes: Bluetooth HC-06
- 040 - MicroPython TechNotes: Relay
- 039 - MicroPython TechNotes: Electromagnet
- 038 - MicroPython TechNotes: Buzzer
- 037 - MicroPython TechNotes: Servo Motor
- 036 - MicroPython TechNotes: Stepper Motor
- 035 - MicroPython TechNotes: Dual Motor Driver
- 034 - MicroPython TechNotes: DC Motors | Gear Motor and Fan Motor
- 033 - MicroPython TechNotes: TCS34725 RGB Color Sensor
- 032 - MicroPython TechNotes: BMP280 Sensor
- 031 - MicroPython TechNotes: TOF Distance Sensor
- 030 - MicroPython TechNotes: DS3231 RTC
- 029 - MicroPython TechNotes: HC-SR04 Ultrasonic Sensor
- 028 - MicroPython TechNotes: DHT11 Temperature and Humidity Sensor
- 027 - MicroPython TechNotes: Rotary Encoder
- 026 - MicroPython TechNotes: Light Dependent Resistor (LDR)
- 025 - MicroPython TechNotes: Joystick
- 024 - MicroPython TechNotes: Slider Switch
- 023 - MicroPython TechNotes: Continuous Rotation Potentiometer
- 022 - MicroPython TechNotes: Potentiometer | Reading an Analog Input
- 020 - MicroPython TechNotes: Touch Sensor
- 019 - MicroPython TechNotes: Switch Module
- 018 - MicroPython TechNotes: Button | Reading an Input
- 017 - MicroPython TechNotes: LASER Module
- 016 - MicroPython TechNotes: RGB LED Matrix
- 015 - MicroPython TechNotes: Neopixel 16
- 014 - MicroPython TechNotes: 8x8 Dot Matrix Display (I2C)
- 013 - MicroPython TechNotes: 8x16 Dot Matrix Display (SPI)
- 012 - MicroPython TechNotes: 8x8 Dot Matrix Display (SPI)
- 011 - MicroPython TechNotes: 1.3 OLED Display
- 010 - MicroPython TechNotes: 0.96 OLED Display
- 009 - MicroPython TechNotes: 7 Segment Display
- 008 - MicroPython TechNotes: 16x2 LCD
- 007 - MicroPython TechNotes: RGB LED
- 006 - MicroPython TechNotes: Traffic Light LED Module
- 005 - MicroPython TechNotes: Gorilla Cell LED | MicroPython Hello World
- 004 - MicroPython TechNotes: Gorilla Cell I/O Devices
- 003 - MicroPython TechNotes: Gorillacell ESP32 Shield
- 002 - MicroPython TechNotes: Introduction for Gorillacell ESP32 Dev Kit
- 001 - MicroPython TechNotes: Get Started with MicroPython
- 000 - MicroPython TechNotes: Unboxing Gorillacell ESP32 Development Kit
No comments yet!