035 - MicroPython TechNotes: Dual Motor Driver
Introduction
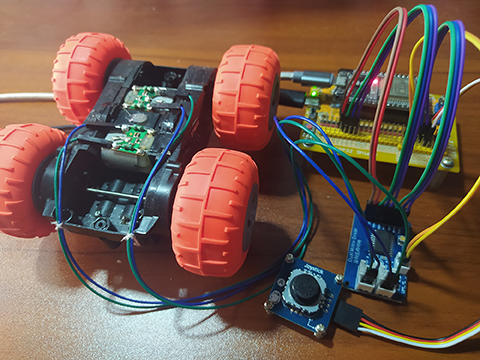
In this article, we will talk about the Dual Motor Driver with ESP32 using MicroPython. With Dual Motor Driver module, you can drive 2 or 4 pieces of DC motor with the ability to rotate the motor in clock-wise and counter-clockwise direction which is commonly found on remote control toy car and on robots.
Pinout
- GND – for the ground pins.
- VCC – for the supply voltage for the H-bridge dual motor driver chip.
- AIN1 – for motor A input pin 1.
- PWMA – for motor A input PWM pin.
- AIN2 – for motor A input pin 2.
- BIN1 – for motor B input pin 1.
- PWMB – for motor B input PWM pin.
- BIN2 – for motor B input pin 2.
Bill Of Materials
- ESP32 development board.
- ESP32 shield (Gorillacell).
- Joystick module (Gorillacell)
- Dual Motor Driver module (Gorillacell).
- Some DC motors.
Video Demonstration
Call To Action
For any concern, write your message in the comment section.
You might also like to support my journey on Youtube by Subscribing. Click this to Subscribe to TechToTinker.
Thank you and have a good days ahead.
See you,
– George Bantique | tech.to.tinker@gmail.com
Source Code
1. Example # 1, explores the basics of controlling the DUAL MOTOR DRIVER module:
  1# More details can be found in TechToTinker.blogspot.com
  2# George Bantique | tech.to.tinker@gmail.com
  3
  4from machine import Pin
  5from machine import PWM
  6
  7# Create pin assignment instance
  8AIN1 = Pin(12, Pin.OUT)
  9PWMA = Pin(13, Pin.OUT)
 10AIN2 = Pin(14, Pin.OUT)
 11BIN1 = Pin(26, Pin.OUT)
 12PWMB = Pin(27, Pin.OUT)
 13BIN2 = Pin(32, Pin.OUT)
 14pwmA = PWM(PWMA) # attached PWM driver to GPIO pin
 15pwmB = PWM(PWMB)
 16pwmA.freq(500)   # sets default frequency
 17pwmB.freq(500)
 18pwmA.duty(0)     # initialized the PWM pulse to OFF
 19pwmB.duty(0)
 20
 21# A function for stopping the motors using digital logic
 22# A logic 0 turns OFF the pin
 23# A logic 1 turns ON the pin
 24def dig_move_stop():
 25    PWMA.value(0)
 26    AIN1.value(0)
 27    AIN2.value(0)
 28    PWMB.value(0)
 29    BIN1.value(0)
 30    BIN2.value(0)
 31    print('[dig] Moving stopped.')
 32
 33# A function for moving forward using digital logic
 34# PWMx pin:
 35#    logic 1 - will enable the motor
 36#    logic 0 - disable the motor
 37# AIN1 and AIN2 or (BIN1 and BIN2) pins:
 38#    * this pins should not be driven both logic 1
 39#    ** AIN1 = 0 and AIN2 = 1 will rotate the motor forward
 40#    ** BIN1 = 0 and BIN2 = 1 will rotate the motor forward
 41def dig_move_forward():
 42    pwmA.duty(1023)
 43    AIN1.value(0)
 44    AIN2.value(1)
 45    pwmB.duty(1023)
 46    BIN1.value(0)
 47    BIN2.value(1)
 48    print('[dig] Moving forward.')
 49
 50# A function for moving backward using digital logic
 51# The logic here is just the opossite of dig_move_forward()
 52def dig_move_backward():
 53    pwmA.duty(1023)
 54    AIN1.value(1)
 55    AIN2.value(0)
 56    pwmB.duty(1023)
 57    BIN1.value(0)
 58    BIN2.value(1)
 59    print('[dig] Moving backward.')
 60
 61# A function to demonstrate stopping the motor using pwm
 62# A PWM duty value of 0 will disable the motor driver
 63# A PWM duty value of 1 to 1023 will control the speed
 64#   of rotation of the motor
 65def pwm_move_stop():
 66    pwmA.duty(0)
 67    AIN1.value(0)
 68    AIN2.value(0)
 69    pwmB.duty(0)
 70    BIN1.value(0)
 71    BIN2.value(0)
 72    print('[pwm] Moving stopped.')
 73
 74# A function to demonstrate moving forward with controlled speed
 75# A PWM duty value can be set both for motor A and B with value
 76#   from 0 to 1023.
 77# A PWM duty value for both motor A and B is default to 700 incase
 78#   you don't want to input in function parameters
 79def pwm_move_forward(pwm=700):
 80    pwmA.duty(pwm)
 81    AIN1.value(0)
 82    AIN2.value(1)
 83    pwmB.duty(pwm)
 84    BIN1.value(0)
 85    BIN2.value(1)
 86    print('[pwm] Moving forward.')
 87
 88# A function to demonstrate moving backward with controlled speed
 89# The logic here works the same as pwm_move_forward()
 90def pwm_move_backward(pwm=700):
 91    pwmA.duty(pwm)
 92    AIN1.value(1)
 93    AIN2.value(0)
 94    pwmB.duty(pwm)
 95    BIN1.value(0)
 96    BIN2.value(1)
 97    print('[pwm] Moving backward.')
 98
 99
100# The following can be tested using the REPL:
101# 1. To move the toy car forward:
102# dig_move_forward()
103# 2. To move the toy car backward:
104# dig_move_backward()
105# 3. To stop the car:
106# dig_move_stop()
107# ***********************************************************
108# Or you may also use the PWM in controlling the motor speed.
109# -----------------------------------------------------------
110# 4. To move the toy car foward with controlled speed:
111# pwm_move_forward()
112# 5. or you may set the speed of the motor:
113# pwm_move_forward(400)
114# 6. To move the toy car backward with controlled speed:
115# pwm_move_backward()
116# 7. or you may set the speed of the motor:
117# pwm_move_backward(500)
118# 8. And to pwm stop the toy car:
119# pwm_move_stop()
py
2. Example # 2, demonstrates how you can use a joystick in controlling a toy car movement:
  1# More details can be found in TechToTinker.blogspot.com
  2# George Bantique | tech.to.tinker@gmail.com
  3
  4from machine import Pin
  5from machine import PWM
  6from machine import ADC
  7from time import ticks_us
  8from time import sleep_ms
  9
 10def map(x, in_min, in_max, out_min, out_max):
 11    return int((x - in_min) * (out_max - out_min) /
 12               (in_max - in_min) + out_min)
 13
 14AIN1 = Pin(12, Pin.OUT, Pin.PULL_DOWN, value=0)
 15PWMA = PWM(Pin(13, Pin.OUT, Pin.PULL_DOWN, value=0))
 16AIN2 = Pin(14, Pin.OUT, Pin.PULL_DOWN, value=0)
 17BIN1 = Pin(26, Pin.OUT, Pin.PULL_DOWN, value=0)
 18PWMB = PWM(Pin(27, Pin.OUT, Pin.PULL_DOWN, value=0))
 19BIN2 = Pin(32, Pin.OUT, Pin.PULL_DOWN, value=0)
 20
 21PWMA.freq(5000)
 22PWMA.duty(0)
 23PWMB.freq(5000)
 24PWMB.duty(0)
 25
 26led = Pin(2, Pin.OUT)
 27joy_x = ADC(Pin(33, Pin.IN))
 28joy_y = ADC(Pin(34, Pin.IN))
 29joy_x.atten(ADC.ATTN_11DB)
 30joy_y.atten(ADC.ATTN_11DB)
 31
 32def backward():
 33    AIN1.on()
 34    AIN2.off()
 35    BIN1.on()
 36    BIN2.off()
 37
 38def forward():
 39    AIN1.off()
 40    AIN2.on()
 41    BIN1.off()
 42    BIN2.on()
 43
 44def stop():
 45#     PWMA.off()
 46#     PWMB.off()
 47    PWMA.duty(0)
 48    PWMB.duty(0)
 49
 50
 51start_A = ticks_us()
 52start_B = ticks_us()
 53interval_A = 0
 54interval_B = 0
 55signal_A = 0
 56signal_B = 0
 57
 58left_val = 0
 59right_val = 0
 60front_val = 0
 61back_val = 0
 62left_duty = 0
 63right_duty = 0
 64
 65while True:
 66    sleep_ms(100)
 67
 68    # ******************************************************
 69    # Process the Joystick:
 70    # 1. Read the x and y analog values
 71    # 2. Convert it to directional values: L, R, F, B
 72    # ------------------------------------------------------
 73    x_val = joy_x.read()
 74    if x_val < 1875:
 75        # move left
 76        left_val = map(x_val,1874,0,0,1000)
 77        right_val = 0
 78    elif x_val > 1902:
 79        # move right
 80        right_val = map(x_val,1903,4095,0,1000)
 81        left_val = 0
 82    else:
 83        # move center
 84        left_val = 0
 85        right_val = 0
 86    y_val = joy_y.read()
 87    if y_val < 1917:
 88        # move backward
 89        back_val = map(y_val, 1916, 0, 0, 1000)
 90        front_val = 0
 91    elif y_val > 1944:
 92        # move forward
 93        front_val = map(y_val, 1945, 4095, 0, 1000)
 94        back_val = 0
 95    else:
 96        # stop moving
 97        front_val = 0
 98        back_val = 0
 99
100    if front_val==0 and left_val==0 and right_val==0 and back_val==0: # A
101        # stop moving
102        left_duty = 0
103        right_duty = 0
104    elif front_val!=0 and left_val==0 and right_val==0 and back_val==0: # B
105        forward()
106        left_duty = front_val
107        right_duty = front_val
108    elif front_val!=0 and left_val==0 and right_val!=0 and back_val==0: # C
109        forward()
110        left_duty = right_val
111        right_duty = right_val * 8 // 10
112    elif front_val==0 and left_val==0 and right_val!=0 and back_val==0: # D
113        left_duty = 800 #right_val // 3 # rotates the left wheel
114        right_duty = 0
115    elif front_val==0 and left_val==0 and right_val!=0 and back_val!=0: # E
116        backward()
117        left_duty = right_val * 8 // 10
118        right_duty = right_val
119    elif front_val==0 and left_val==0 and right_val==0 and back_val!=0: # F
120        backward()
121        left_duty = back_val
122        right_duty = back_val
123    elif front_val==0 and left_val!=0 and right_val==0 and back_val!=0: # G
124        backward()
125        right_duty = left_val
126        left_duty = left_val * 8 // 10
127    elif front_val==0 and left_val!=0 and right_val==0 and back_val==0: # H
128        right_duty = 800 #left_val // 3 # rotates the right wheel
129        left_duty = 0
130    elif front_val!=0 and left_val!=0 and right_val==0 and back_val==0: # I
131        forward()
132        left_duty = left_val * 8 // 10
133        right_duty = left_val
134    else: # stop
135        left_duty = 0
136        right_duty = 0
137
138    PWMA.duty(right_duty)
139    PWMB.duty(left_duty)
140
141    print(left_val, right_val, front_val, back_val, left_duty, right_duty)
py
References And Credits
- Purchase your Gorillacell ESP32 Development kit at: https://gorillacell.kr
Posts in this series
- 049 - MicroPython TechNotes: MP3 Player
- 048 - MicroPython TechNotes: Analog Touch Sensor
- 047 - MicroPython TechNotes: E108 GPS
- 046 - MicroPython TechNotes: RF433 Transceivers
- 045 - MicroPython TechNotes: Infrared Transmitter
- 044 - MicroPython TechNotes: Infrared Receiver
- 043 - MicroPython TechNotes: ESP12E WiFi | External WiFi module
- 042 - MicroPython TechNotes: JDY-32 | Bluetooth Low Energy BLE
- 041 - MicroPython TechNotes: Bluetooth HC-06
- 040 - MicroPython TechNotes: Relay
- 039 - MicroPython TechNotes: Electromagnet
- 038 - MicroPython TechNotes: Buzzer
- 037 - MicroPython TechNotes: Servo Motor
- 036 - MicroPython TechNotes: Stepper Motor
- 034 - MicroPython TechNotes: DC Motors | Gear Motor and Fan Motor
- 033 - MicroPython TechNotes: TCS34725 RGB Color Sensor
- 032 - MicroPython TechNotes: BMP280 Sensor
- 031 - MicroPython TechNotes: TOF Distance Sensor
- 030 - MicroPython TechNotes: DS3231 RTC
- 029 - MicroPython TechNotes: HC-SR04 Ultrasonic Sensor
- 028 - MicroPython TechNotes: DHT11 Temperature and Humidity Sensor
- 027 - MicroPython TechNotes: Rotary Encoder
- 026 - MicroPython TechNotes: Light Dependent Resistor (LDR)
- 025 - MicroPython TechNotes: Joystick
- 024 - MicroPython TechNotes: Slider Switch
- 023 - MicroPython TechNotes: Continuous Rotation Potentiometer
- 022 - MicroPython TechNotes: Potentiometer | Reading an Analog Input
- 021 - MicroPython TechNotes: Color Touch Sensor
- 020 - MicroPython TechNotes: Touch Sensor
- 019 - MicroPython TechNotes: Switch Module
- 018 - MicroPython TechNotes: Button | Reading an Input
- 017 - MicroPython TechNotes: LASER Module
- 016 - MicroPython TechNotes: RGB LED Matrix
- 015 - MicroPython TechNotes: Neopixel 16
- 014 - MicroPython TechNotes: 8x8 Dot Matrix Display (I2C)
- 013 - MicroPython TechNotes: 8x16 Dot Matrix Display (SPI)
- 012 - MicroPython TechNotes: 8x8 Dot Matrix Display (SPI)
- 011 - MicroPython TechNotes: 1.3 OLED Display
- 010 - MicroPython TechNotes: 0.96 OLED Display
- 009 - MicroPython TechNotes: 7 Segment Display
- 008 - MicroPython TechNotes: 16x2 LCD
- 007 - MicroPython TechNotes: RGB LED
- 006 - MicroPython TechNotes: Traffic Light LED Module
- 005 - MicroPython TechNotes: Gorilla Cell LED | MicroPython Hello World
- 004 - MicroPython TechNotes: Gorilla Cell I/O Devices
- 003 - MicroPython TechNotes: Gorillacell ESP32 Shield
- 002 - MicroPython TechNotes: Introduction for Gorillacell ESP32 Dev Kit
- 001 - MicroPython TechNotes: Get Started with MicroPython
- 000 - MicroPython TechNotes: Unboxing Gorillacell ESP32 Development Kit
No comments yet!