Part 2: DF Player Mini Tinkering with Arduino Nano
Introduction
I decided to explore more functionality of the DF Player Mini which can be achieved using a microcontroller. I planned to be able to PLAY, PAUSE, PLAY NEXT, PLAY PREVIOUS, INCREASE and DECREASE VOLUME. I used an Arduino Nano mainly because of its small foot prints.
Bill Of Materials
- DF Player mini board
- Arduino Nano
- Micro SD card with mp3 files inside
- Some tactile switch
- LED
- Resistor
- Power supply of 3.3V to 5.0V
- A speaker
- Breadboard (or a perfboard)
- Some jumper wires
Hardware Instruction
- Insert the micro SD card to the DF player mini.
- Place the DF player mini to the breadboard.
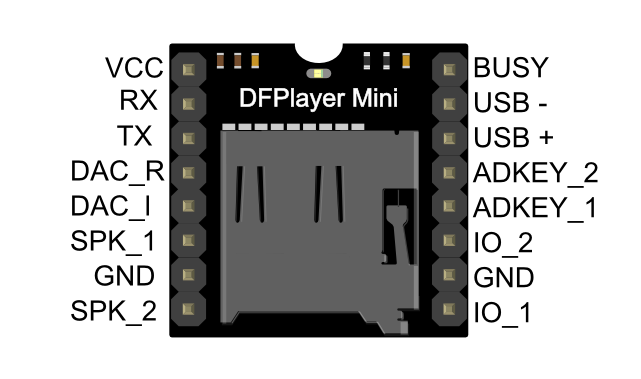
- Connect power supply +5V to VCC pin (pin 1, please refer to below picture)
- Connect power supply ground to GND pin (pin 7 and pin 10).
- Connect the speaker – pin to SPK_1 (pin 6) and speaker + pin to SPK_2 pins (pin 8).
- Connect 1K Ohm resistor in between Arduino Nano Tx pin (pin 11) and DFP Rx pin (pin 2). This is very important since DF Player Mini is 3.3V compliant while our Arduino Nano is 5.0V compliant.
- Connect the Arduino Nano Rx pin (pin 10) to DF Player Mini Tx pin (pin 3).
- Connect 1K Ohm resistor and an LED in busy pin (pin 16). BUSY pin works as follows:
Logic HIGH: not busy
Logic LOW : busy, something is playing - All other pins of DF Player is not used (pin 4, 5, 9, 11, 12, 13, 14, and 15).
- Connect the Arduino Nano to the computer.
- Make sure the correct serial port is selected under Tools > Port.
- Select “Arduino Nano” under Tools > Board.
- Select “ATmega328P (Old Bootloader)” under Tools > Processor.
- Upload the sketch using the source code provided below.
- Test the circuit as follows:
a. Short press Button 1 to play previous song.
b. Short press Button 2 to play / pause song.
c. Short press Button 3 to play next song.
d. Long press Button 1 to decrease song volume.
e. Long press Button 3 to increase song volume.
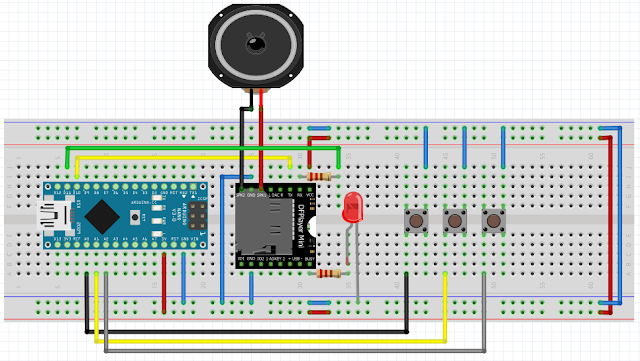
Schematic Diagram
Video demonstration
Source Code
  1///              MP3 PLAYER PROJECT
  2/// https://educ8s.tv/arduino-mp3-player/
  3//////////////////////////////////////////
  4
  5#include "SoftwareSerial.h"
  6
  7SoftwareSerial dfpSerial(10, 11);
  8
  9/*************************
 10DF Player Serial Format:
 11  1. START_BYTE     0x7E
 12  2. VERSION        0xFF
 13  3. LENGTH         0x06
 14  4. COMMAND        CMD / operation
 15  5. FEEDBACK       1: with Feedback, 0: no feedback
 16  6. PARAMETER_1    Parameter of Command (High data byte)
 17  7. PARAMETER_2    Parameter of Command (Low data byte)
 18  8. CHECKSUM
 19  9. CHECKSUM
 20  10. END_BYTE      0xEF
 21*/
 22# define START_BYTE 0x7E
 23# define VERSION    0xFF
 24# define LENGTH     0x06
 25# define FEEDBACK   0x00
 26# define END_BYTE   0xEF
 27
 28# define ACTIVATED LOW
 29
 30const byte buttonPin = A3;
 31int buttonNext = A2;
 32int buttonPause = A1;
 33int buttonPrevious = A0;
 34boolean isPlaying = false;
 35
 36unsigned long buttonTimerL = 0;
 37unsigned long longPressTimeL = 250;
 38boolean buttonActiveL = false;
 39boolean longPressActiveL = false;
 40
 41unsigned long buttonTimerR = 0;
 42unsigned long longPressTimeR = 250;
 43boolean buttonActiveR = false;
 44boolean longPressActiveR = false;
 45
 46byte currVolume = 25;
 47
 48void setup () {
 49  pinMode(buttonPause, INPUT_PULLUP);
 50  pinMode(buttonNext, INPUT_PULLUP);
 51  pinMode(buttonPrevious, INPUT_PULLUP);
 52  pinMode(buttonPin, INPUT_PULLUP);
 53
 54  Serial.begin(9600);
 55
 56  dfpSerial.begin (9600);
 57  delay(1000);
 58  //playFirst();
 59  isPlaying = false;
 60
 61  setVolume(currVolume);
 62  delay(500);
 63
 64
 65  Serial.println("Setup Completed.");
 66}
 67
 68void loop () {
 69  // Button PREVIOUS / Volume DOWN
 70  if (digitalRead(buttonPrevious) == LOW) {
 71    if (buttonActiveL == false) {
 72      buttonActiveL = true;
 73      buttonTimerL = millis();
 74    }
 75    //if ((millis() - buttonTimerL > longPressTimeL) && (longPressActiveL == false)) {
 76    if (millis() - buttonTimerL > longPressTimeL) { // multiple long press
 77      longPressActiveL = true;
 78      volumeDown();
 79      Serial.println("Volume DOWN: ");
 80      Serial.println(currVolume);
 81    }
 82  }
 83  else {
 84    if (buttonActiveL == true) {
 85      if (longPressActiveL == true) {
 86        longPressActiveL = false;
 87      } else {
 88        playPrevious();
 89        Serial.println("Playing PREVIOUS song");
 90      }
 91      buttonActiveL = false;
 92    }
 93  }
 94
 95  // Button PLAY / PAUSE
 96  if (digitalRead(buttonPause) == ACTIVATED)
 97  {
 98    Serial.println("Button PLAY");
 99    if(isPlaying)
100    {
101      pause();
102      isPlaying = false;
103      Serial.println("Pause");
104    }else
105    {
106      isPlaying = true;
107      play();
108      Serial.println("Play");
109    }
110  }
111
112  // Button NEXT / Volume UP
113  if (digitalRead(buttonNext) == LOW) {
114    if (buttonActiveR == false) {
115      buttonActiveR = true;
116      buttonTimerR = millis();
117    }
118
119    //if ((millis() - buttonTimerR > longPressTimeR) && (longPressActiveR == false)) {
120    if (millis() - buttonTimerR > longPressTimeR) { // Try multiple long press
121      longPressActiveR = true;
122      volumeUp();
123      Serial.println("Volume UP: ");
124      Serial.println(currVolume);
125    }
126
127  }
128  else {
129    if (buttonActiveR == true) {
130      if (longPressActiveR == true) {
131        longPressActiveR = false;
132      } else {
133        playNext();
134        Serial.println("Playing NEXT song");
135      }
136      buttonActiveR = false;
137    }
138  }
139}
140
141
142void volumeUp() {
143  if (currVolume < 30) {
144    currVolume++;
145    setVolume(currVolume);
146    delay(500);
147  }
148}
149
150void volumeDown() {
151  if (currVolume > 0){
152    currVolume--;
153    setVolume(currVolume);
154    delay(500);
155  }
156}
157
158void playFirst() {
159  // Send initialization parameters
160  execute_CMD(0x3F, 0, 0);
161  delay(500);
162
163  // Set volume
164  setVolume(30);
165  delay(500);
166
167  // Repeat play:
168  // 1: start repeat play
169  // 0: stop play
170  execute_CMD(0x11,0,1);
171  delay(500);
172}
173
174void pause() {
175  execute_CMD(0x0E,0,0);
176  delay(500);
177}
178
179void play() {
180  // Playback
181  execute_CMD(0x0D,0,1);
182  delay(500);
183}
184
185void playNext() {
186  // Next
187  execute_CMD(0x01,0,1);
188  delay(500);
189}
190
191void playPrevious() {
192  // Previous
193  execute_CMD(0x02,0,1);
194  delay(500);
195}
196
197void setVolume(int volume) {
198  execute_CMD(0x06, 0, volume); // Set the volume (0x00~0x30)
199  delay(2000);
200}
201
202void execute_CMD(byte CMD, byte Par1, byte Par2) {
203  // Excecute the command and parameters
204
205  // Calculate the checksum (2 bytes)
206  word checksum = -(VERSION + LENGTH + CMD + FEEDBACK + Par1 + Par2);
207
208  // Build the command line
209  byte Command_line[10] = { START_BYTE, VERSION, LENGTH, CMD, FEEDBACK,
210                            Par1, Par2, highByte(checksum), lowByte(checksum), END_BYTE};
211
212  //Send the command line to the module
213  for (byte k = 0; k < 10; k++) {
214    dfpSerial.write(Command_line[k]);
215  }
216}
Call To Action
If you find this lesson useful, please consider supporting my blog post:
- Blog: techtotinker.com
- Youtube: TechToTinker Youtube Channel
Please leave your comments and suggestions in the comment box below.
Thank you. Happy tinkering!
References And Credits
Posts in this series
- How to Get Started with ATTiny85 in Arduino IDE
- Tutorial: How to use MFRC522 RFID module using Arduino
- SOS Flasher Using Millis Function with Enable Switch
- Tutorial: How to use DS3231 RTC in Arduino
- Tutorial: How to use 0.96 OLED - a small and cute display
- Tutorial: Getting Started with the NRF24L01 | How to use | Arduino
- Tutorial: How to use SIM800L GSM Module for Controlling Anything | Arduino
- Tutorial: How to use Keypad | Text Entry Mode | Arduino
- Tutorial: How to use 4x4 Keypad | Arduino
- Project Idea: Arduino Voltmeter
- Project Idea: Door Lock Security | Arduino
- Multitasking with Arduino | Relay Timer Controller | using millis
- Tutorial Understanding Blink Without Delay | How to millis
- Arduino Simple LCD Menu
- How to use SIM800L GSM Module using Arduino | Make or Answer Voice Calls
- Tutorial: How to Use Arduino Uno as HID | Part 2: Arduino Mouse Emulation
- Tutorial: How to Use Arduino Uno as HID | Part 1: Arduino Keyboard Emulation
- Tutorial: How to use SIM800L DTMF to Control Anything | Arduino
- Tutorial: Arduino EEPROM
- How to use SIM800L GSM Module | Arduino | Send and Receive SMS
- 16x2 LCD Menu for Arduino
- Tutorial: Arduino GPIO | How to use Arduino Pins
- MIT App Inventor for Arduino
- RC Car using L298N, HC-06, and Arduino Uno
- How to Use LCD Keypad Shield for Arduino
- How to Use Arduino Interrupts
- Project: Automatic Alcohol Dispenser
- TUTORIAL: How to use HC-SR04 Ultrasonic Sensor with Arduino
- Source Code: Astronomia Meme and Funeral Dance | melodies the Arduino way
- How to Get Started with L293D Motor Driver Shield with Arduino
- How to Get Started with L298N Motor Driver module using Arduino
- Part 2: Wav Music Player with Lyrics Using Arduino and SD Card
- Interfacing Infrared to Arduino Uno
- Part 1: Wav Music Player Using Arduino Uno and SD Card
- How to Interface Stepper Motor to Arduino Uno
- How To Play MP3 Files on Arduino from SD Card
- What is Arduino Software Serial
- How to Interface SD card to Arduino (without SD card shield)?
- Playing Melodies Using Arduino
- 8 Degrees Of Freedom (DOF) Robot Using Arduino Uno
- How to Interface PS2 Controller to Arduino Uno
- Part 3: DF Player Mini Tinkering with Arduino Nano and LCD
- How to Interface HC-06 to Arduino
- How to make a Remote Control RC car using Arduino and HC-06 bluetooth module
- Part 1: DF Player Mini - a mini cheap mp3 player
No comments yet!