Tutorial: How to use 4x4 Keypad | Arduino
Introduction
Keypad is commonly use in devices like ATM machine, microwave oven, safety vault, security door lock, and many more.
In this tutorial we will focus on the most popular to electronics enthusiasts and tinkerers which is a 4×4 matrix keypad. We will discuss how it works and at the last we will provide an example Arduino sketch so you may be able to tinker with it and use it to your project.
Circuit Diagram
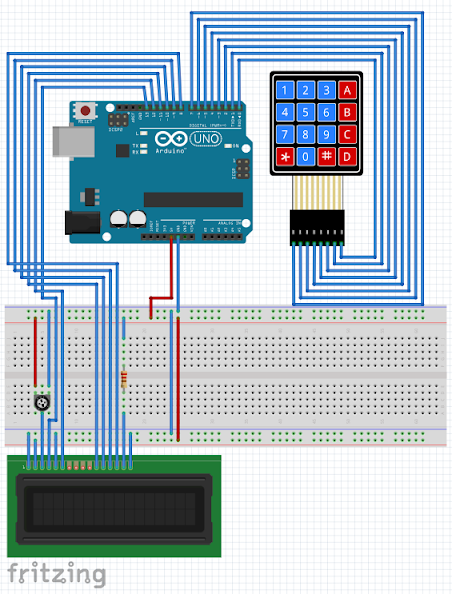
Bill Of Materials
- Arduino Uno or any compatible Arduino microcontroller board.
- 16×2 LCD for the LCD.
- 4×4 or 3×4 Keypad
- Breadboard, jumper wires, resistor, potentiometer, etc.
Hardware Instruction
- Connect the LCD pin 1 VSS to the Arduino GND
- Connect the LCD pin 2 VDD to the Arduino 5V
- Connect the potentiometer pin 1 and pin 3 to Arduino 5V and GND respectively, and the potentiometer center pin 2 to LCD pin 3 VEE/Vo
- Connect the LCD pin 4 RS to the Arduino digital pin 13
- Connect the LCD pin 5 RW to the Arduino GND because we only need to write to the LCD (no reading required)
- Connect the LCD pin 6 En to the Arduino digital pin 12
- Leave the LCD pin 7 D0 to pin 10 D3 not connected because we will use 4-bit mode of the LCD.
- Connect the LCD pin 11 D4 to the Arduino digital pin 11
- Connect the LCD pin 12 D5 to the Arduino digital pin 10
- Connect the LCD pin 13 D6 to the Arduino digital pin 9
- Connect the LCD pin 14 D7 to the Arduino digital pin 8
- Connect the LCD pin 15 Anode to the Arduino 5V via current limiting resistor (220 ohms).
- Connect the LCD pin 16 Cathode to the Arduino GND
- Connect the keypad Row1 (left-most) to the Arduino Uno digital pin D7.
- Connect the keypad Row2 to the Arduino Uno digital pin D6.
- Connect the keypad Row3 to the Arduino Uno digital pin D5.
- Connect the keypad Row4 to the Arduino Uno digital pin D4.
- Connect the keypad Column1 to the Arduino Uno digital pin D3.
- Connect the keypad Column2 to the Arduino Uno digital pin D2.
- Connect the keypad Column3 to the Arduino Uno digital pin D1.
- Connect the keypad Column4 (right-most) to the Arduino Uno digital pin D0.
- Upload the provided sketch making sure that the correct board and serial comm port is selected under the Tools menu of Arduino IDE.
- If it works, modify and experiment with it, and enjoy learning.
4×4 Keypad Illustration

Video Demonstration
Call To Action
I hope you find this tutorial as helpful. Please consider supporting me in Youtube by Subscribing.
Thank you and have a good day.
Source Code
1. 4x4 Keypad using no library
 1/*
 2 * 4x4 Keypad to Arduino Uno with LCD display
 3 * Author: George Bantique, TechToTinker (July 28, 2020)
 4 *
 5 *  - In this tutorial, we need the following:
 6 *    1. Arduino Uno or any compatible Arduino board
 7 *    2. 16x2 LCD for the display
 8 *    3. 4x4 keypad module
 9 *
10 */
11
12#include "LiquidCrystal.h"
13LiquidCrystal lcd(13, 12, 11, 10, 9, 8);
14
15#define ROW   4   // we have 4 rows
16#define COL   4   // by 4 columns of keys
17char keys[ROW][COL] =
18{
19  {'1', '2', '3', 'A'},
20  {'4', '5', '6', 'B'},
21  {'7', '8', '9', 'C'},
22  {'*', '0', '#', 'D'}
23};
24uint8_t row_line[ROW] = {7, 6, 5, 4};
25uint8_t col_line[COL] = {3, 2, 1, 0};
26char keyPressed = ' ';
27
28void setup() {
29
30  // initialized the LCD as 16x2
31  lcd.begin(16, 2);
32
33  // set the row lines as output then
34  // initialized all the line as HIGH
35  for (int r = 0; r < ROW; r++) {
36    pinMode(row_line[r], OUTPUT);
37    digitalWrite(row_line[r], HIGH);
38  }
39
40  // set the column lines as input,
41  // use INPUT_PULLUP to avoid additional hardware
42  // by taking advantage of the internal pullup resistors
43  for (int c = 0; c < COL; c++) {
44    pinMode(col_line[c], INPUT_PULLUP);
45  }
46
47}
48
49void loop() {
50
51  // Process the key press here
52  keyPressed = getKey();
53  lcd.setCursor(0,0);                   // if the key is press
54  lcd.print(keyPressed);                // display it to the LCD
55
56  // Do other stuff
57}
58
59char getKey() {
60  char key_temp = keyPressed;
61  // scan the keypad
62  for (int r = 0; r < ROW; r++) {             // for traversing the row lines
63    digitalWrite(row_line[r], LOW);           // enable the specific row line (one by one)
64    for (int c = 0; c < COL; c++) {           // for traversing the column lines
65      if (digitalRead(col_line[c]) == LOW) {  // check if the specific column is press (one by one)
66         key_temp = keys[r][c];               // store it to key_temp
67      }                                       // if no key is press, check next column
68    }
69    digitalWrite(row_line[r], HIGH);          // disable the specific row line, then next row lines
70  }
71  return key_temp;
72}
cpp
2. 4×4 Keypad using Keypad library:
 1
 2#include "Keypad.h"
 3#include "LiquidCrystal.h"
 4LiquidCrystal lcd(13, 12, 11, 10, 9, 8);
 5
 6#define ROW   4
 7#define COL   4
 8char key[ROW][COL] =
 9{
10  {'1', '2', '3', 'A'},
11  {'4', '5', '6', 'B'},
12  {'7', '8', '9', 'C'},
13  {'*', '0', '#', 'D'}
14};
15uint8_t row_line[ROW] = {7, 6, 5, 4};
16uint8_t col_line[COL] = {3, 2, 1, 0};
17Keypad keypad = Keypad( makeKeymap(key), row_line, col_line, ROW, COL );
18
19void setup() {
20  lcd.begin(16, 2); // initialized the LCD as 16x2
21}
22
23void loop() {
24  char keypress = keypad.getKey();
25  if (keypress){
26    lcd.clear();
27    lcd.print(keypress);
28  }
29}
cpp
3. 4×4 Keypad for password entry:
 1
 2#include <keypad .h="">
 3#include 	<liquidcrystal .h="">
 4LiquidCrystal lcd(13, 12, 11, 10, 9, 8);
 5
 6#define ROW   4
 7#define COL   4
 8char key[ROW][COL] =
 9{
10  {'1', '2', '3', 'A'},
11  {'4', '5', '6', 'B'},
12  {'7', '8', '9', 'C'},
13  {'*', '0', '#', 'D'}
14};
15uint8_t row_line[ROW] = {7, 6, 5, 4};
16uint8_t col_line[COL] = {3, 2, 1, 0};
17Keypad keypad = Keypad( makeKeymap(key), row_line, col_line, ROW, COL );
18const String password = "1234"; // change your password here
19String input_password;
20
21void setup() {
22
23  lcd.begin(16, 2); // initialized the LCD as 16x2
24  lcd.setCursor(0,0);
25  lcd.print("-Enter password-");
26  lcd.setCursor(0,1);
27  lcd.print("Password: ");
28}
29
30void loop() {
31  char key = keypad.getKey();
32
33  if (key){
34
35    if(key == '*') {
36      input_password = ""; // reset imput password
37      lcd.clear();
38      lcd.print("Enter password");
39      lcd.setCursor(0,1);
40      lcd.print("Password: ");
41    } else if(key == '#') {
42      if(password == input_password) {
43        lcd.clear();
44        lcd.print("Granted, welcome");
45        // DO YOUR WORK HERE
46
47      } else {
48        lcd.clear();
49        lcd.print("Access denied");
50      }
51
52      input_password = ""; // reset imput password
53    } else {
54      input_password += key; // append new character to input password string
55      lcd.setCursor(10, 1);
56      lcd.print(input_password);
57    }
58  }
59}</liquidcrystal></keypad>
cpp
4. 4×4 Keypad for password entry (password replaced with *)
 1
 2#include "Keypad.h"
 3#include "LiquidCrystal.h"
 4LiquidCrystal lcd(13, 12, 11, 10, 9, 8);
 5
 6#define ROW   4
 7#define COL   4
 8char key[ROW][COL] =
 9{
10  {'1', '2', '3', 'A'},
11  {'4', '5', '6', 'B'},
12  {'7', '8', '9', 'C'},
13  {'*', '0', '#', 'D'}
14};
15uint8_t row_line[ROW] = {7, 6, 5, 4};
16uint8_t col_line[COL] = {3, 2, 1, 0};
17Keypad keypad = Keypad( makeKeymap(key), row_line, col_line, ROW, COL );
18const String password = "1234"; // change your password here
19String input_password;
20int char_cnt = 0;
21
22void setup() {
23
24  lcd.begin(16, 2); // initialized the LCD as 16x2
25  lcd.setCursor(0,0);
26  lcd.print("-Enter password-");
27  lcd.setCursor(0,1);
28  lcd.print("Password: ");
29}
30
31void loop() {
32
33  char key = keypad.getKey();
34
35  if (key){
36
37    if(key == '*') {
38      input_password = ""; // reset imput password
39      char_cnt = 0;
40      lcd.clear();
41      lcd.print("Enter password");
42      lcd.setCursor(0,1);
43      lcd.print("Password: ");
44    } else if(key == '#') {
45      if(password == input_password) {
46        lcd.clear();
47        lcd.print("Granted, welcome");
48        // DO YOUR WORK HERE
49
50      } else {
51        lcd.clear();
52        lcd.print("Access denied");
53      }
54
55      input_password = ""; // reset imput password
56    } else {
57      input_password += key; // append new character to input password string
58      char_cnt++;
59      lcd.setCursor(10, 1);
60      for (int i = 0; i < char_cnt; i++) {
61        lcd.print("*");
62      };
63    }
64  }
65}
cpp
Posts in this series
- How to Get Started with ATTiny85 in Arduino IDE
- Tutorial: How to use MFRC522 RFID module using Arduino
- SOS Flasher Using Millis Function with Enable Switch
- Tutorial: How to use DS3231 RTC in Arduino
- Tutorial: How to use 0.96 OLED - a small and cute display
- Tutorial: Getting Started with the NRF24L01 | How to use | Arduino
- Tutorial: How to use SIM800L GSM Module for Controlling Anything | Arduino
- Tutorial: How to use Keypad | Text Entry Mode | Arduino
- Project Idea: Arduino Voltmeter
- Project Idea: Door Lock Security | Arduino
- Multitasking with Arduino | Relay Timer Controller | using millis
- Tutorial Understanding Blink Without Delay | How to millis
- Arduino Simple LCD Menu
- How to use SIM800L GSM Module using Arduino | Make or Answer Voice Calls
- Tutorial: How to Use Arduino Uno as HID | Part 2: Arduino Mouse Emulation
- Tutorial: How to Use Arduino Uno as HID | Part 1: Arduino Keyboard Emulation
- Tutorial: How to use SIM800L DTMF to Control Anything | Arduino
- Tutorial: Arduino EEPROM
- How to use SIM800L GSM Module | Arduino | Send and Receive SMS
- 16x2 LCD Menu for Arduino
- Tutorial: Arduino GPIO | How to use Arduino Pins
- MIT App Inventor for Arduino
- RC Car using L298N, HC-06, and Arduino Uno
- How to Use LCD Keypad Shield for Arduino
- How to Use Arduino Interrupts
- Project: Automatic Alcohol Dispenser
- TUTORIAL: How to use HC-SR04 Ultrasonic Sensor with Arduino
- Source Code: Astronomia Meme and Funeral Dance | melodies the Arduino way
- How to Get Started with L293D Motor Driver Shield with Arduino
- How to Get Started with L298N Motor Driver module using Arduino
- Part 2: Wav Music Player with Lyrics Using Arduino and SD Card
- Interfacing Infrared to Arduino Uno
- Part 1: Wav Music Player Using Arduino Uno and SD Card
- How to Interface Stepper Motor to Arduino Uno
- How To Play MP3 Files on Arduino from SD Card
- What is Arduino Software Serial
- How to Interface SD card to Arduino (without SD card shield)?
- Playing Melodies Using Arduino
- 8 Degrees Of Freedom (DOF) Robot Using Arduino Uno
- How to Interface PS2 Controller to Arduino Uno
- Part 3: DF Player Mini Tinkering with Arduino Nano and LCD
- How to Interface HC-06 to Arduino
- How to make a Remote Control RC car using Arduino and HC-06 bluetooth module
- Part 2: DF Player Mini Tinkering with Arduino Nano
- Part 1: DF Player Mini - a mini cheap mp3 player
No comments yet!