Project Idea: Door Lock Security | Arduino
Introduction
In this project, we will create a door lock security system using an Arduino.
The idea is as follows:
- The door lock is controlled by entering the correct password.
- If user password entered is correct, open the door lock
- If user password entered is wrong, an alarm will be triggered (alarm sound and flashing of LED). It can be turned only by entering the admin password.
The materials needed are:
- An Arduino Uno board or any other compatible Arduino board.
- A 16×2 LCD for the display
- A 3×4 or 4×4 membrane keypad for inputting the password.
- A servo motor that will serve as a door lock
- A buzzer or a speaker for the audible alarm.
- Some LED for the visual indicator, this is optional
- Some resistor for limiting the current to the LED
- A breadboard and wires for connecting the circuit.
- A potentiometer for the LCD contrast, this is optional
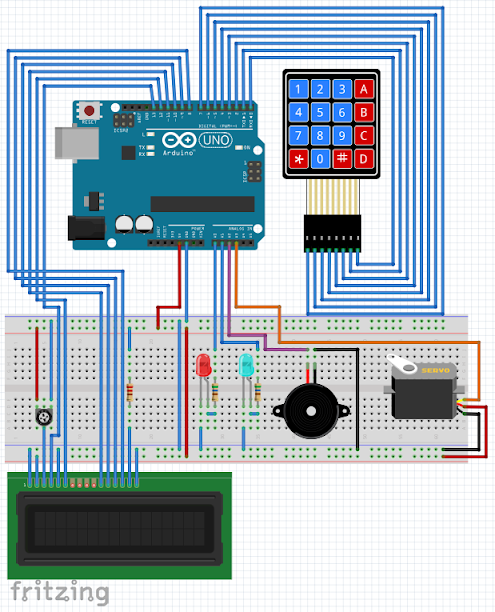
Circuit Diagram
Hardware Instruction
If you have some confusion regarding the connection, please refer to the circuit diagram.
- Connect the LCD pin 1 VSS to the Arduino GND.
- Connect the LCD pin 2 VDD to the Arduino 5V.
- Connect the potentiometer pin 1 and pin 3 to Arduino 5V and GND respectively, and the potentiometer center pin 2 to LCD pin 3 VEE/Vo.
- Connect the LCD pin 4 RS to the Arduino digital pin 13.
- Connect the LCD pin 5 RW to the Arduino GND because we only need to write to the LCD (no reading required).
- Connect the LCD pin 6 En to the Arduino digital pin 12.
- Leave the LCD pin 7 D0 to pin 10 D3 not connected because we will use 4-bit mode of the LCD.
- Connect the LCD pin 11 D4 to the Arduino digital pin 11.
- Connect the LCD pin 12 D5 to the Arduino digital pin 10.
- Connect the LCD pin 13 D6 to the Arduino digital pin 9.
- Connect the LCD pin 14 D7 to the Arduino digital pin 8.
- Connect the LCD pin 15 Anode to the Arduino 5V via current limiting resistor.
- Connect the LCD pin 16 Cathode to the Arduino GND.
- Connect the 4×4 membrane keypad to Arduino digital pin 7 to digital pin 0.
- Connect the red LED to Arduino analog pin A0 via current limiting resistor.
- Connect the blue LED to the Arduino analog pin A1 via current limiting resistor.
- Connect buzzer to Arduino analog pin A2 and GND respectively.
- Connect the servo motor signal pin to Arduino analog pin A3, and its power to external power supply.
- I already Uploaded the source code in the Arduino Uno, so lets power it.
Video Demonstration
Call To Action
If you like this video, please give me thumbs up and share this to your friends.
Leave your comments and suggestions in the comment box.
Please do not forget to Subscribe to TechToTinker Youtube channel:
Please click this to SUBSCRIBE
Thank you and have a good day.
Source Code
  1
  2/*
  3 * Project Idea: Door Lock Security System
  4 *    - the idea here is to create a door lock security system with
  5 *      keypad entry for the password. If the password entered is
  6 *      wrong, the alarm will be triggered. The alarm could be
  7 *      disabled by entering the admin password.
  8 *
  9 *      If the password is correct, it will open the door lock then
 10 *      after sometime, will automatically close the door lock.
 11 *
 12 *      Please feel free to modify this source code to adapt
 13 *      to your specific application. Please do not forget to SUBSCRIBE.
 14 *
 15 * Author: George Bantique (TechToTinker) @ July 23, 2020
 16 */
 17
 18// Place include libraries here:
 19#include "LiquidCrystal.h"
 20#include "Keypad.h"
 21#include "Servo.h"
 22
 23// Pin definitions here:
 24#define RED_LED A0
 25#define BLU_LED A1
 26#define BUZ_PIN A2
 27#define SRV_PIN A3
 28
 29// Global variables here:
 30char* password = "1234";  // User password
 31char* admnpass = "9876";  // Admin password
 32uint8_t keyPos = 0;       // Key position for password entry
 33uint8_t invalid_cnt = 0;  // Invalid entry counter
 34bool isAlarmed = false;   // Alarmed flag, use for alarming sound and flashing light
 35uint8_t currStatus = 0;   // This is for the current requested state
 36uint8_t prevStatus = 0;   // This holds the previous state, #### INITIALIZED THIS TO VALUE 1 #####
 37const byte ROWS = 4;      // 4 keypad rows
 38const byte COLS = 4;      // 4 keypad columns
 39char keys[ROWS][COLS] = { // keypad key array
 40  {'1', '2', '3', 'A'},
 41  {'4', '5', '6', 'B'},
 42  {'7', '8', '9', 'C'},
 43  {'*', '0', '#', 'D'}
 44};
 45byte rowPins[ROWS] = {7, 6, 5, 4}; // pin assignments for the keypad
 46byte colPins[COLS] = {3, 2, 1, 0};
 47
 48// Create the objects here:
 49Keypad keypad = Keypad( makeKeymap(keys), rowPins, colPins, ROWS, COLS );
 50LiquidCrystal lcd (13, 12, 11, 10, 9, 8); // pins of the LCD. (RS, E, D4, D5, D6, D7)
 51Servo myservo;
 52
 53// Function prototypes here:
 54void doAlarm();
 55void manageKeypad();
 56void manageStatus();
 57
 58void setup(){
 59  lcd.begin(16, 2);         // Initialized the lcd as 16 characters by 2 lines
 60  pinMode(RED_LED, OUTPUT); // Set the pin directions
 61  pinMode(BLU_LED, OUTPUT);
 62  pinMode(BUZ_PIN, OUTPUT);
 63  myservo.attach(SRV_PIN);  // attaches the servo on pin to the servo object
 64  myservo.write(90);        // set initial angle
 65  manageStatus();           // Set initial lcd display
 66} // end of void setup()
 67
 68void loop() {
 69  manageKeypad();           // Manage keypad inputs
 70  manageStatus();           // Respond according to keypad key presses
 71  if (isAlarmed) {          // If alarm is triggered
 72    doAlarm();              // Make an alarm notification
 73  }
 74} // end of void loop()
 75
 76void doAlarm() {
 77  tone(BUZ_PIN, 1000);        // Send 1KHz sound signal...
 78  digitalWrite(RED_LED, HIGH);
 79  digitalWrite(BLU_LED, LOW);
 80  delay(150);
 81  digitalWrite(RED_LED, LOW);
 82  digitalWrite(BLU_LED, HIGH);
 83  noTone(BUZ_PIN);
 84  delay(50);
 85} // end of void doAlarm()
 86
 87void manageStatus() {
 88  if ( currStatus != prevStatus ) {   // check if the status is different from previous
 89                                      // this is to avoid unnecessary lcd updating same display
 90    switch(currStatus) {
 91      case 0:                         // default screen
 92        lcd.clear();
 93        lcd.setCursor(0,0);
 94        lcd.print("    Welcome     ");
 95        lcd.setCursor(0,1);
 96        lcd.print(" Enter password ");
 97        digitalWrite(RED_LED, HIGH);
 98        digitalWrite(BLU_LED, LOW);
 99        prevStatus = currStatus;
100        currStatus = 0;
101        break;
102      case 1:                         // invalid entry
103        lcd.clear();
104        lcd.print(" Invalid entry  ");
105        delay(1000);
106        prevStatus = currStatus;
107        currStatus = 0;
108        break;
109      case 2:                         // valid entry
110        digitalWrite(BLU_LED, HIGH);
111        delay(100);
112        digitalWrite(BLU_LED, LOW);
113        prevStatus = currStatus;
114        currStatus = 0;
115        break;
116      case 3:                         // entry verified
117        lcd.clear();
118        lcd.print(" Entry verified ");
119        digitalWrite(BLU_LED, HIGH);
120        delay(1000);
121        prevStatus = currStatus;
122        currStatus = 4;
123        break;
124      case 4:                         // notification for opening door
125        lcd.clear();
126        lcd.print(" Opening lock ");
127        isAlarmed = false;
128        tone(BUZ_PIN, 1000); // Send 1KHz sound signal...
129        delay(2000);
130        noTone(BUZ_PIN);
131        for (int pos = 90; pos >= 0; pos--) {
132          myservo.write(pos);
133          delay(10);
134        }
135        prevStatus = currStatus;
136        currStatus = 5;
137        break;
138      case 5:                         // unlocking the door lock
139        lcd.clear();
140        lcd.print(" Door open ");
141        digitalWrite(RED_LED, LOW);
142        delay(5000);
143        prevStatus = currStatus;
144        currStatus = 6;
145        break;
146      case 6:                         // warning, door will close
147        lcd.clear();
148        lcd.print(" Door closing ");
149        for (int i=0; i < 20; i++) {
150          tone(BUZ_PIN, 1000);
151          delay(150);
152          noTone(BUZ_PIN);
153          delay(50);
154        }
155        prevStatus = currStatus;
156        currStatus = 7;
157        break;
158      case 7:                         // locking the door lock
159        digitalWrite(RED_LED, HIGH);
160        digitalWrite(BLU_LED, LOW);
161        for (int pos = 0; pos <= 90; pos++) {
162          myservo.write(pos);
163          delay(10);
164        }
165        lcd.clear();
166        lcd.print(" Door Close ");
167        delay(2000);
168        prevStatus = currStatus;
169        currStatus = 9;
170        break;
171      case 8:                         // Continues alarm
172        lcd.clear();
173        lcd.setCursor(0,0);
174        lcd.print("    Alarmed     ");
175        lcd.setCursor(0,1);
176        lcd.print("Enter admin pass");
177        prevStatus = currStatus;
178        break;
179      case 9:                         // Promotional message :)
180        lcd.clear();
181        lcd.print("  TechToTinker  ");
182        lcd.setCursor(0,1);
183        lcd.print(" - Project Ideas");
184        delay(3000);
185        currStatus = 0;
186      default:
187        break;
188    }
189  }
190} // end of void manageStatus
191
192void manageKeypad() {
193  char key = keypad.getKey();         // Get the key press
194
195  if (key){
196    if (!isAlarmed) {                 // Currently in no alarm status
197      if (key == password[keyPos]) {  // user password entered is still correct
198        currStatus = 2;               // valid entry
199        keyPos = keyPos + 1;          // increment the password key position
200      } else {                        // user password entered is incorrect
201        keyPos = 0;                   // reset key position, [possibility to change this to increase security
202                                      // like press something (i.e * or #) to reset counter
203        currStatus = 1;               // invalid entry
204        invalid_cnt = invalid_cnt + 1;// increment invalid counter
205        if (invalid_cnt == 3) {       // if 3 times invalid entry, set an alarm
206          currStatus = 8;             // alarmed
207          isAlarmed = true;
208        }
209      }
210      if (keyPos == 4) {              // user password entered is correct
211        keyPos = 0;                   // reset password key position
212        currStatus = 3;               // entry verified
213      }
214    } else {                          // Currently in alarmed status
215      // currently alarming, enter admin password to disable alarm
216      if (key == admnpass[keyPos]) {  // admin password entry is still correct
217        invalid_cnt = 0;              // reset invalid counter
218        keyPos = keyPos + 1;          // increment the password key position
219      } else {                        // admin password entered is incorrect
220        keyPos = 0;                   // reset key position, [possibility to change this to increase security
221                                      // like press something (i.e * or #) to reset counter
222        invalid_cnt = invalid_cnt + 1;// increment invalid counter
223      }
224      if (keyPos == 4) {              // admin password entered is correct
225        keyPos = 0;                   // reset password key position
226        currStatus = 0;               // reset the current status
227        isAlarmed = false;            // disabled current alarm
228      }
229    }
230  }
231} // end of void manageKeypad
cpp
Posts in this series
- How to Get Started with ATTiny85 in Arduino IDE
- Tutorial: How to use MFRC522 RFID module using Arduino
- SOS Flasher Using Millis Function with Enable Switch
- Tutorial: How to use DS3231 RTC in Arduino
- Tutorial: How to use 0.96 OLED - a small and cute display
- Tutorial: Getting Started with the NRF24L01 | How to use | Arduino
- Tutorial: How to use SIM800L GSM Module for Controlling Anything | Arduino
- Tutorial: How to use Keypad | Text Entry Mode | Arduino
- Tutorial: How to use 4x4 Keypad | Arduino
- Project Idea: Arduino Voltmeter
- Multitasking with Arduino | Relay Timer Controller | using millis
- Tutorial Understanding Blink Without Delay | How to millis
- Arduino Simple LCD Menu
- How to use SIM800L GSM Module using Arduino | Make or Answer Voice Calls
- Tutorial: How to Use Arduino Uno as HID | Part 2: Arduino Mouse Emulation
- Tutorial: How to Use Arduino Uno as HID | Part 1: Arduino Keyboard Emulation
- Tutorial: How to use SIM800L DTMF to Control Anything | Arduino
- Tutorial: Arduino EEPROM
- How to use SIM800L GSM Module | Arduino | Send and Receive SMS
- 16x2 LCD Menu for Arduino
- Tutorial: Arduino GPIO | How to use Arduino Pins
- MIT App Inventor for Arduino
- RC Car using L298N, HC-06, and Arduino Uno
- How to Use LCD Keypad Shield for Arduino
- How to Use Arduino Interrupts
- Project: Automatic Alcohol Dispenser
- TUTORIAL: How to use HC-SR04 Ultrasonic Sensor with Arduino
- Source Code: Astronomia Meme and Funeral Dance | melodies the Arduino way
- How to Get Started with L293D Motor Driver Shield with Arduino
- How to Get Started with L298N Motor Driver module using Arduino
- Part 2: Wav Music Player with Lyrics Using Arduino and SD Card
- Interfacing Infrared to Arduino Uno
- Part 1: Wav Music Player Using Arduino Uno and SD Card
- How to Interface Stepper Motor to Arduino Uno
- How To Play MP3 Files on Arduino from SD Card
- What is Arduino Software Serial
- How to Interface SD card to Arduino (without SD card shield)?
- Playing Melodies Using Arduino
- 8 Degrees Of Freedom (DOF) Robot Using Arduino Uno
- How to Interface PS2 Controller to Arduino Uno
- Part 3: DF Player Mini Tinkering with Arduino Nano and LCD
- How to Interface HC-06 to Arduino
- How to make a Remote Control RC car using Arduino and HC-06 bluetooth module
- Part 2: DF Player Mini Tinkering with Arduino Nano
- Part 1: DF Player Mini - a mini cheap mp3 player
No comments yet!