How to Get Started with L293D Motor Driver Shield with Arduino
Introduction
I have here an L293D Motor Driver Shield V1. It has 2 pieces L293D dual H-bridge motor driver IC to be able to provide control to a total of 4 DC motor. It also comes with 74HC595 shift registers to minimized the use of pins.
Pin Assignment
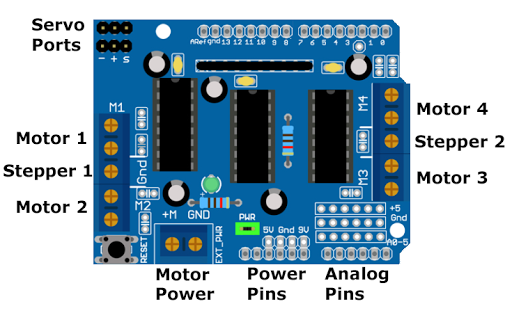
DC Motors:
Motor 1: digital pin 11
Motor 2: digital pin 3
Motor 3: digital pin 5
Motor 4: digital pin 6
Servo Motors:
Servo 1: digital pin 9
Servo 2: digital pin 10
Shift registers:
Digital pins 4, 7, 8, and 12
Hardware Serial:
Digital pins 0 and 1
Not Connected:
Digital pins 2 and 13
Analog A0 to A5
How to use L293D Motor Driver Shield:
It can run up to 4 DC Motors in bidirectional turns
Use terminal block M1 for motor 1
Use terminal block M2 for motor 2
Use terminal block M3 for motor 3
Use terminal block M4 for motor 4
It can run 2 stepper motors (unipolar and bipolar)
Use terminal block M1 and M2 for stepper 1
Use terminal block M3 and M4 for stepper 2
It can run 2 servo motors using the 3-pin male headers.
How to supply power to the shield:
-
Single power supply for both Arduino and motors:
Coonect AC-to-DC power adapter to Arduino DC barrel jack
Connect external DC power supply to the EXT_PWR terminal block
This setup take advantage of the onboard voltage regulator found in the Arduino Uno board.
Make sure that the PWR jumper pin is in place -
Separate power supply for Arduino and for motors:
Power the Arduino through the USB or through the DC barrel connector
Power the motors through the EXT_PWR terminal block
Make sure that the PWR jumper pins is removed. You might damaged your Arduino if you accidentally forget this step.
Others:
Onboard pull down resistor array to keep the motors switch OFF during power up
Onboard power LED indicator.
Onboard reset switch button
Video Demonstration
Source Code
 1
 2// Adafruit Motor shield library
 3// copyright Adafruit Industries LLC, 2009
 4// this code is public domain, enjoy!
 5
 6#include "AFMotor.h"
 7
 8AF_DCMotor motor(1);
 9
10void setup() {
11  Serial.begin(9600);           // set up Serial library at 9600 bps
12  Serial.println("Motor test!");
13
14  // turn on motor
15  motor.setSpeed(200);
16  motor.run(RELEASE);
17}
18
19void loop() {
20  uint8_t i;
21  Serial.print("tick");
22  motor.run(FORWARD);
23  for (i = 0; i < 255; i++) {
24    motor.setSpeed(i);
25    delay(10);
26 }
27  for (i = 255; i != 0; i--) {
28    motor.setSpeed(i);
29    delay(10);
30 }
31
32  Serial.print("tock");
33  motor.run(BACKWARD);
34  for (i = 0; i < 255; i++) {
35    motor.setSpeed(i);
36    delay(10);
37 }
38
39  for (i = 255; i != 0; i--) {
40    motor.setSpeed(i);
41    delay(10);
42 }
43  Serial.print("tech");
44  motor.run(RELEASE);
45  delay(1000);
46}
Call To Action
That’s all for now. If you have any questions or clarifications, please write it in the comments section.
Thank you and have a good day.
Posts in this series
- How to Get Started with ATTiny85 in Arduino IDE
- Tutorial: How to use MFRC522 RFID module using Arduino
- SOS Flasher Using Millis Function with Enable Switch
- Tutorial: How to use DS3231 RTC in Arduino
- Tutorial: How to use 0.96 OLED - a small and cute display
- Tutorial: Getting Started with the NRF24L01 | How to use | Arduino
- Tutorial: How to use SIM800L GSM Module for Controlling Anything | Arduino
- Tutorial: How to use Keypad | Text Entry Mode | Arduino
- Tutorial: How to use 4x4 Keypad | Arduino
- Project Idea: Arduino Voltmeter
- Project Idea: Door Lock Security | Arduino
- Multitasking with Arduino | Relay Timer Controller | using millis
- Tutorial Understanding Blink Without Delay | How to millis
- Arduino Simple LCD Menu
- How to use SIM800L GSM Module using Arduino | Make or Answer Voice Calls
- Tutorial: How to Use Arduino Uno as HID | Part 2: Arduino Mouse Emulation
- Tutorial: How to Use Arduino Uno as HID | Part 1: Arduino Keyboard Emulation
- Tutorial: How to use SIM800L DTMF to Control Anything | Arduino
- Tutorial: Arduino EEPROM
- How to use SIM800L GSM Module | Arduino | Send and Receive SMS
- 16x2 LCD Menu for Arduino
- Tutorial: Arduino GPIO | How to use Arduino Pins
- MIT App Inventor for Arduino
- RC Car using L298N, HC-06, and Arduino Uno
- How to Use LCD Keypad Shield for Arduino
- How to Use Arduino Interrupts
- Project: Automatic Alcohol Dispenser
- TUTORIAL: How to use HC-SR04 Ultrasonic Sensor with Arduino
- Source Code: Astronomia Meme and Funeral Dance | melodies the Arduino way
- How to Get Started with L298N Motor Driver module using Arduino
- Part 2: Wav Music Player with Lyrics Using Arduino and SD Card
- Interfacing Infrared to Arduino Uno
- Part 1: Wav Music Player Using Arduino Uno and SD Card
- How to Interface Stepper Motor to Arduino Uno
- How To Play MP3 Files on Arduino from SD Card
- What is Arduino Software Serial
- How to Interface SD card to Arduino (without SD card shield)?
- Playing Melodies Using Arduino
- 8 Degrees Of Freedom (DOF) Robot Using Arduino Uno
- How to Interface PS2 Controller to Arduino Uno
- Part 3: DF Player Mini Tinkering with Arduino Nano and LCD
- How to Interface HC-06 to Arduino
- How to make a Remote Control RC car using Arduino and HC-06 bluetooth module
- Part 2: DF Player Mini Tinkering with Arduino Nano
- Part 1: DF Player Mini - a mini cheap mp3 player
No comments yet!