How To Play MP3 Files on Arduino from SD Card
Introduction
After successfully accessing the SD Card with Arduino Uno the crude way (by soldering directly to SD card pins), I thought of making an mp3 player. As a caveat, this design is not recommended for a daily mp3 player but it does play and I am happy with it. So let’s prepare the following materials:
Bill Of Materials
- Arduino Uno (or any microcontroller you are comfortable with).
- SD card loaded with mp3 file.
- A speaker (optional audio amplifier).
- 3 pieces tactile switch for player control.
- Breadboard.
- Some jumper wires.
- Source code provided below.
So let us begin by:
Hardware Instruction
- First, make the necessary soldering of jumper wires to the SD card. Please refer to the schematic below. You may also break out the SD card cover to expose its internal parts. This is to make soldering easier. I suggest to make the connection from inside so that you may still connect the SD card to a computer for transferring of files (please refer to what I did).
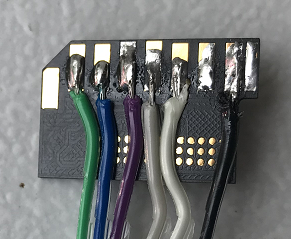
Please take note of the following:
- SD card pin 1 (C/S pin) is connected with (green) wire to Arduino Uno pin 10.
- SD card pin 2 (MOSI pin) is connected with (blue) wire to Arduino Uno pin 11.
- SD card pin 3 and pin 6 (VSS pin) is connected with (violet) wire to Arduino Uno GND pin.
- SD card pin 4 (VDD pin) is connected with (dark gray) wire to Arduino Uno +3.3V pin (but I believe you can also use 5V, but Im not sure with regards to this).
- SD card pin 5 (SCK pin) is connected with (light gray) wire to Arduino Uno pin 13.
- SD card pin 7 (MISO pin) is connected with (black) wire to Arduino Uno pin 12.
- Connect the speaker to Arduino Uno as follows:
- Speaker (+) pin to Arduino Uno pin 9.
- Speaker (-) pin to Arduino Uno GND pin.
- Connect the Arduino Uno to a computer.
- Run the Arduino IDE.
- Make sure “Arduino Uno” is selected under Tools > Board.
- Check that the correct serial port is selected under Tools > Port.
- Upload the following sketch. After successfully uploading the sketch to our microcontroller, it should function as follows:
- Pressing the first button should play the previous mp3 file.
- Pressing the middle button should play / pause the currently playing mp3 file.
- Pressing the third button should play the next mp3 file.
- Long pressing the first button should decrease the volume.
- Long pressing the third button should increase the volume.
- Lastly, feel free to modify the source code for learning and fun.
Video Demonstration:
insert video here
Source Code
 1#include "SD.h"
 2#include "TMRpcm.h"
 3#include "SPI.h"
 4
 5#define SD_ChipSelectPin 10
 6#define spkrPin 9
 7
 8TMRpcm tmrpcm;
 9
10void setup() {
11  tmrpcm.speakerPin = spkrPin;
12  SD.begin(SD_ChipSelectPin);
13  tmrpcm.setVolume(6);
14  tmrpcm.play("CannotBe.wav");
15  delay(3000);
16}
17
18void loop() {
19  tmrpcm.play("AyeSir.wav");
20  delay(3000);
21}
cpp
Call To Action
If you find this lesson helpful, please consider supporting my Youtube channel: tech-to-tinker. You may also leave your comments and suggestions in the comment box below.
Thank you and have a good day.
Happy tinkering!
Posts in this series
- How to Get Started with ATTiny85 in Arduino IDE
- Tutorial: How to use MFRC522 RFID module using Arduino
- SOS Flasher Using Millis Function with Enable Switch
- Tutorial: How to use DS3231 RTC in Arduino
- Tutorial: How to use 0.96 OLED - a small and cute display
- Tutorial: Getting Started with the NRF24L01 | How to use | Arduino
- Tutorial: How to use SIM800L GSM Module for Controlling Anything | Arduino
- Tutorial: How to use Keypad | Text Entry Mode | Arduino
- Tutorial: How to use 4x4 Keypad | Arduino
- Project Idea: Arduino Voltmeter
- Project Idea: Door Lock Security | Arduino
- Multitasking with Arduino | Relay Timer Controller | using millis
- Tutorial Understanding Blink Without Delay | How to millis
- Arduino Simple LCD Menu
- How to use SIM800L GSM Module using Arduino | Make or Answer Voice Calls
- Tutorial: How to Use Arduino Uno as HID | Part 2: Arduino Mouse Emulation
- Tutorial: How to Use Arduino Uno as HID | Part 1: Arduino Keyboard Emulation
- Tutorial: How to use SIM800L DTMF to Control Anything | Arduino
- Tutorial: Arduino EEPROM
- How to use SIM800L GSM Module | Arduino | Send and Receive SMS
- 16x2 LCD Menu for Arduino
- Tutorial: Arduino GPIO | How to use Arduino Pins
- MIT App Inventor for Arduino
- RC Car using L298N, HC-06, and Arduino Uno
- How to Use LCD Keypad Shield for Arduino
- How to Use Arduino Interrupts
- Project: Automatic Alcohol Dispenser
- TUTORIAL: How to use HC-SR04 Ultrasonic Sensor with Arduino
- Source Code: Astronomia Meme and Funeral Dance | melodies the Arduino way
- How to Get Started with L293D Motor Driver Shield with Arduino
- How to Get Started with L298N Motor Driver module using Arduino
- Part 2: Wav Music Player with Lyrics Using Arduino and SD Card
- Interfacing Infrared to Arduino Uno
- Part 1: Wav Music Player Using Arduino Uno and SD Card
- How to Interface Stepper Motor to Arduino Uno
- What is Arduino Software Serial
- How to Interface SD card to Arduino (without SD card shield)?
- Playing Melodies Using Arduino
- 8 Degrees Of Freedom (DOF) Robot Using Arduino Uno
- How to Interface PS2 Controller to Arduino Uno
- Part 3: DF Player Mini Tinkering with Arduino Nano and LCD
- How to Interface HC-06 to Arduino
- How to make a Remote Control RC car using Arduino and HC-06 bluetooth module
- Part 2: DF Player Mini Tinkering with Arduino Nano
- Part 1: DF Player Mini - a mini cheap mp3 player
No comments yet!