Tutorial: How to Use Arduino Uno as HID | Part 2: Arduino Mouse Emulation
In this tutorial, we will explore the mouse emulation in Arduino Uno. This should be the part 2 in using the Arduino Uno as Human Interface Device.
You may also want to visit the part 1 here:
Tutorial: How to use Arduino Uno as HID | Arduino Keyboard Emulation
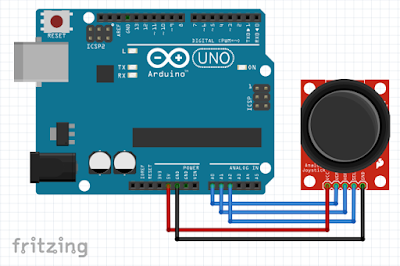
Circuit Diagram:
Video Demonstration:
Firmware Links:
Arduino Mouse firmware
Arduino Original firmware
Source Code:
/* Arduino USB Mouse HID demo */

/* Author: Darran Hunt
 * Release into the public domain.
 *
 * Modified: George Bantique
 *           TechToTinker
 */

//#define ORIGINAL_CODE   // to display the original code
#define MODIFIED_CODE   // to display the modified code
//#define SERIAL_DEBUG    // to overwrite the mouse hid character with printable character

struct {
    uint8_t buttons;
    int8_t x;
    int8_t y;
    int8_t wheel;   /* Not yet implemented */
} mouseReport;

uint8_t nullReport[4] = { 0, 0, 0, 0 };

void setup();
void loop();


#ifdef MODIFIED_CODE

#define ONBOARD_LED 13
#define SR_PIN  A2
#define XR_PIN  A1
#define YR_PIN  A0

int xr_rest, yr_rest;

void setup()
{
    Serial.begin(9600);

    pinMode(ONBOARD_LED, OUTPUT);
    pinMode(SR_PIN, INPUT_PULLUP);
    pinMode(XR_PIN, INPUT);
    pinMode(YR_PIN, INPUT);

    mouseReport.buttons = 0;
    mouseReport.x = 0;
    mouseReport.y = 0;
    mouseReport.wheel = 0;

    // save the rest value
    xr_rest = analogRead(XR_PIN);
    yr_rest = analogRead(YR_PIN);
}

void loop()
{
    uint8_t s_temp;
    int x_temp, y_temp, ind;

    if (digitalRead(SR_PIN)) {
      s_temp = 0;
    } else {
      s_temp = 1;
    }

    int xr_val = analogRead(XR_PIN);
    int yr_val = analogRead(YR_PIN);

    if (xr_val == xr_rest) {
      // joystick is not move
      x_temp = 0;
    } else if (xr_val < xr_rest) {
      // joystick to the left
      x_temp = - map(xr_val, 0, xr_rest, 10, 0);
    } else {
      // joystick to the right
      x_temp = map(xr_val, xr_rest, 1023, 0, 10);
    }

    if (yr_val == yr_rest) {
      // joystick is not move
      y_temp = 0;
    } else if (yr_val < yr_rest) {
      // joystick to the left
      y_temp = - map(yr_val, 0,yr_rest, 10, 0);
    } else {
      // joystick to the right
      y_temp = map(yr_val, yr_rest,1023, 0, 10);
    }

#ifdef SERIAL_DEBUG
    Serial.print("X: ");
    Serial.println(x_temp);
    Serial.print("Y: ");
    Serial.println(y_temp);
#endif // SERIAL_DEBUG

    mouseReport.buttons = s_temp;
    mouseReport.x = x_temp;
    mouseReport.y = y_temp;
    mouseReport.wheel = 0;

    for (int ind = 0; ind < 20; ind++) {
      Serial.write((uint8_t *)&mouseReport, 4);
      Serial.write((uint8_t *)&nullReport, 4);
    }

}
#endif // MODIFIED_CODE


#ifdef ORIGINAL_CODE
void setup()
{
    Serial.begin(9600);
    delay(200);
}

/* Move the mouse in a clockwise square every 5 seconds */
void loop()
{
    int ind;
    delay(1000);

    mouseReport.buttons = 0;
    mouseReport.x = 0;
    mouseReport.y = 0;
    mouseReport.wheel = 0;

    // Going left
    mouseReport.x = -2;
    for (ind = 0; ind < 20; ind++) {
    Serial.write((uint8_t *) &mouseReport, 4);
    Serial.write((uint8_t *) &nullReport, 4);
    }

    // Going up
    mouseReport.x = 0;
    mouseReport.y = -2;
    for (ind = 0; ind < 20; ind++) {
    Serial.write((uint8_t *)&mouseReport, 4);
    Serial.write((uint8_t *)&nullReport, 4);
    }

    // Going right
    mouseReport.x = 2;
    mouseReport.y = 0;
    for (ind = 0; ind < 20; ind++) {
    Serial.write((uint8_t *)&mouseReport, 4);
    Serial.write((uint8_t *)&nullReport, 4);
    }

    // Going down
    mouseReport.x = 0;
    mouseReport.y = 2;
    for (ind = 0; ind < 20; ind++) {
    Serial.write((uint8_t *)&mouseReport, 4);
    Serial.write((uint8_t *)&nullReport, 4);
    }
}
#endif // ORIGINAL_CODE
If you found this tutorial, please help me spread this tutorial to as many as possible so that it could help and inspire others.
Please don’t forget to Subscribe to TechToTinker Youtube channel:
Click this to SUBSCRIBE
Thank you and have a good day.


Awesome thank you!
how to use push buttons for this plz code
How to after the keyboard setup , the Arduino re-use (com port not showing)