Tutorial: How to use DS3231 RTC in Arduino
In this tutorial, we will learn how to use the DS3231 Real Time Clock (RTC) module.
Hardware Requirements:
1. DS3231 RTC module with coin cell battery inserted.
2. Arduino Uno board, or any Arduino compatible boards.
3. 0.96 OLED display.
4. A breadboard and jumper wires for connecting the circuits.
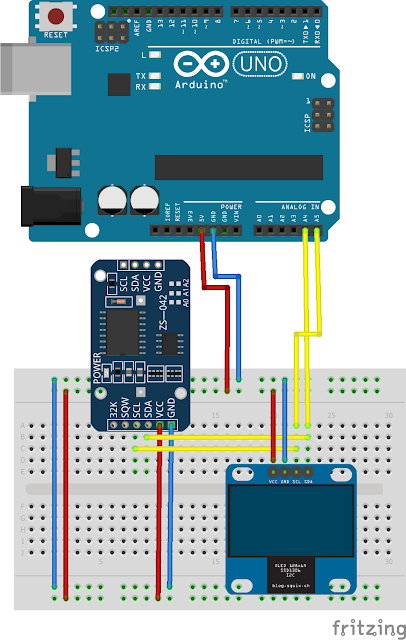
Circuit Diagram:
Instruction:
1. Connect the DS3231 VCC pin to Arduino Uno 5V pin.
2. Connect the DS3231 GND pin to Arduino Uno GND pin.
3. Connect the DS3231 SDA pin to Arduino Uno A4 pin.
4. Connect the DS3231 SCL pin to Arduino Uno A5 pin.
5. Connect the OLED VCC pin to Arduino Uno 5V pin.
6. Connect the OLED GND pin to Arduino Uno GND pin.
7. Connect the OLED SDA pin to Arduino Uno A4 pin.
8. Connect the OLED SCL pin to Arduino Uno A5 pin.
9. Copy and paste the source code below to Arduino IDE.
10. Upload the sketch to the Arduino board.
11. Please feel free the example source code and enjoy tinkering.
Video Demonstration:
If you have any question regarding this tutorial, please do not hesitate to write it in the comment box.
If you enjoy this tutorial, please consider supporting me by Subscribing. Click this to Subscribe.
Thank you and stay safe always.
Source Code:
#include "Adafruit_GFX.h"
#include "Adafruit_SSD1306.h"
#include "RTClib.h"

RTC_DS3231 rtc;
char daysOfTheWeek[7][4] = {"SUN", "MONDAY", "TUESDAY", "WEDNESDAY", "THURSDAY", "FRIDAY", "SATURDAY"};

// OLED display size in pixels
#define SCREEN_WIDTH 128
#define SCREEN_HEIGHT 64

#define OLED_RESET -1
Adafruit_SSD1306 oled(SCREEN_WIDTH, SCREEN_HEIGHT, &Wire, OLED_RESET);
DateTime now;

void setup() {
  Serial.begin(9600);
  delay(3000); // wait for console opening

  initializeRTC();
  initializeOLED();

}

void loop() {
  now = rtc.now();

  displayDay();
  displayDate();
  displayTime();
  displayTemperature();
}

void initializeRTC() {
  if (! rtc.begin()) {
    Serial.println("Couldn't find RTC");
    while (1);
  }

  if (rtc.lostPower()) {
    Serial.println("RTC lost power, lets set the time!");
    // following line sets the RTC to the date & time this sketch was compiled
    rtc.adjust(DateTime(F(__DATE__), F(__TIME__)));
    // This line sets the RTC with an explicit date & time, for example to set
    // January 21, 2014 at 3am you would call:
    // rtc.adjust(DateTime(2014, 1, 21, 3, 0, 0));
  }
}

void initializeOLED() {
  oled.begin(SSD1306_SWITCHCAPVCC, 0x3C);
  oled.clearDisplay();
  oled.display();
  oled.setTextColor(WHITE, BLACK);
  oled.setTextSize(1);

  oled.setCursor(117,55);
  // Enable the Code Page 437
  // https://en.wikipedia.org/wiki/Code_page_437
  oled.cp437(true);
  // Then print the chosen characters
  // which in this case is the degrees symbol
  // https://www.ascii-codes.com/
  oled.write(248);

  oled.setCursor(0,55);
  oled.print("TEMPERATURE =");
  oled.setCursor(122,55);
  oled.print("C");
}

void displayDay() {
  oled.setTextSize(1);
  oled.setCursor(5,15);
  oled.print(daysOfTheWeek[now.dayOfTheWeek()]);
}

void displayDate() {
  char currentDate [16];
  uint8_t thisDay, thisMonth ;
  thisDay = now.day();
  thisMonth = now.month();
  sprintf (currentDate, "%02d/%02d/", thisDay, thisMonth); //add leading zeros to the day and month

  oled.setTextSize(1);
  oled.setCursor(62,15);
  oled.print(currentDate);

  oled.setTextSize(1);
  oled.setCursor(102,15);
  oled.print(now.year(), DEC);
}

void displayTime() {
  char buffer [16];
  char AmPm[3];
  uint8_t thisSec, thisMin, thisHour;
  thisSec = now.second();
  thisMin = now.minute();
  thisHour = now.hour();

  if (thisHour > 12) {
    thisHour = thisHour - 12;
    strcpy(AmPm,"PM");
  } else strcpy(AmPm,"AM");

  sprintf (buffer, "%02d:%02d:%02d", thisHour, thisMin, thisSec);

  oled.setTextSize(2);
  oled.setCursor(6,32);
  oled.print(buffer);

  oled.setTextSize(1);
  oled.setCursor(110,32);
  oled.print(AmPm);
}

void displayTemperature() {
  oled.setTextSize(1);
  oled.setCursor(82,55);
  oled.print(rtc.getTemperature());
  oled.display();
}
