Tutorial: How to use 4x4 Keypad | Arduino
Table of Contents
Keypad is commonly use in devices like ATM machine, microwave oven, safety vault, security door lock, and many more.
In this tutorial we will focus on the most popular to electronics enthusiasts and tinkerers which is a 4x4 matrix keypad. We will discuss how it works and at the last we will provide an example Arduino sketch so you may be able to tinker with it and use it to your project.
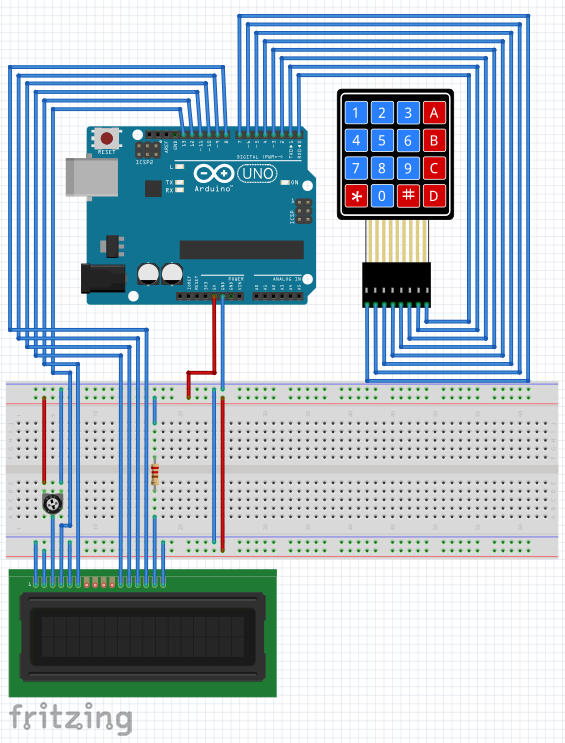
CIRCUIT DIAGRAM
BILL OF MATERIALS
- Arduino Uno or any compatible Arduino microcontroller board.
- 16x2 LCD for the LCD.
- 4x4 or 3x4 Keypad
- Breadboard, jumper wires, resistor, potentiometer, etc.
HARDWARE INSTRUCTION
- Connect the LCD pin 1 VSS to the Arduino GND
- Connect the LCD pin 2 VDD to the Arduino 5V
- Connect the potentiometer pin 1 and pin 3 to Arduino 5V and GND respectively, and the potentiometer center pin 2 to LCD pin 3 VEE/Vo
- Connect the LCD pin 4 RS to the Arduino digital pin 13
- Connect the LCD pin 5 RW to the Arduino GND because we only need to write to the LCD (no reading required)
- Connect the LCD pin 6 En to the Arduino digital pin 12
- Leave the LCD pin 7 D0 to pin 10 D3 not connected because we will use 4-bit mode of the LCD.
- Connect the LCD pin 11 D4 to the Arduino digital pin 11
- Connect the LCD pin 12 D5 to the Arduino digital pin 10
- Connect the LCD pin 13 D6 to the Arduino digital pin 9
- Connect the LCD pin 14 D7 to the Arduino digital pin 8
- Connect the LCD pin 15 Anode to the Arduino 5V via current limiting resistor (220 ohms).
- Connect the LCD pin 16 Cathode to the Arduino GND
- Connect the keypad Row1 (left-most) to the Arduino Uno digital pin D7.
- Connect the keypad Row2 to the Arduino Uno digital pin D6.
- Connect the keypad Row3 to the Arduino Uno digital pin D5.
- Connect the keypad Row4 to the Arduino Uno digital pin D4.
- Connect the keypad Column1 to the Arduino Uno digital pin D3.
- Connect the keypad Column2 to the Arduino Uno digital pin D2.
- Connect the keypad Column3 to the Arduino Uno digital pin D1.
- Connect the keypad Column4 (right-most) to the Arduino Uno digital pin D0.
- Upload the provided sketch making sure that the correct board and serial comm port is selected under the Tools menu of Arduino IDE.
- If it works, modify and experiment with it, and enjoy learning.
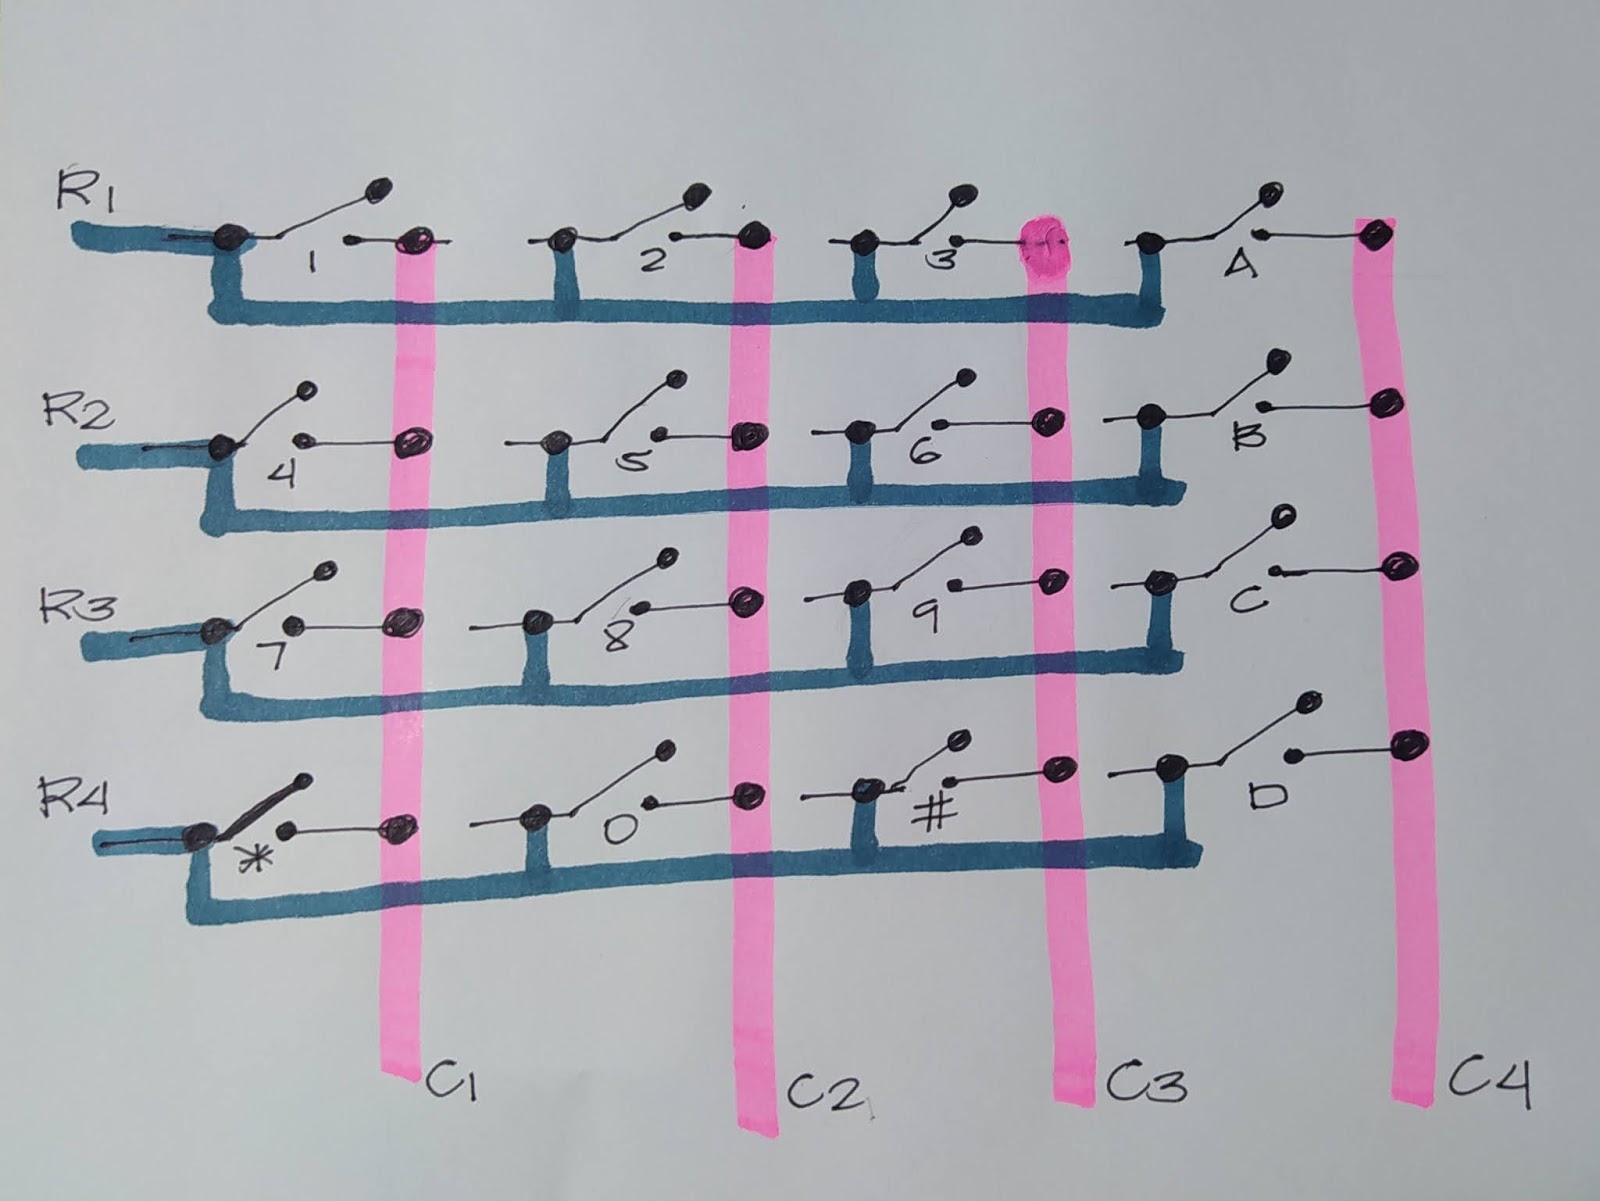
4x4 Keypad Illustration:
VIDEO DEMONSTRATION
CALL TO ACTION
I hope you find this tutorial as helpful. Please consider supporting me in Youtube by Subscribing.
Thank you and have a good day.
SOURCE CODE
1. 4x4 Keypad using no library for keypad
/*
 * 4x4 Keypad to Arduino Uno with LCD display
 * Author: George Bantique, TechToTinker (July 28, 2020)
 *
 *  - In this tutorial, we need the following:
 *    1. Arduino Uno or any compatible Arduino board
 *    2. 16x2 LCD for the display
 *    3. 4x4 keypad module
 *
 */

#include "LiquidCrystal.h"
LiquidCrystal lcd(13, 12, 11, 10, 9, 8);

#define ROW   4   // we have 4 rows
#define COL   4   // by 4 columns of keys
char keys[ROW][COL] =
{
  {'1', '2', '3', 'A'},
  {'4', '5', '6', 'B'},
  {'7', '8', '9', 'C'},
  {'*', '0', '#', 'D'}
};
uint8_t row_line[ROW] = {7, 6, 5, 4};
uint8_t col_line[COL] = {3, 2, 1, 0};
char keyPressed = ' ';

void setup() {

  // initialized the LCD as 16x2
  lcd.begin(16, 2);

  // set the row lines as output then
  // initialized all the line as HIGH
  for (int r = 0; r < ROW; r++) {
    pinMode(row_line[r], OUTPUT);
    digitalWrite(row_line[r], HIGH);
  }

  // set the column lines as input,
  // use INPUT_PULLUP to avoid additional hardware
  // by taking advantage of the internal pullup resistors
  for (int c = 0; c < COL; c++) {
    pinMode(col_line[c], INPUT_PULLUP);
  }
}

void loop() {
  // Process the key press here
  keyPressed = getKey();
  lcd.setCursor(0,0);                   // if the key is press
  lcd.print(keyPressed);                // display it to the LCD

  // Do other stuff
}

char getKey() {
  char key_temp = keyPressed;

  // scan the keypad
  for (int r = 0; r < ROW; r++) {             // for traversing the row lines
    digitalWrite(row_line[r], LOW);           // enable the specific row line (one by one)
    for (int c = 0; c < COL; c++) {           // for traversing the column lines
      if (digitalRead(col_line[c]) == LOW) {  // check if the specific column is press (one by one)
         key_temp = keys[r][c];               // store it to key_temp
      }                                       // if no key is press, check next column
    }
    digitalWrite(row_line[r], HIGH);          // disable the specific row line, then next row lines
  }

  return key_temp;
}
2. 4x4 Keypad using Keypad library
#include "Keypad.h"
#include "LiquidCrystal.h"
LiquidCrystal lcd(13, 12, 11, 10, 9, 8);

#define ROW   4
#define COL   4
char key[ROW][COL] =
{
  {'1', '2', '3', 'A'},
  {'4', '5', '6', 'B'},
  {'7', '8', '9', 'C'},
  {'*', '0', '#', 'D'}
};
uint8_t row_line[ROW] = {7, 6, 5, 4};
uint8_t col_line[COL] = {3, 2, 1, 0};
Keypad keypad = Keypad( makeKeymap(key), row_line, col_line, ROW, COL );

void setup() {
  lcd.begin(16, 2); // initialized the LCD as 16x2
}

void loop() {
  char keypress = keypad.getKey();
  if (keypress){
    lcd.clear();
    lcd.print(keypress);
  }
}
3. 4x4 Keypad for password entry
#include
#include
LiquidCrystal lcd(13, 12, 11, 10, 9, 8);

#define ROW   4
#define COL   4
char key[ROW][COL] =
{
  {'1', '2', '3', 'A'},
  {'4', '5', '6', 'B'},
  {'7', '8', '9', 'C'},
  {'*', '0', '#', 'D'}
};
uint8_t row_line[ROW] = {7, 6, 5, 4};
uint8_t col_line[COL] = {3, 2, 1, 0};
Keypad keypad = Keypad( makeKeymap(key), row_line, col_line, ROW, COL );
const String password = "1234"; // change your password here
String input_password;

void setup() {

  lcd.begin(16, 2); // initialized the LCD as 16x2
  lcd.setCursor(0,0);
  lcd.print("-Enter password-");
  lcd.setCursor(0,1);
  lcd.print("Password: ");
}

void loop() {
  char key = keypad.getKey();

  if (key){

    if(key == '*') {
      input_password = ""; // reset imput password
      lcd.clear();
      lcd.print("Enter password");
      lcd.setCursor(0,1);
      lcd.print("Password: ");
    } else if(key == '#') {
      if(password == input_password) {
        lcd.clear();
        lcd.print("Granted, welcome");
        // DO YOUR WORK HERE

      } else {
        lcd.clear();
        lcd.print("Access denied");
      }

      input_password = ""; // reset imput password
    } else {
      input_password += key; // append new character to input password string
      lcd.setCursor(10, 1);
      lcd.print(input_password);
    }
  }
}
4. 4x4 Keypad for password entry (password replaced with *)
#include "Keypad.h"
#include "LiquidCrystal.h"
LiquidCrystal lcd(13, 12, 11, 10, 9, 8);

#define ROW   4
#define COL   4
char key[ROW][COL] =
{
  {'1', '2', '3', 'A'},
  {'4', '5', '6', 'B'},
  {'7', '8', '9', 'C'},
  {'*', '0', '#', 'D'}
};
uint8_t row_line[ROW] = {7, 6, 5, 4};
uint8_t col_line[COL] = {3, 2, 1, 0};
Keypad keypad = Keypad( makeKeymap(key), row_line, col_line, ROW, COL );
const String password = "1234"; // change your password here
String input_password;
int char_cnt = 0;

void setup() {

  lcd.begin(16, 2); // initialized the LCD as 16x2
  lcd.setCursor(0,0);
  lcd.print("-Enter password-");
  lcd.setCursor(0,1);
  lcd.print("Password: ");
}

void loop() {

  char key = keypad.getKey();

  if (key){

    if(key == '*') {
      input_password = ""; // reset imput password
      char_cnt = 0;
      lcd.clear();
      lcd.print("Enter password");
      lcd.setCursor(0,1);
      lcd.print("Password: ");
    } else if(key == '#') {
      if(password == input_password) {
        lcd.clear();
        lcd.print("Granted, welcome");
        // DO YOUR WORK HERE

      } else {
        lcd.clear();
        lcd.print("Access denied");
      }

      input_password = ""; // reset imput password
    } else {
      input_password += key; // append new character to input password string
      char_cnt++;
      lcd.setCursor(10, 1);
      for (int i = 0; i < char_cnt; i++) {
        lcd.print("*");
      };
    }
  }
}
×
![]()