Interfacing Infrared to Arduino Uno
Table of Contents
I am thinking if it is possible to create a single remote controller for the appliances in our home. So I do some search in google on how to interface infrared to a microcontroller. To my surprised it was very easy. But for the meantime while I do not have the materials, here is the infrared decoder. This could decode infrared code sent by our remote controllers, and ofcourse every remote controller has a different set of code. With the power of microcontroller, it is possible to change the set of IR code by just pressing a single button switch. LEDs will be use as indicators.
Hello peeps. I am George, welcome to tech-to-tinker channel, where technology is explored and shared.
And today, I am going to show you my tinkering with the Infrared reciever to Arduino Uno
BILL OF MATERIALS
- Arduino Uno
- Keypad/LCD shield
- Infrared receiver
- Some jumper wires
INSTRUCTION
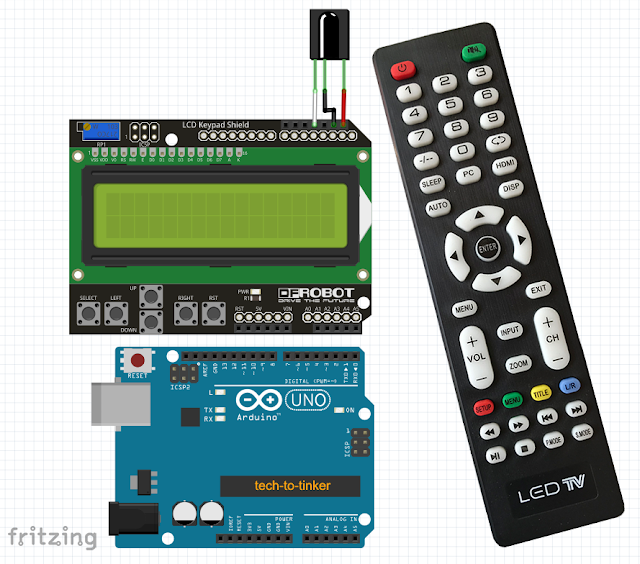
- Connect the Keypad/LCD shield at the top of Arduino Uno board. Only the LCD of the shield will be use for this tinkering.
- Connect the Infrared receiver as follows from Right-to-Left
- VCC connected to Arduino 5V (red wire)
- GND connected to Arduino GND (black wire)
- Output pin connected to digital pin 3 of Arduino (white wire)
- Upload the sketch provided.
- Enjoy.
VIDEO DEMONSTRATION
SOURCE CODE
#include "IRremote.h"
#include "LiquidCrystal.h"

LiquidCrystal lcd(8, 9, 4, 5, 6, 7);

const int RECV_PIN = 3;
IRrecv irrecv(RECV_PIN);
decode_results results;
unsigned long key_value = 0;

void setup(){
  Serial.begin(9600);
  irrecv.enableIRIn();
  irrecv.blink13(true);

  // LCD
  lcd.begin(16, 2);
  lcd.setCursor(0, 0);
  lcd.print(" tech-to-tinker ");
  lcd.setCursor(0, 1);
  lcd.print(" IR Code:");

}

void loop(){
  if (irrecv.decode(&results)){

        if (results.value == 0XFFFFFFFF)
          results.value = key_value;

        switch(results.value){
        /*
          case 0xFDD22D:
            Serial.println("CH-");
            lcd.setCursor(10, 1); // set the position
            lcd.print("      ");
            lcd.setCursor(10,1);
            lcd.print("CH-");
            break;
          case 0xFD52AD:
            Serial.println("CH+");
            lcd.setCursor(10, 1); // set the position
            lcd.print("      ");
            lcd.setCursor(10,1);
            lcd.print("CH+");
            break;
          case 0xFD6A95:
            Serial.println("<<");
            lcd.setCursor(10, 1); // set the position
            lcd.print("      ");
            lcd.setCursor(10,1);
            lcd.print("<<");
            break;
          case 0xFDEA15:
            Serial.println(">>");
            lcd.setCursor(10, 1); // set the position
            lcd.print("      ");
            lcd.setCursor(10,1);
            lcd.print(">>");
            break ;
          case 0xFD8A75:
            Serial.println(">||");
            lcd.setCursor(10, 1); // set the position
            lcd.print("      ");
            lcd.setCursor(10,1);
            lcd.print(">||");
            break ;
          case 0xFD926D:
            Serial.println("Vol-");
            lcd.setCursor(10, 1); // set the position
            lcd.print("      ");
            lcd.setCursor(10,1);
            lcd.print("Vol-");
            break ;
          case 0xFD12ED:
            Serial.println("Vol+");
            lcd.setCursor(10, 1); // set the position
            lcd.print("      ");
            lcd.setCursor(10,1);
            lcd.print("Vol+");
            break ;
          case 0XFDC837:
            Serial.println("UP");
            lcd.setCursor(10, 1); // set the position
            lcd.print("      ");
            lcd.setCursor(10,1);
            lcd.print("UP");
            break ;
          case 0xFD8877:
            Serial.println("LEFT");
            lcd.setCursor(10, 1); // set the position
            lcd.print("      ");
            lcd.setCursor(10,1);
            lcd.print("LEFT");
            break ;
          case 0xFD28D7:
            Serial.println("DOWN");
            lcd.setCursor(10, 1); // set the position
            lcd.print("      ");
            lcd.setCursor(10,1);
            lcd.print("DOWN");
            break ;
          case 0XFD48B7:
            Serial.println("RIGHT");
            lcd.setCursor(10, 1); // set the position
            lcd.print("      ");
            lcd.setCursor(10,1);
            lcd.print("RIGHT");
            break ;
          case 0xFD08F7:
            Serial.println("ENTER");
            lcd.setCursor(10, 1); // set the position
            lcd.print("      ");
            lcd.setCursor(10,1);
            lcd.print("ENTER");
            break ;
          case 0xFDAA55:
            Serial.println(">>|");
            lcd.setCursor(10, 1); // set the position
            lcd.print("      ");
            lcd.setCursor(10,1);
            lcd.print(">>|");
            break ;
          case 0xFD2AD5:
            Serial.println("|<<");
            lcd.setCursor(10, 1); // set the position
            lcd.print("      ");
            lcd.setCursor(10,1);
            lcd.print("|<<");
            break ;
          case 0xFD4AB5:
            Serial.println("STOP");
            lcd.setCursor(10, 1); // set the position
            lcd.print("      ");
            lcd.setCursor(10,1);
            lcd.print("STOP");
            break ;
          */
          default:
            Serial.println(results.value,HEX);
            lcd.setCursor(10, 1); // set the position
            lcd.print("      ");
            lcd.setCursor(10,1);
            lcd.print(results.value,HEX);
            break ;
        }
        key_value = results.value;
        irrecv.resume();
        //delay(2000);
  }
}