How to Interface SD card to Arduino (without SD card shield)?
Table of Contents
I wonder if I can interface SD card to a microcontroller without using any adapter or shield. After a quick search of SD card pinout in google, I found out that SPI is use in order to communicate with SD card. To minimize my effort, I then search for some reference and below are my tinkering with it.
So first, let me introduce myself. My name is George! Welcome to tech-to-tinker Youtube channel where technology is explored and shared.
CIRCUIT DIAGRAM

BILL OF MATERIALS
To get started, we need the following materials
- Arduino Uno.
- A spare SD card you are willing to kiss goodbye :). Because you might damage it.
- Soldering iron, some soldering leads, and your soldering skills.
- Some jumper wires.
HARDWARE INSTRUCTION
So let us begin
- First, make the necessary soldering of jumper wires to the SD card. Please refer to the schematic below. You may also break out the SD card cover to expose its internal parts. This is to make soldering easier. I suggest to make the connection from inside so that you may still connect the SD card to a computer for transferring of files (please refer to what I did).
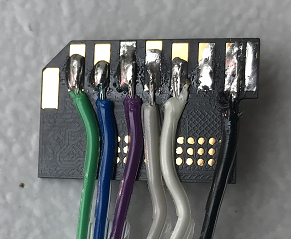
Please take note of the following
- SD card pin 1 (C/S pin) is connected with (green) wire to Arduino Uno pin 10.
- SD card pin 2 (MOSI pin) is connected with (blue) wire to Arduino Uno pin 11.
- SD card pin 3 and pin 6 (VSS pin) is connected with (violet) wire to Arduino Uno GND pin.
- SD card pin 4 (VDD pin) is connected with (dark gray) wire to Arduino Uno +3.3V pin (but I believe you can also use 5V, but Im not sure with regards to this).
- SD card pin 5 (SCK pin) is connected with (light gray) wire to Arduino Uno pin 13.
- SD card pin 7 (MISO pin) is connected with (black) wire to Arduino Uno pin 12.
- Connect the Arduino Uno to a computer.
- Run the Arduino IDE.
- Make sure "Arduino Uno" is selected under Tools > Board.
- Check that the correct serial port is selected under Tools > Port.
- The source code is available in the Arduino IDE under Files > Examples > SD, or you may copy the source code provided below.
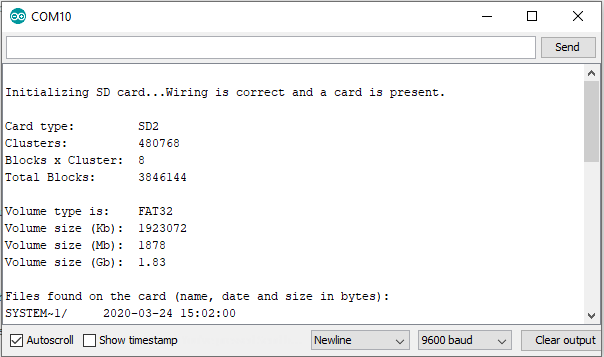
- If all goes well, you should be able to see something similar to above picture in your Serial Monitor.
- Enjoy.
VIDEO DEMONSTRATION
SOURCE CODE
/*
  SD card test

  This example shows how use the utility libraries on which the'
  SD library is based in order to get info about your SD card.
  Very useful for testing a card when you're not sure whether its working or not.

  The circuit:
    SD card attached to SPI bus as follows:
 ** MOSI - pin 11 on Arduino Uno/Duemilanove/Diecimila
 ** MISO - pin 12 on Arduino Uno/Duemilanove/Diecimila
 ** CLK - pin 13 on Arduino Uno/Duemilanove/Diecimila
 ** CS - depends on your SD card shield or module.
   Pin 4 used here for consistency with other Arduino examples


  created  28 Mar 2011
  by Limor Fried
  modified 9 Apr 2012
  by Tom Igoe
*/
// include the SD library:
#include
#include

// set up variables using the SD utility library functions:
Sd2Card card;
SdVolume volume;
SdFile root;

// change this to match your SD shield or module;
// Arduino Ethernet shield: pin 4
// Adafruit SD shields and modules: pin 10
// Sparkfun SD shield: pin 8
// MKRZero SD: SDCARD_SS_PIN
const int chipSelect = 10;

void setup() {
  // Open serial communications and wait for port to open:
  Serial.begin(9600);
  while (!Serial) {
    ; // wait for serial port to connect. Needed for native USB port only
  }


  Serial.print("nInitializing SD card...");

  // we'll use the initialization code from the utility libraries
  // since we're just testing if the card is working!
  if (!card.init(SPI_HALF_SPEED, chipSelect)) {
    Serial.println("initialization failed. Things to check:");
    Serial.println("* is a card inserted?");
    Serial.println("* is your wiring correct?");
    Serial.println("* did you change the chipSelect pin to match your shield or module?");
    while (1);
  } else {
    Serial.println("Wiring is correct and a card is present.");
  }

  // print the type of card
  Serial.println();
  Serial.print("Card type:         ");
  switch (card.type()) {
    case SD_CARD_TYPE_SD1:
      Serial.println("SD1");
      break;
    case SD_CARD_TYPE_SD2:
      Serial.println("SD2");
      break;
    case SD_CARD_TYPE_SDHC:
      Serial.println("SDHC");
      break;
    default:
      Serial.println("Unknown");
  }

  // Now we will try to open the 'volume'/'partition' - it should be FAT16 or FAT32
  if (!volume.init(card)) {
    Serial.println("Could not find FAT16/FAT32 partition.nMake sure you've formatted the card");
    while (1);
  }

  Serial.print("Clusters:          ");
  Serial.println(volume.clusterCount());
  Serial.print("Blocks x Cluster:  ");
  Serial.println(volume.blocksPerCluster());

  Serial.print("Total Blocks:      ");
  Serial.println(volume.blocksPerCluster() * volume.clusterCount());
  Serial.println();

  // print the type and size of the first FAT-type volume
  uint32_t volumesize;
  Serial.print("Volume type is:    FAT");
  Serial.println(volume.fatType(), DEC);

  volumesize = volume.blocksPerCluster();    // clusters are collections of blocks
  volumesize *= volume.clusterCount();       // we'll have a lot of clusters
  volumesize /= 2;                           // SD card blocks are always 512 bytes (2 blocks are 1KB)
  Serial.print("Volume size (Kb):  ");
  Serial.println(volumesize);
  Serial.print("Volume size (Mb):  ");
  volumesize /= 1024;
  Serial.println(volumesize);
  Serial.print("Volume size (Gb):  ");
  Serial.println((float)volumesize / 1024.0);

  Serial.println("nFiles found on the card (name, date and size in bytes): ");
  root.openRoot(volume);

  // list all files in the card with date and size
  root.ls(LS_R | LS_DATE | LS_SIZE);
}

void loop(void) {
}
CALL TO ACTION
If you find this lesson useful, please consider leaving your comments and suggestion below.
Thank you and have a good day. Happy tinkering!
×
![]()