How to Get Started with L293D Motor Driver Shield with Arduino
Table of Contents
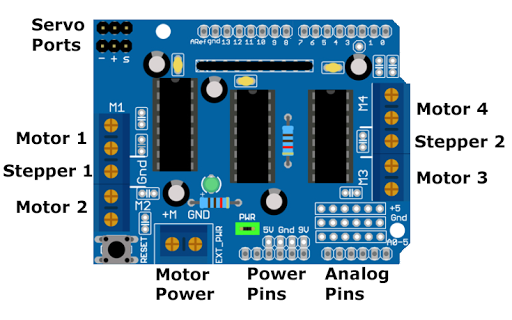
I have here an L293D Motor Driver Shield V1. It has 2 pieces L293D dual H-bridge motor driver IC to be able to provide control to a total of 4 DC motor. It also comes with 74HC595 shift registers to minimized the use of pins.
PINOUT
DC Motors
- Motor 1: digital pin 11
- Motor 2: digital pin 3
- Motor 3: digital pin 5
- Motor 4: digital pin 6
Servo Motors
- Servo 1: digital pin 9
- Servo 2: digital pin 10
Shift registers:
- Digital pins 4, 7, 8, and 12
Hardware Serial
- Digital pins 0 and 1
Not Connected
- Digital pins 2 and 13
- Analog A0 to A5
How to use L293D Motor Driver Shield
It can run up to 4 DC Motors in bidirectional turns
- Use terminal block M1 for motor 1
- Use terminal block M2 for motor 2
- Use terminal block M3 for motor 3
- Use terminal block M4 for motor 4
It can run 2 stepper motors (unipolar and bipolar)
- Use terminal block M1 and M2 for stepper 1
- Use terminal block M3 and M4 for stepper 2
It can run 2 servo motors using the 3-pin male headers.
How to supply power to the shield
- Single power supply for both Arduino and motors
- Coonect AC-to-DC power adapter to Arduino DC barrel jack
- Connect external DC power supply to the EXT_PWR terminal block
- This setup take advantage of the onboard voltage regulator found in the Arduino Uno board.
- Make sure that the PWR jumper pin is in place
- Separate power supply for Arduino and for motors
- Power the Arduino through the USB or through the DC barrel connector
- Power the motors through the EXT_PWR terminal block
- Make sure that the PWR jumper pins is removed. You might damaged your Arduino if you accidentally forget this step.
Others
- Onboard pull down resistor array to keep the motors switch OFF during power up
- Onboard power LED indicator.
- Onboard reset switch button
VIDEO DEMONSTRATION
SOURCE CODE
// Adafruit Motor shield library
// copyright Adafruit Industries LLC, 2009
// this code is public domain, enjoy!

#include "AFMotor.h"

AF_DCMotor motor(1);

void setup() {
  Serial.begin(9600);           // set up Serial library at 9600 bps
  Serial.println("Motor test!");

  // turn on motor
  motor.setSpeed(200);

  motor.run(RELEASE);
}

void loop() {
  uint8_t i;

  Serial.print("tick");

  motor.run(FORWARD);
  for (i = 0; i < 255; i++) {
    motor.setSpeed(i);
    delay(10);
 }

  for (i = 255; i != 0; i--) {
    motor.setSpeed(i);
    delay(10);
 }

  Serial.print("tock");

  motor.run(BACKWARD);
  for (i = 0; i < 255; i++) {
    motor.setSpeed(i);
    delay(10);
 }

  for (i = 255; i != 0; i--) {
    motor.setSpeed(i);
    delay(10);
 }

  Serial.print("tech");
  motor.run(RELEASE);
  delay(1000);
}
CALL TO ACTION
That's all for now. If you have any questions or clarifications, please write it in the comments section.
Thank you and have a good day.
×
![]()