RC Car using L298N, HC-06, and Arduino Uno
With this article, we will create a remote control (RC) car with the use of HC-06 bluetooth module to make it wireless and L298N motor driver to control speed and direction of rotations of the motors.
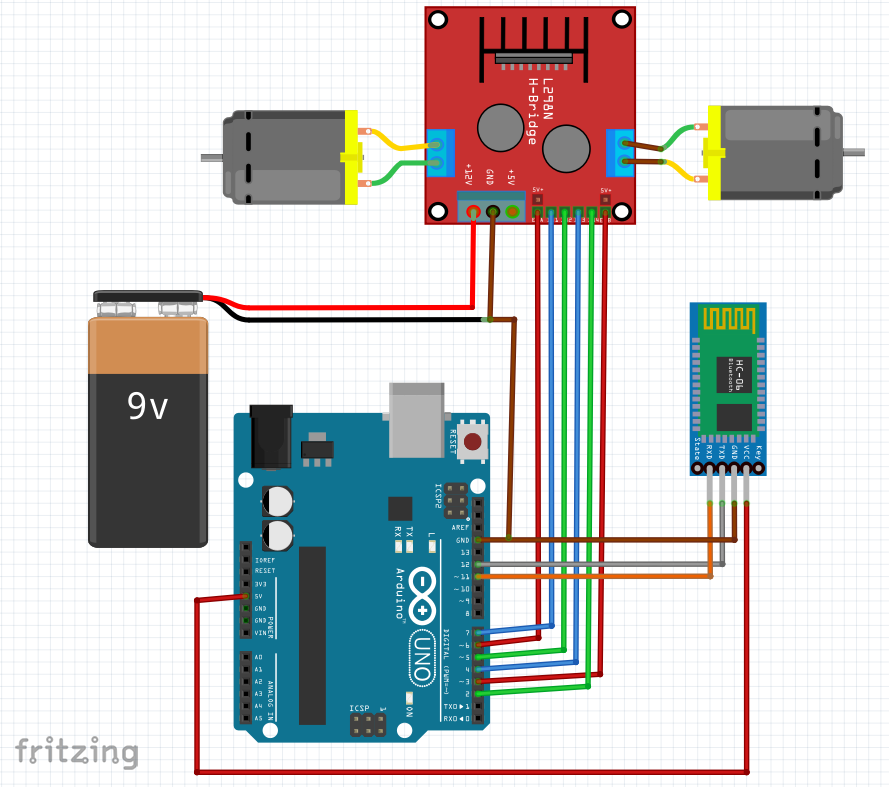
CIRCUIT DIAGRAM
BILL OF MATERIALS
- Arduino Uno as the main board
- HC-06 bluetooth module to receive commands via bluetooth communication protocol.
- L298N motor driver module
- DC motors to move the RC car.
VIDEO DEMONSTRATION
SOURCE CODE
#include "SoftwareSerial.h"

#define IN3Br 2
#define IN4Br 4
#define PWMBr 3

#define IN1Al 7
#define IN2Al 5
#define PWMAl 6

#define HC_06_Rx 12
#define HC_06_Tx 11

#define NORMAL_SPEED 60
#define TURNS_SPEED 10

SoftwareSerial swSerial(HC_06_Rx,HC_06_Tx);
String cmd="";
bool isAlEnabled = false;
bool isBrEnabled = false;
byte PWMAl_val = 100;
byte PWMBr_val = 100;

void setup() {
  // put your setup code here, to run once:
  Serial.begin(9600);

  swSerial.begin(9600);


  pinMode(IN3Br, OUTPUT);
  pinMode(IN4Br, OUTPUT);
  pinMode(PWMBr, OUTPUT);

  pinMode(IN1Al, OUTPUT);
  pinMode(IN2Al, OUTPUT);
  pinMode(PWMAl, OUTPUT);

  digitalWrite(IN3Br, LOW);
  digitalWrite(IN4Br, LOW);
  digitalWrite(PWMBr, LOW);

  digitalWrite(IN1Al, LOW);
  digitalWrite(IN2Al, LOW);
  digitalWrite(PWMAl, LOW);

  swSerial.println("Setup Complete");
}

void loop() {
  // put your main code here, to run repeatedly:
  checkSerial();
}


void checkSerial() {
 //Read data from Serial
 while(Serial.available()>0){
   cmd+=(char)Serial.read();
 }

 while(swSerial.available()>0){
   cmd+=(char)swSerial.read();
 }

 //Select function with cmd
 if(cmd!=""){
    cmd.trim();  // Remove added LF in transmit
    // We expect Command from bluetooth
    if (cmd.equals("S")) {
      swSerial.println("Braking");
      brakeVehicle();
    } else if(cmd.equals("R")) {
       swSerial.println("Right turn");
       turnVehicleRght();
    }else if (cmd.equals("L")){
       swSerial.println("Left turn");
       turnVehicleLeft();
    }else if(cmd.equals("F")){
       swSerial.println("Moving forward");
       moveVehicleForward();
    }else if(cmd.equals("B")){
       swSerial.println("Moving backward");
       moveVehicleBackward();
    }
    cmd=""; //reset cmd
 }


}

void brakeVehicle () {
  digitalWrite(PWMBr, LOW);
  digitalWrite(PWMAl, LOW);
}

void turnVehicleRght() {
  analogWrite(PWMBr, TURNS_SPEED);
  analogWrite(PWMAl, NORMAL_SPEED);
}

void turnVehicleLeft() {
  analogWrite(PWMAl, TURNS_SPEED);
  analogWrite(PWMBr, NORMAL_SPEED);
}

void moveVehicleForward() {
  digitalWrite(IN3Br, HIGH);
  digitalWrite(IN4Br, LOW);
  analogWrite(PWMBr, NORMAL_SPEED);

  digitalWrite(IN1Al, HIGH);
  digitalWrite(IN2Al, LOW);
  analogWrite(PWMAl, NORMAL_SPEED);
}

void moveVehicleBackward() {
  digitalWrite(IN3Br, LOW);
  digitalWrite(IN4Br, HIGH);
  analogWrite(PWMBr, NORMAL_SPEED);

  digitalWrite(IN1Al, LOW);
  digitalWrite(IN2Al, HIGH);
  analogWrite(PWMAl, NORMAL_SPEED);
}
CALL TO ACTION
If you found this tutorial helpful, please consider supporting me by sharing this to your friends. You may leave your comments and suggestions in the comment box.
Thank you and have a good day.
×
![]()