001 - Raspberry Pi Pico: GPIO | MicroPython
Table of Contents
In this article, I would like to share to you the results of my exploration with the basic GPIO of the Raspberry Pi Pico using the MicroPython language.
BILL OF MATERIALS
- Raspberry Pi Pico dev board.
- Breadboard.
- 5 pieces of LEDs with its appropriate limiting resistor.
- 3 pieces of tactile switch.
- and some jumper wires.
HARDWARE INSTRUCTION
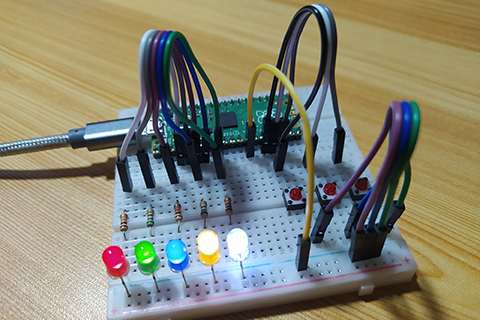
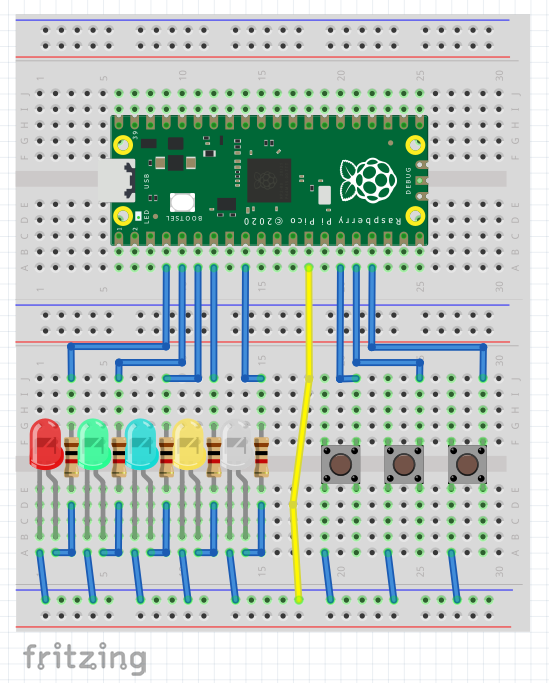
- First, attach the Raspberry Pi Pico development board to the breadboard and make sure to refer to the circuit diagram below.
- Next, setup all the LEDs so that its anode pin(long leg) is connected to the limiting resistor in order to prevent damaging the LEDs from over current while its cathode pin to the ground.
- Next, connect the first LED (red LED in my case) to GPIO 2 (pin 4) of the RPi Pico.
- Next, connect the second LED (green LED in my case) to GPIO 3 (pin 5) of the RPi Pico.
- Next, connect the third LED (blue LED in my case) to GPIO 4 (pin 6) of the RPi Pico.
- Next, connect the fourth LED (yellow LED in my case) to GPIO 5 (pin 7) of the RPi Pico.
- Next, connect the fifth LED (white LED in my case) to GPIO 6 (pin 9) of the RPi Pico.
- Next, setup all the tactile switch so that one side of the switch is connected to the ground.
- Next, connect the first button to GPIO 11 (pin15) of the RPi Pico.
- Next, connect the second button to GPIO 12 (pin 16) of the RPi Pico.
- Next, connect the third button to GPIO 13 (pin 17) of the RPi Pico.
- Lastly, make sure to connect the ground pin of RPi Pico to the ground rail. Our demo circuit should now be ready.
VIDEO DEMONSTRATION:
CALL TO ACTION
For any concern, write your message in the comment section.
You might also like to support my journey on Youtube by Subscribing. Click this to Subscribe to TechToTinker.
Thank you and have a good days ahead.
See you,
– George Bantique | tech.to.tinker@gmail.com
SOURCE CODE
1. Binary Coded Decimal (BCD) using LEDs
This code aims to display a Binary Coded Decimal (BCD) using LEDs. BCD value can be decremented using the first button (swA) or incremented using the third button (swC). The BCD value can be reset using the middle button (swB).
# More details can be found in TechToTinker.blogspot.com
 # George Bantique | tech.to.tinker@gmail.com
 from machine import Pin
 from time import sleep_ms

 # LEDs:
 r = Pin(2, Pin.OUT)
 g = Pin(3, Pin.OUT)
 b = Pin(4, Pin.OUT)
 y = Pin(5, Pin.OUT)
 w = Pin(6, Pin.OUT)

 # Buttons:
 swA = Pin(11, Pin.IN, Pin.PULL_UP)
 swB = Pin(12, Pin.IN, Pin.PULL_UP)
 swC = Pin(13, Pin.IN, Pin.PULL_UP)

 # Converts an integer value to equivalent BCD
 # For more details, visit TechToTinker.blogspot.com
 def convert_to_bcd(bits, integer):
   global bcd
   for i in range(bits-1, -1, -1):
     # check if the specific bit should be set or clear
     div = integer//2**i
     # save the binary value to specific bit in the BCD
     bcd[i] = div
     # get the remainder of the integer value
     # which will be use for the next loop iteration
     integer = integer%2**i
     # DEBUG: print the current bit of BCD
     #    and the current remainder.
     print(div, integer)

 # constants and global variables
 NUM_OF_LED = 5
 led = [w, y, b, g, r]
 bcd = [0, 0, 0, 0, 0]
 counter = 0
 prev_cnt = 0

 while True:
   if swA.value()==0:
     # Subtract 1 from counter
     if counter>0:
       counter -= 1
   if swB.value()==0:
     # Reset counter to 0
     counter = 0
   if swC.value()==0:
     # Add 1 to counter
     if counter < 31:
       counter += 1

   # Check if the counter is change
   if prev_cnt != counter:
     # convert the counter into BCD
     convert_to_bcd(NUM_OF_LED, counter)
     # display the current bcd value
     for i in range(NUM_OF_LED):
       led[i].value(bcd[i])
     # DEBUG: print the current counter
     print(counter)
     # store the current counter value
     prev_cnt = counter

   # soft debounce
   sleep_ms(250)
2. Knight Rider v1
from machine import Pin
from time import sleep_ms

r = Pin(2, Pin.OUT)
g = Pin(3, Pin.OUT)
b = Pin(4, Pin.OUT)
y = Pin(5, Pin.OUT)
w = Pin(6, Pin.OUT)
led = [r, g, b, y, w]

swA = Pin(11, Pin.IN, Pin.PULL_UP)
swB = Pin(12, Pin.IN, Pin.PULL_UP)
swC = Pin(13, Pin.IN, Pin.PULL_UP)

delay = 50

while True:
    for i in range(0, 4, 1):
        led[i].value(1)
        sleep_ms(delay)
        led[i].value(0)
        sleep_ms(delay)
    for i in range(4, 0, -1):
        led[i].value(1)
        sleep_ms(delay)
        led[i].value(0)
        sleep_ms(delay)
3. Knight Rider v2
This code creates smoother transition.
from machine import Pin
from time import sleep_ms

r = Pin(2, Pin.OUT)
g = Pin(3, Pin.OUT)
b = Pin(4, Pin.OUT)
y = Pin(5, Pin.OUT)
w = Pin(6, Pin.OUT)
led = [r, g, b, y, w]

swA = Pin(11, Pin.IN, Pin.PULL_UP)
swB = Pin(12, Pin.IN, Pin.PULL_UP)
swC = Pin(13, Pin.IN, Pin.PULL_UP)

delay = 50

while True:
    for i in range(0, 4, 1):
        led[i].value(1)
        sleep_ms(delay)
        led[i+1].value(1)
        sleep_ms(delay)
        led[i].value(0)
        sleep_ms(delay*2)
    for i in range(4, 0, -1):
        led[i].value(1)
        sleep_ms(delay)
        led[i-1].value(1)
        sleep_ms(delay)
        led[i].value(0)
        sleep_ms(delay*2)
REFERENCES AND CREDITS
None so far.
×
![]()

