Project Idea: Arduino Voltmeter
Table of Contents
In this project idea, we will create a simple voltmeter by taking advantage of the Arduino's analog to digital converter. The problem is it can only measure up to 5V, if you exceeded this limit the Arduino could be damage. The workaround is to use a voltage divider circuit.
In light of that, let us review some basic theory behind it.
So what is voltmeter? Voltmeter is a device use for measuring the voltage across a specific component or electronics circuit.
BILL OF MATERIALS
- Arduino Uno board or any compatible board
- 16x2 LCD for the display
- A breadboard
- A potentiometer for the LCD contrast control
- Some resistor values in R1 = 10 x R2 such as
- R1 = 100K and R2 = 10K
- R1 = 10K and R2 = 1K
- R1 = 560 and R2 = 56, since this are the resistor values we use, please modify the sketch source code according to your R1 and R2 resistor values.
- Some jumper wires.
CIRCUIT DIAGRAM
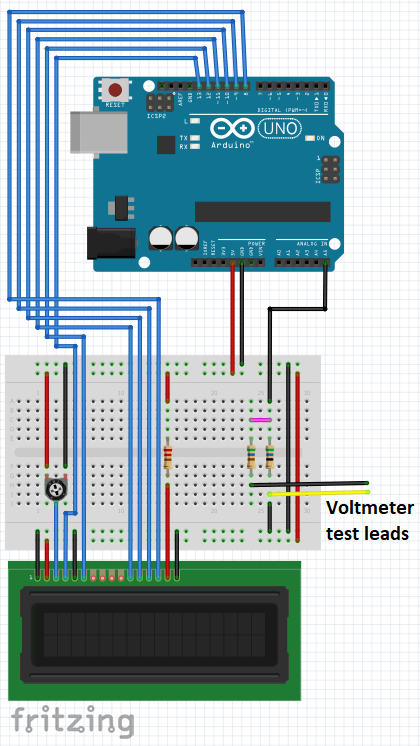
HARDWARE INSTRUCTION
- Connect the LCD pin 1 VSS to the Arduino GND
- Connect the LCD pin 2 VDD to the Arduino 5V
- Connect the potentiometer pin 1 and pin 3 to Arduino 5V and GND respectively, and the potentiometer center pin 2 to LCD pin 3 VEE/Vo
- Connect the LCD pin 4 RS to the Arduino digital pin 13
- Connect the LCD pin 5 RW to the Arduino GND because we only need to write to the LCD (no reading required)
- Connect the LCD pin 6 En to the Arduino digital pin 12
- Leave the LCD pin 7 D0 to pin 10 D3 not connected because we will use 4-bit mode of the LCD.
- Connect the LCD pin 11 D4 to the Arduino digital pin 11
- Connect the LCD pin 12 D5 to the Arduino digital pin 10
- Connect the LCD pin 13 D6 to the Arduino digital pin 9
- Connect the LCD pin 14 D7 to the Arduino digital pin 8
- Connect the LCD pin 15 Anode to the Arduino 5V via current limiting resistor (220 ohms).
- Connect the LCD pin 16 Cathode to the Arduino GND
- Attach the voltage divider circuit accordingly (verify it according to the circuit diagram) or if in doubt ask for some help.
- Upload the provided sketch.
VIDEO DEMONSTRATION
CALL TO ACTION
If you find this tutorial as helpful, please give me THUMBS UP and SHARE this to your friends.
Comment your question and suggestion in the comment box. And please SUBSCRIBE.
Thank you and have a good day.
Happy tinkering.
SOURCE CODE
#include "LiquidCrystal.h"

// Pin definitions here:
#define VMETER  A5

LiquidCrystal lcd (13, 12, 11, 10, 9, 8);

int raw_voltage = 0;
float vout = 0.0;
float vin = 0.0;
float R1 = 560.0;
float R2 = 56.0;

void setup() {

  lcd.begin(16,2);
  lcd.print("Raw data : ");
  lcd.setCursor(0,1);
  lcd.print("Voltmeter: ");

  pinMode(VMETER, INPUT);

}

void loop() {

  raw_voltage = analogRead(VMETER);
  vout = ((float)(raw_voltage+1) * 5.0) / 1024.0;
  vin = vout / (R2/(R1+R2));

  lcd.setCursor(11,0);
  if        (raw_voltage < 10) {
    lcd.print("   ");
  } else if (raw_voltage < 100) {
    lcd.print("  ");
  } else if (raw_voltage < 1000) {
    lcd.print(" ");
  }
  lcd.print(raw_voltage);

  lcd.setCursor(11,1);
  if (vin < 10.0) {
    lcd.print(" ");
  }
  lcd.print(vin);

  delay(500);
}
×
![]()